Consulting, Dynamics Operations Architecture, Featured
Dynamics Operations On Premise Tutorial Part 6A: Walking through an install
 10640
10640 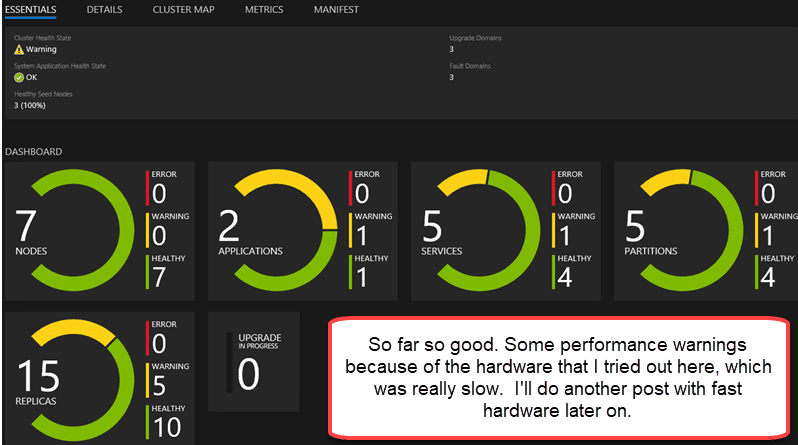
Oct
I’ve been finishing up on a huge Enterprise D365 on premise install and upgrade this month for an organization, and thought I would write a special post with a configuration that I tested out for them. Predictably, a lot has changed since my day 1 install. For one, the install is a lot more stable, and the instructions have really improved. I’ve tested out 5 different configurations with the install and I’ve gotten 4 of them to work. This is the only one that failed even though the steps were the exact same as the other configurations (except for my 3 machine install hack which I didn’t use for an Enterprise install). What I like about this post is that I will show you how to troubleshoot an install gone wrong when all the steps are there, but it just didn’t work initially.
This client wanted to test their installation with the good hardware, but they also wanted to know what was the minimum hardware they could use for non-prod environments. At their size, they might have 20 or 30 non-prod environments and it was important to figure out a few things. So, I built a configuration and put it to the test just to see how AX would perform if I went minimal.
Part A: here I show exactly what I needed for this setup:
| Server | Specs | Anything else I did |
| SQL Primary, SSRS Node |
4 processors, 16GB ram, sharing 7000 RPM with secondary, virtualized with slow type 2 hypervisor | I put a cap on the sql ram at 12 GB’s |
| SQL Secondary, Management Reporter |
2 processors, 8 GB ram, sharing 7000, RPM with primary, virtualized with slow type 2 hypervisor | I capped the sql ram at 4 gb’s for the secondary. Note had to eventually remove this because a previous install was interfering with it so I just left the node alone. |
| AOS1 | 2 processors, 8 GB ram, sharing 7000 RPM with another AOS2, virtualized with slow type 2 hypervisor | |
| AOS 2 File Server |
2 processors, 8 GB ram, sharing 7000 RPM with another AOS1 and has a file server, virtualized with slow type 2 hypervisor | |
| Orchestrator1 | 2 processors, 8 GB ram, sharing 7000 RPM with Orchestrator 2 and 3, virtualized with slow type 2 hypervisor | |
| Orchestrator2 | 2 processors, 8 GB ram, sharing 7000 RPM with Orchestrator 1 and 3, virtualized with slow type 2 hypervisor | |
| Orchestrator3 | 2 processors, 8 GB ram, sharing 7000 RPM with Orchestrator 1 and 2, virtualized with slow type 2 hypervisor |
Predictably, the settings ran into some extreme latency but what’s so interesting is that the performance bottleneck didn’t happen with the RAM or processors. It happened with the disk, which wouldn’t be suitable even for a testing environment. I had to use my slow configuration because I have another configuration setup for load testing right now that has solid state drives and bunches of ram and processors. So, this gave me an interesting experiment plus an answer to my client’s question.
First, let’s change the configuration file and minimize it for a sandbox install
You need to open up the configtemplate.xml file which should be extracted after you downloaded it from Lifecycle services in some folder called “Infrastructure”. Watch out for the DNS names here as it will become big. Notice how I didn’t change the name of the VM. Notice how I did reduce the management reporter machines and the AOSNodeType. Ordinarily, you would have the names match the vm names for the self-signed certificates. We are going to change it up a little here for our certificates. What you should see here is that the install is pretty easy if you match your vm name up with the name over here.

Second, let’s change the NodeTopologyDefinition.xml file
What I did here was replace the Network Service with my own domain user who has permissions to do the querying. This may not be necessary but for logging purposes, I love to see a dedicated domain user for some of these processes.

Third, leave DatabaseTopologyDefinition.xml alone
You don’t need to touch this unless you are changing or adding database account permissions/roles during the install.
Fourth, Generate the Scripts and copy them on each VM in a folder
Generate your scripts first with this powershell:

Afterwards, copy each of the relevant ones to the respective machines. For example, reviewing my AOS1 is at 192.168.200.138.
Important: in my testing, I’ve found that no two Orchestrator nodes can be on the same machine. No two non-Orchestrator nodes can be on the same machine. But an Orchestrator node and a non-Orchestrator node can be on the same machine. This is due to the way that lifecycle services installs a program which generates a unique guid for each of these types. Yes, there is a way to fake the guids but I haven’t had enough time to test it out and see if it is completely viable.
Fifth, change the location of the prereqs install path to match wherever you put the generated VM’s
I made a copy of Configure-Prereqs.ps1 and called it servicefabricalteprereqscript.ps1 and placed it in the infrastructure fold. I then copied the entire infrastructure folder which included the vm’s to each node to save time. Afterwards, I went into the file and manually edited two lines. For each VM, I had to set the path for the NodePurposes.txt. I then called that file in my powershell on each machine instead of the Config-Prereqs.ps1.

Sixth, On each VM, with the configured prereqs run the following scripts being sure to change your servicefabricalternateprereqinstall script as mentioned above for each VM
Because I used an alternate prereq process, I only needed to run one script. I had already imported the certificates and assigned the proper permissions plus created the GMSA accounts.

Seventh, some time saving with certificates
I made a total of two certificates. I would have been able to use just one if wildcards were completely supported in service fabric.

Eight, now get the ClusterConfig.Json ready
This part will seem a little strange. You have to install a clusterconfig.json in order to do the deployment. It’s actually pretty simple. The clusterconfig is just like the multiclusterconfig except that it names each node with the ip address as a suffix. So, AOS_138 for ip address 192.168.200.138. Pretty simple actually. But the official strategy is to first generate a multiclusterconfig that you have validated as working. Then, generate your cluster config from that. And then, install the cluster.
Ninth, browse back to wherever you saved your cluster and validate the definition
I’ve tested out multiple cluster configurations so I have them handy in a little powershell template script. Here I tested the clusterconfig.json.

And here are the results.

Tenth, now install the cluster
I just called the same powershell above but at

Eleventh, if you mess up…
If you mess up, copy your install directory for service fabric on each machine that has a node on it. Then, set the location to it in powershell and run the:
.\CleanFabric.ps1
That will get you all fixed up. Yes, log on to each and every machine and do it or you risk having artifacts that interfere with your install.
Twelfth , Get your permissions added to Azure
In your ConfigTemplate.xml file, there will be an entry with the thumbprint for the OnPremlocalAgent. You need to login to Azure Portal with Super Duper Rights and run the script below. Note, unless you are the global administrator of Lifecycle Services and have super duper active directory permissions, you can’t do this.

So, when you look at this script, remember that I had to do it from a machine with Azure Powershell installed. I also had all the scripts copied over to my directory on that machine to make things easier.

There we go. I used the Connect-MsolService commandlet to make a connection. And then, I ran the scripts. I got a confirmation screen with some sensitive information here:

Thirteenth, now you need to add the sql account to the agent and encrypt it
Big time Gotcha. Be sure that sql server is in mixed mode authentication. Early on, I forgot to do that and it caused some strange issues.

First, type the password of your axservice user along with the sql account that you created. Store them in the agent file share that you setup in a folder called credentials. The file should be named Credentials.json.

Second, you need to run this powershell to encrypt them:
Note: the dll’s have problems if you haven’t installed the Service Fabric SDK before running the powershell scripts or if you have left over artifacts. And sometimes if you have a previous install of the sdk. This is because the service fabric folder has old dlls mixed with new ones. To get around this, you have to completely delete the service fabric sdk folder, restart the machine, reinstall the sdk folder, and restart the machine. That fixed it for me. You will know if you get an error with fabriccommon.dll and something about expecting to contain an assembly manifest. Remember, it just means that the delete didn’t really delete everything that it should have from a previous installation. I reinstalled Azure Powershell also. Fiy.. Also note, you shouldn’t need the service fabric sdk to do an install. That is for local development mode.
However, as of now, you need the sdk for the powershell which means you have to install it somewhere.
You can see the full command from the Microsoft website so I won’t spend too long on this.

Now, immediately after running this command you need to paste the full output as the powershell.
Fourteenth, just follow the instructions on the guide for configuring SSRS and the databases. They actually work.
Fifteenth, setup ADFS for Dynamics Operations:
Once again, you can follow the instructions. However, I want to make one special note. You need to use your active directory federation url to make this work. For example, mine was http://sts1.brandonahmadlabs.com.

Sixteenth, in one of the fileshares setup a folder and encrypt it
For some reason, I received inconsistent behavior when I only a file share with the agent folder. I had to add another folder underneath it for the download to agent to work. But here is where it gets tricky. Some of you with experience installing previous versions of AX may remember one common gotcha that would occur if you chose to install

You’ll need to create a credentials.json like the instructions ask for. You then have to copy and paste the password and username from the powershell.

Notice here how I imported the powershell Service Fabric Modules and then see the commented out code in green where I ran a test to make sure that my values encrypted right before pasting them in the file and saving it.
Here is an example of what your credentials.json will look like after you run the powershell 3 times and copy and paste it in the file.

Eighteenth, properly configure the Local-Agent.json in lifecycle services with the right values
Now, go to lifecycle services because you need to generate a working localagent-config.json file that you will copy into your localagent folder.
These values will align closely with your configtemplate.xml and your Azure active directory settings. Let’s go through them:
You’re hero here will be the ConfigTemplate.xml. For the service fabric section, you need the ip address of one of your orchestrator nodes plus the 19000 which is the default endpoint if you didn’t change it. You then need the name of the cluster which will have the default name of “Dynamics365Operations”. And you need the thumbprints for your certificates that you entered in the sections ServiceFabric and ServiceFabric client in your configtemplate.xml file.

You will need your tenant id. In case you forgot your account id, check out my two commands over here:
Get-MSOLCompanyInformation and GetMSOLAccountSKU. You can have the person who has permissions on the Azure Active Directory retrieve that information for you this way by running these powershell commands provided that they’ve downloaded the powershell for Azure Active Directory.

Finally, you will need the name of your file share where install will download the agent files and do a global install. You will also need the GMSA account name that you setup. Be careful to type this stuff in correctly. Otherwise, you have to log on to each and every machine and go to C:\ProgramData\SF\(name of your node)\Applications\work and manually edit each and every one of the appsettings files after a failed install. Urghhhh.. I know. I had to do it and it sucked.

Once, you are all done with that, download the config.json to your file and put it in a folder.
Nineteenth, run the install and verify that it worked
If all went well, the command prompt with that you ran will show you a confirmation of some sort. I had a typo in my localagent-config.json file and had to redo mine.

So, just as the instructions show in the guide with the screenshot, you need to get to the part where the messaging agent validates the install.

Twenty, download the latest topology that you want to use. I used the Sandbox topology
So, I went into lifecycle services and downloaded platform 8. There is only one platform to choose from at this time.

Give it whatever Environment name that you like and then choose advanced settings:

For some reason, this never worked for me without filling out all those tons of advanced settings. So, here we go again.

So I double clicked and copied and pasted those and that gave me the first section of values for Active Directory.

Next up. The sql section. This wasn’t so bad. It’s just the two databases that were included in the guide plus the fqdn of your sql server or the listener.

Third, is the file share settings. Again, this isn’t so bad. Just be careful about too big of a name. What happens is that when the install files extract, they go into multiple different levels. Those levels that are too long simply don’t get installed with or without warning. So, if you’ve been reading comment boards, several people are going through funny issues that look highly like missing dll’s or application functionality. It sucks and is probably the weakest part of the installation so far. So check.. keep the share names down to minimum to allow for space.
Though undocumented, I believe the certificate thumbprint for this to be the Data encipherment section of ConfigTemplate.xml. I created a new folder for the file share under the aos-storage folder called userdocs.

The next section is pretty straight forward also. It’s just the ip address of where your SSRS node is installed (on a machine with SSRS hopefully) and the thumbprint you setup in configtemplate.xml.

The only tricky part about the next one is the confusing wording on the dns server for AX. It’s asking for the actual internal DNS server that AX needs to look to when installing AX. If not set correctly, the install will fail. I also used the regular accounts from ConfigTemplate.xml which were setup.

The last part for the Application Certificate Settings was straight off the Configtemplate.xml. Thankfully, I was just able to just copy and paste this section.

Some implementations already have solutions either from the cloud or ongoing development or that they purchased. The last section with Customize solution assets is for you but I don’t need that here. Not, in this case. I’ll move over code later which make for another good series one day when we talk about migrating code in D365.
So, finally, we are all done. I copied and pasted all the values to a file because if it messes up, you have to redo them and that’s a lot of typing. In case, you want to save your lcs settings, there is a special file called topology.xml that you can use until your heart is content for looking at the lcs settings. It will be in your share that you setup for the agent.
Twentyone, Agree to deploy and watch:
Now, just agree to deploy:

And you will get this little confirmation message that it is deploying.

You will get a message saying you can refresh your state, but you usually won’t know how things went for 45 minutes unless it is an instant error. A better place to look is in the Application and Service fabric event logs or by checking the service fabric dashboard.
For example, here you see lots of file activity with all that copying across machines.


Now, this is where you can get completely different results on multiple installs. The product downloads and extracts the results from the share that you setup. If you start to get errors about missing stuff than the extraction didn’t go right. To make things even more headache like, there are numerous timeouts on the install and there is no published way to restart the install if one of the components fails. You have to delete everything from lifecycle services and start all over.
So, that is why it is possible for two installs with the exact same hardware and software and processes to fail. The performance of your server at the time of install is very much an issue. If you get something really strange, I can post on how to troubleshoot that later.
On this install, I had a failure where the MonitoringAgentType for the functionalTestServicePackage failed to install. I actually saw it hit a performance bottleneck and start failing on the extractions. So, maybe my testing took it a little too low this time. While I got zero errors in everything, the service fabric event log did show a culprit. Furthermore, I compared the zip file with all the install data to the programdata folder for the node where all your dlls are supposed to be located and saw dlls missing on two of my machines.

If you go to your share for the agent, and extract the zip file called standalonesetup-76308 as of now (Microsoft keeps incrementing it causing other potential for breakings when the dll’s don’t match your version of service fabric), you can see which dll’s are supposed to be where. If you have missing dlls, it is very likely that your onpremise install will have problems. Here I checked mine out and sure enough found that the functionaltestservice package had not extracted into the programdata nodes folder that it was supposed to be in.

Urgghhh.. That’s the problem with on premise installs that depend on multiple network calls to third party networks. Ironically, the life cycle services dependency makes it unstable in environments with compromised performance or networking. The install is so sensitive, especially when you have hundreds of steps like here through the calls. Even one step or network call gone wrong can break your install, and as of now, you have to start all over when that occurs. So, what I did was clean the install and add a little more disk speed to it. Disk speed hit a latency of 600 ms on my disk and the extract operation timed out, so this was pretty easy to correct. That worked and it ran fine, but I will do one more post detailing the correction stuff and with more on troubleshooting D365 for operations.
See everyone at the AXUG conference.. Part 6B will finish this series out. Till the next time.

