Consulting, Development
Dynamics AX AIF Tutorial Series Part 3: AIF, Document Services, and a SharePoint InfoPath Forms step by step for Power Users Part A
 15945
15945 
Jun
Wouldn’t it be nice if you could consume and edit your Dynamics AX data with SharePoint? While Dynamics AX has a very intuitive user interface for forms, sometimes we need to be able to work with data within other applications. There are two particular aims of this tutorial. First, I want to show you how easy it is to build a service Dynamics AX and use that information in SharePoint (in a non-proprietary way that will work with everything, yet maintain the best practice security and validation within Dynamics AX) . Second, this should give you a good understanding of the power user fundamentals within Document Services, and why it is so wonderful. There are many cases where a power user will be just fine with AIF. There are other cases where a developer will be required.
WARNING: ONCE AGAIN, I’M WORKING ON THIS WHILE TAKING BREAKS FROM WORK. PLEASE EXCUSE THE TYPOS.
- Brandon, what is a document in ERP Lingo?
In order to really understand AIF, you have to have this down. Back in the days of printed press, every single major business transaction correlated with some printed document as a record of it occurring. If someone purchased something as a transaction, there was a receipt generated. If someone was billed for materials, an invoice was submitted. If a company needed to review multiple different proposals for carrying out some sort of function, a request for a proposal was generated. These printed sheets of paper all symbolized a record of some transaction that meant something to the company. The sheets of paper that were records of various business activities came to be known as documents. The way that the documents looked and the information within the document varied by the type of transaction that it was recording. For example, an invoice document looked a lot different than a receipt document. Also, different types of documents recorded different transactions. So, the information in one document could vary greatly from the information in another document. But the one thing that has never changed is that a document will always be our way of recording the outcome of some meaningful business process transaction.
Today, our business outcomes are still represented by documents, though they often tend to be electronic now days as opposed to sheets of paper. Also, realize that we usually use forms to produce a document. Forms are really just ways that we ensure that guidelines are met before generating a document, such as a person must fill out their firstname, lastname, and address before ordering new equipment for a company (purchase order being the document generated because a company purchases something here).
- Brandon, what is document services?
Remember in Part 1 of this series where I said that services are important because they give us the ability to share information between multiple different software systems. There is a cost to this. The simplicity of getting a service up and running is often done at the expense of the graphical user interface. Forms, by their nature are graphical. We see them, and a good form guides us on how to fill it out. For example, if we forget to fill out our first name, than we want the form to give us some sort of error message, rather than letting us generate a document with missing information. Unfortunately, services are automated code that runs on a backend & don’t directly have a front-end form user interface attached to them by default.
So, here is what the folks at Microsoft came up with… What if they could find the best of both worlds? What if they could provide for all of the logic that a form does in order to generate documents (such as validating that the right entries are in the form and a host of other stuff), but still give us the flexibility and the sharing power of a service. This is exactly what they did with document services. They created a programming framework that it made it easy to do the common things that forms do behind the scenes, but still give us a way to share information. They created wizards and a friendly sequence of methods to guide a developer along the path of creating a document service.
Document Services is Microsoft’s attempt to share and generate documents over services which are directly tied in to the Dynamics AX API by combining the validating & backend logic of a form with the open sharing of a service.
And what you got from this? You got an extremely powerful API service based programming interface that really excels when it comes to generating documents with information from many different applications. If one just understands that document services is trying to mimic a form without a graphical front-end, it will become very intuitive.
Part 1: Create a Query object that we can use for generating our data
The most important part of generating a document service is choosing the set of data that you will be interacting with. When this is done with care, it can really save you a lot of work later and simplify the process. And when it is done in a sloppy manner, you’ll need to do a lot of coding to make up for it. See, Dynamics AX has a wizard that will attempt to generate all of the code for the service from the query. Therefore, you want to put as much effort as possible into the query, choosing relationships, labels, ect.. You can find several good query tutorials on the web with a google search. It is definitely worth it to read them.
To avoid customizing a long query here, which would take up a lot of blogging space, we will build a simplified query on one object.
-
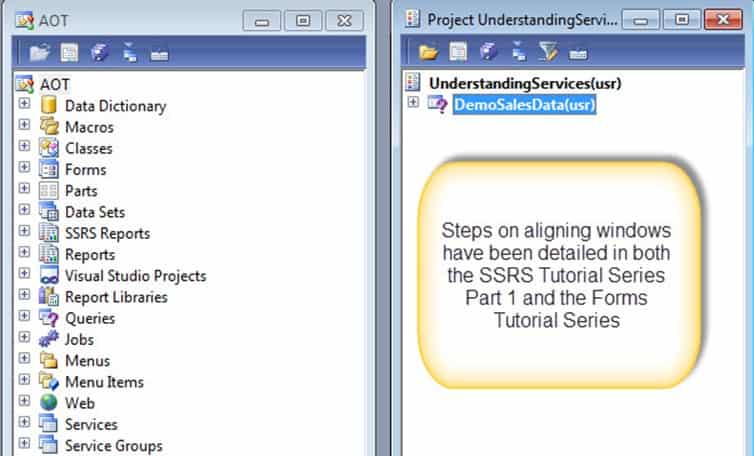
Open up your Development Window and align the UnderstandingServices project right next to the AOT window. For instructions on how to do this, look at the opening instructions within Part 2 of this tutorial series. At any rate, within your development window, the windows should look similar to this:
-
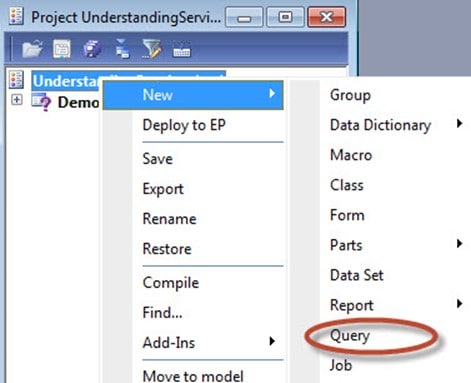
Right-Click on the UnderstandingServices project and click on New
à
Query.
-
Right-click on the Query and choose Properties (learned how to do this in part 1 of the series or any of the other series). Change the name to DemoCustQuery.

-
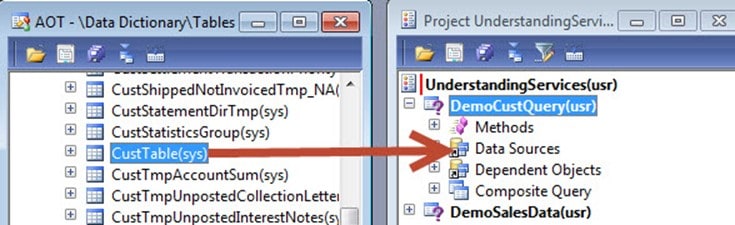
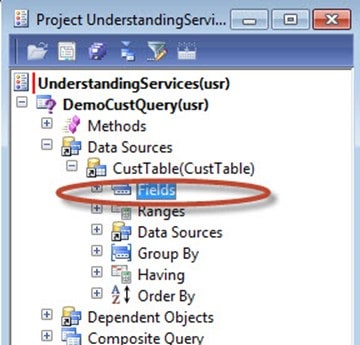
With the window on the left, locate the CustTable by expanding the AOT à Data Dictionary à Tables. Drag that to the Data Sources node on the right for the DemoCustQuery. We do this so that we can drag
and drop information over easily.
-
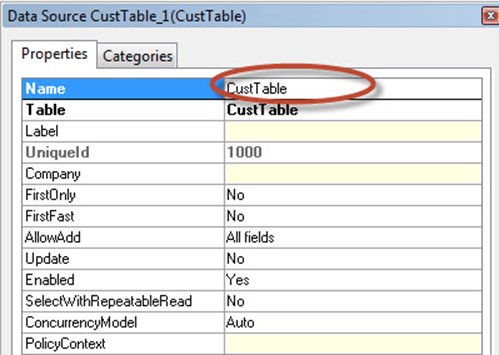
Right-Click on CustTable_1(CustTable) and left-click on Properties. Just as you’ve done several times by renaming objects, do that here. Change the name of CustTable_1(CustTable) to CustTable.
-
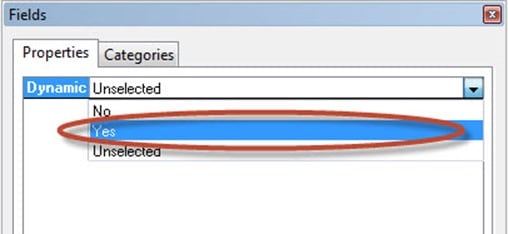
Expand the DemoCustQuery(usr). Then, expand the Data Sources node. Right-Click on the Fields Node. Change the Dynamic property to Yes. This tells the query to include all columns. See the two screenshots below for how to do this.
Note: setting the Dynamic property to “yes” is the equivalent of selecting all columns from a table. It is a poor practice with services. With services, you will usually drag and drop your fields as you did in Part 2 of this series.
-
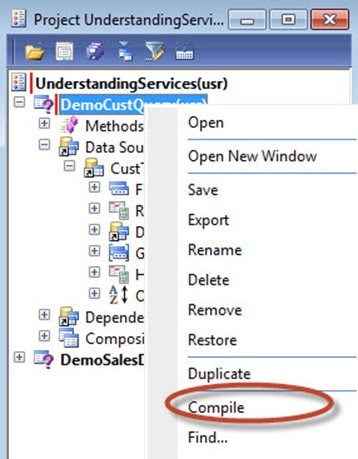
Right-Click on DemoCustQuery and click Compile to save all your changes.
Make sure that you frequently compile your project so that your changes are committed and checked for errors. This doesn’t mean
that all of the errors will be checked, but it is better than nothing.
——-This was a very simplified query meant to save time. I could have spent a full day teaching someone how to really use the query interface for super functionality. Please google the dynamics ax query tutorials and see bunches of good tutorials. But what you need to remember here is how important this step is. There are several things that you can do when defining the query, such as adding ranges, sorting, ect.. Those things will make it much easier for the wizard to generate a service.
Part 2: Let the wizard generate the code that we need
-
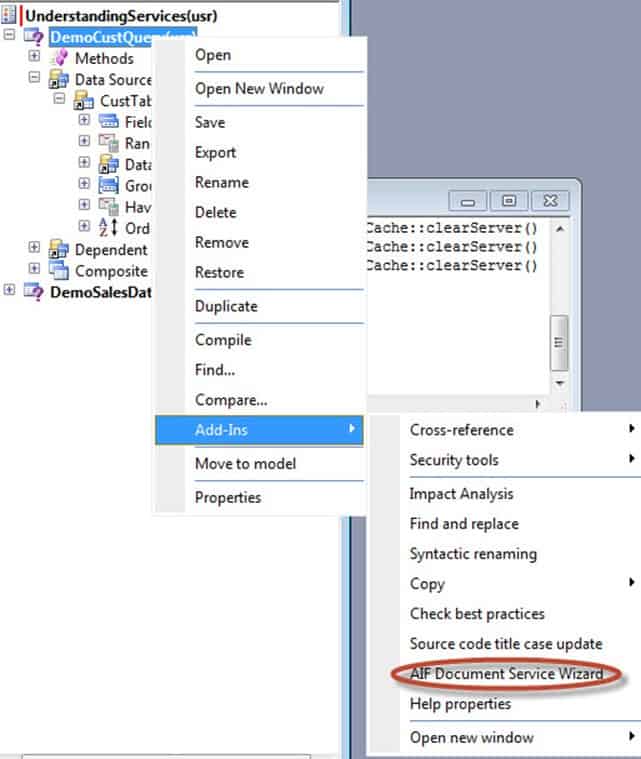
Right click on DemoCustQuery, choose Add-Ins à AIF Document Service Wizard. Thankfully, the wizard is very easy to use as you see here.
-
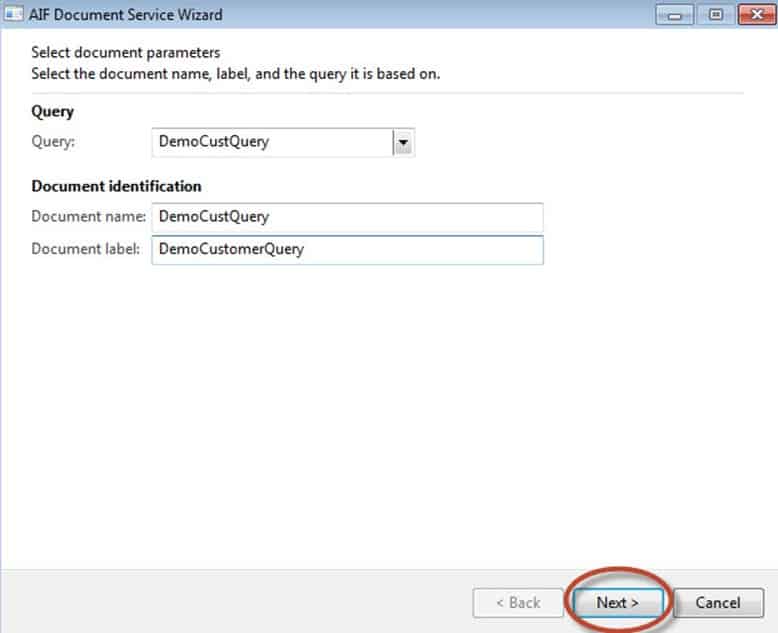
Now, within the AIF Document Service Wizard form, fill in the following 3 values: For the Query, the value should be the query that we used, DemoCustQuery. For Document name, the value should be DemoCustQuery. For Document label, the name should be DemoCustomerQuery. When everything is finished, click Next.
-
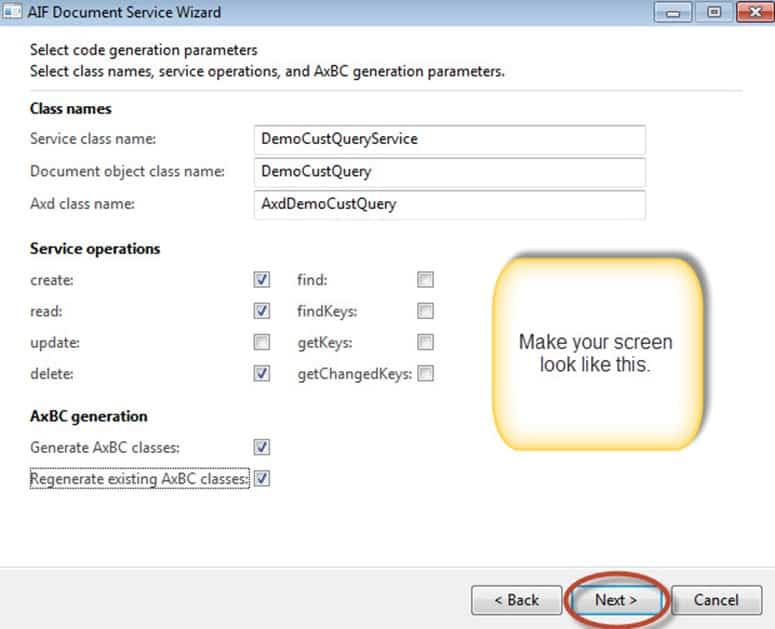
Now, you have to choose what your users can do. In this case, give your user the power to do Create, Read, and Delete operations, so check 3 of the Service Operations. There is another table permission called update. Here we won’t use that one. Also, check generate AxBC classes and regenerate existing AxBC classes. AxBC classes are specialized classes that give our services the ability to mimic table specific logic. For our power user tutorial, I won’t harp on this too much. For our developer tutorial, we’ll go in more depth. However, here just understand that you decide what you want users to be able to do against your service. Create, read, and delete means that users can do those operations against a table. They can create new records, delete records, or insert records. The other ones apply more to development and data process optimization – more on that when I do the developer series tutorials.
-
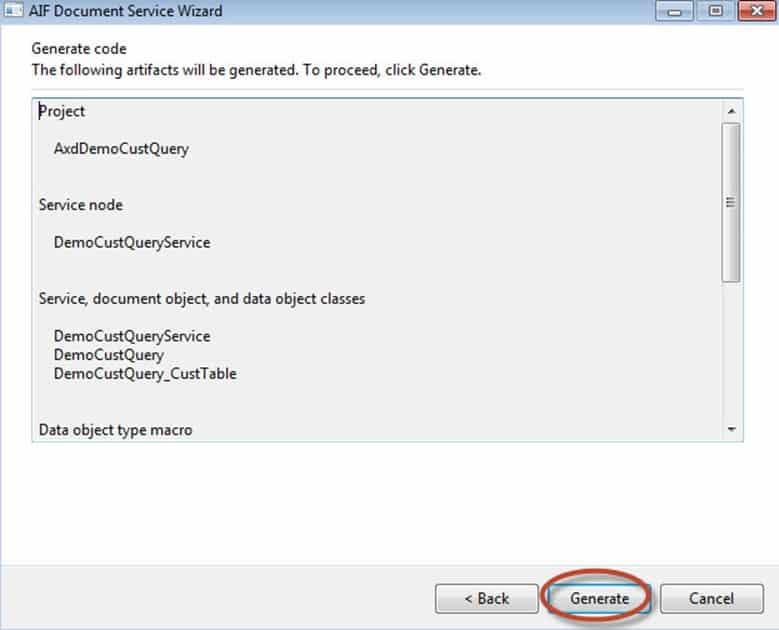
On the final screen, click Generate. For those of you looking at my developer tutorials on AIF, you’ll see that this is a very important step. There is a method sequence within Dynamics AIF. And if you understand the method sequence, you’ll quickly understand where to make customizations and how to use the wizard/autogenerated code to cut down on loads of work. For our power users, I just want you to understand that Dynamics AX gets all the code ready here, so that we often don’t have to worry about it. There are many times where we do need to do customization but not always. What I like about this step is that it greatly saves time. Dynamics AX will try & generate code which takes care of all the rules that a form would address. It does this by examining the query that you made(which is why it is so important to do the query right).
-
In the end, you will get a bunch of ToDO messages that ask you to do some best practice things like create labels for descriptions or change the location of the file where it is stored.
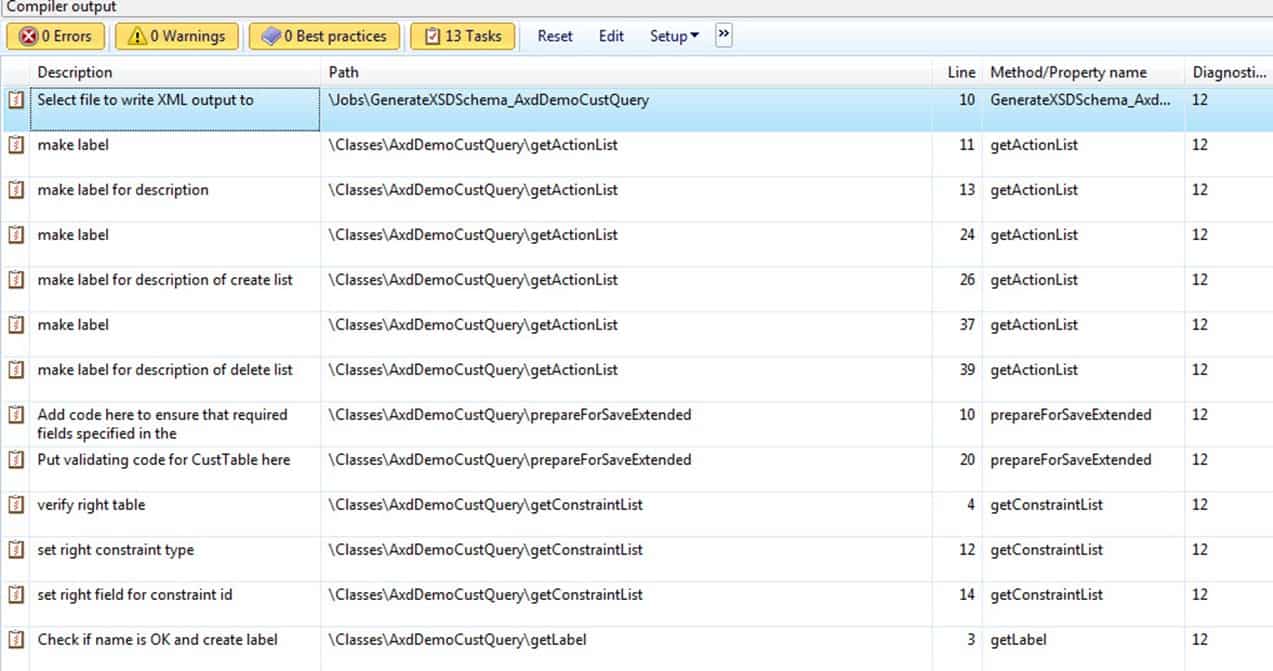
These Todo’s basically ask you to use labels instead of hard coded text. The reason for this is because when other people visit your service, they may need to read messages in a different language or read more meaningful descriptions than what is described in code. In part 2A, we will go through our service and take care of all of our labels. Part 2A is next… Pay attention to the next two steps carefully where we take care of the Todo’s and security. Both of these will be key to you making a decision of whether to bring in a developer or not. Look forward to the next post in the series everyone.

