Development, Microsoft Dynamics 365 Developer (F&S) Training Series
Step by Step How to Create Performance Load Tests in Dynamics 365 – Part 1
 8916
8916 
10
Apr
Apr
Editor’s note: Microsoft ceased their cloud performance load testing service for Dynamics 365 after this post was written, but before it was published. However, it’s just as easy to do this with the base tools today and requires no external purchases as it is out of the box. Thus, we’ve published this step by step guide on how to do performance load testing in Dynamics 365 for all who are interested. We hope that you will enjoy bringing the benefits of fast, efficient performance load testing in your organization. Let us know if it helps you and as always… thank you for reading our blog! — Brandon Ahmad, Technical Architect, Founder of InstructorBrandon & DynatunersThe key is in not spending time, but in investing it.
Stephen R. Covey
Time baby.. It’s all about the time.. Today, things are just way too busy to sit around and spend all day trying to manually run tests during a Dynamics update. We know that they are coming and there is no way to avoid them. Getting end users to test can be like ‘pulling teeth’ and the most common reason is simply because of the time it takes to manually test. That being said, there is no reason for this. Dynamics 365 introduced several simplified, easy-to-use testing features to avoid this. And guess what? You don’t have to pay anything extra to use them.
In this post, we stop the madness and walk you through just how easy it is to automate performance load tests in D365 with the cloud version in a 3 part series. Join us and follow along and let us know if we changed your mind about testing. [icon name=”smile-o” class=”” unprefixed_class=””] Let us know if it helps you to get some serious performance automation going.

 NOTE: The account used for Cloud environment, Azure, LCS and Azure DevOps must be on the same domain.
 Select Create recording, give a proper name for the recording and an optional description. Then click on ‘Start’:
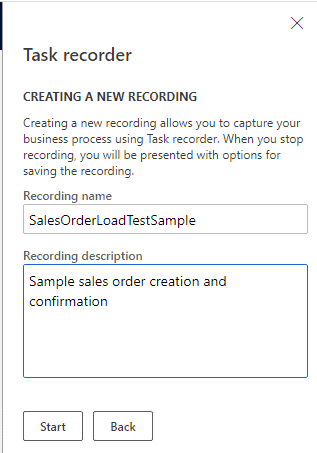 From this moment, Dynamics 365 will start recording all our actions inside the system. You will notice the recording bar at the top of the browser and the steps sidebar at the right. We can create the sales order:
 When creating the sales order, make sure you include the following information:

After clicking on Stop, select “Save as developer recording” to download the XML file. Now we have our first test case recorded and ready add some serious workload into our system!
 In the dist folder, rename the following .nupkg files as .zip files, and then unzip them:
 Copy the following files and save them to the new folder that you created in the previous step:

 Click on the Import button. The tool will create a new C# class under the Generated folder of your PerfSDKSample project:
 Repeat the previous steps for each test scenario that you want to add into the Load testing.
 Step 10
The Test explorer sidebar will appear. Right-click on your test case and click on the “Run selected tests” option:
Step 10
The Test explorer sidebar will appear. Right-click on your test case and click on the “Run selected tests” option:
 NOTE: If you don’t see your Dynamics 365 Load Test listed inside Test explorer, save the solution, restart Visual Studio as an admin, and rebuild the project.
You will see that a new Internet Explorer window will launch, and the tests will be executed on Dynamics 365.
Amazing, isn’t it? Imagine the possibilities… You or your team will be focused on the important things while you can run this automated testing as many times as you want. Hope you liked this first post and if you want to see multiple user testing, please stay tuned for our second part.
NOTE: If you don’t see your Dynamics 365 Load Test listed inside Test explorer, save the solution, restart Visual Studio as an admin, and rebuild the project.
You will see that a new Internet Explorer window will launch, and the tests will be executed on Dynamics 365.
Amazing, isn’t it? Imagine the possibilities… You or your team will be focused on the important things while you can run this automated testing as many times as you want. Hope you liked this first post and if you want to see multiple user testing, please stay tuned for our second part.
Prerequisites for Dynamics 365 Load Testing
In order to set up the Dynamics 365 Load Testing framework, we need the following prerequisites:- A Dynamics 365 for Finance and Operations on-premises environment. The minimum version to run load testing is Platform update 21. We are using Finance and Operations version 10.0.5 with the Platform Update 29; this is the latest version of the demo on-premises virtual machine available for download from Lifecycle Services at the current date. We will call this environment from now on the Development Environment.
- A Dynamics 365 for Finance and Operations cloud environment that matches the on-premises version (10.0.5 with Platform Update 29). We will call this environment from now on the Cloud Environment. If you are testing only on-premises, this environment is optional.
- Visual Studio 2015, Enterprise version installed on the Development Environment.
- Dynamics 365 Developer tools for Visual Studio installed.
- Microsoft Performance Framework SDK (included on the on-premises virtual machine and located typically on C:\PerfSDK).
- Administrator access to both Development Environment and Cloud Environment through Remote Desktop.
- Administrator or Contributor access to the Azure subscription hosting the Cloud environment.
- Contributor or Administrator or access to Azure DevOps.
- Administrator or Contributor access to your account on Lifecycle Services (LCS).
Designing Dynamics 365 Load Testing Scenarios
Before doing Dynamics 365 Load Testing, we need to define what we’re going to test, right? No worries on this, we have our beloved Task recorder, which has evolved from Dynamics AX 2012 to a tool with a flexible API and seamless integrations with consumers of business process recordings. A lot of features have been added to it, including the ability to use the recording files for the Load testing framework. For this blog post, we will do a test scenario to create and confirm a Sales order: NOTE: This can be done on the Development or the Cloud environment.Test Scenario Recording
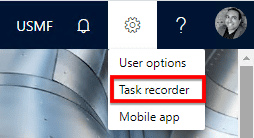
Sign in into Dynamics 365 for Finance and Operations as a user with assigned roles for the Sales modules (Sales and Marketing/Accounts Receivable), or as a System administrator user. Turn on Task recorder clicking on the Settings icon at the top right > Task recorder:
Select Create recording, give a proper name for the recording and an optional description. Then click on ‘Start’:
From this moment, Dynamics 365 will start recording all our actions inside the system. You will notice the recording bar at the top of the browser and the steps sidebar at the right. We can create the sales order:
When creating the sales order, make sure you include the following information:
- Customer account
- Item number
- Sales quantity
- Site
- Warehouse
- Sales price.
After clicking on Stop, select “Save as developer recording” to download the XML file. Now we have our first test case recorded and ready add some serious workload into our system!
Running Single-User Tests
Step 1
Now we will configure the Development environment to do a Dynamics 365 Load Testing with a single user approach. In order to implement the single setup load testing, follow these steps: Download, unblock (right click > Properties > click on the Unblock check) and unzip the following files: https://selenium-release.storage.googleapis.com/3.13/selenium-dotnet-strongnamed-3.13.1.zip https://selenium-release.storage.googleapis.com/3.13/IEDriverServer_Win32_3.13.0.zip
In the dist folder, rename the following .nupkg files as .zip files, and then unzip them:
| Original filename | New filename |
| Selenium.Support.StrongNamed.3.13.1.nupkg | Selenium.Support.StrongNamed.3.13.1.zip |
| Selenium.WebDriver.StrongNamed.3.13.1.nupkg | Selenium.WebDriver.StrongNamed.3.13.1.zip |
Step 2
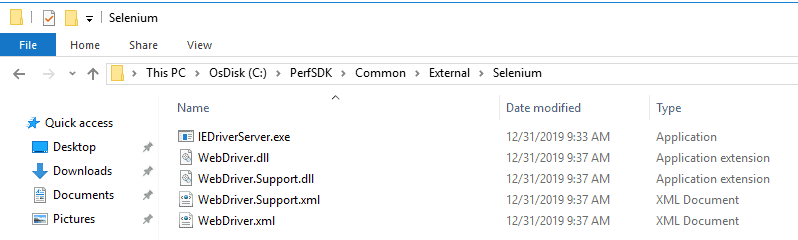
Locate the PerfSDK folder from your Development machine (typically located on C:\PerfSDK), and create a folder that is named Common\External\Selenium:
Copy the following files and save them to the new folder that you created in the previous step:
- exe from the unzipped IEDriverServer_Win32_3.13.0.zip file
- dll and WebDriver.xml from the lib\net45 folder in the unzipped Selenium.WebDriver.StrongNamed.3.13.1.zip file
- Support.dll and WebDriver.Support.xml from the lib\net45 folder in the unzipped Selenium.Support.StrongNamed.3.13.1.zip file
Step 3
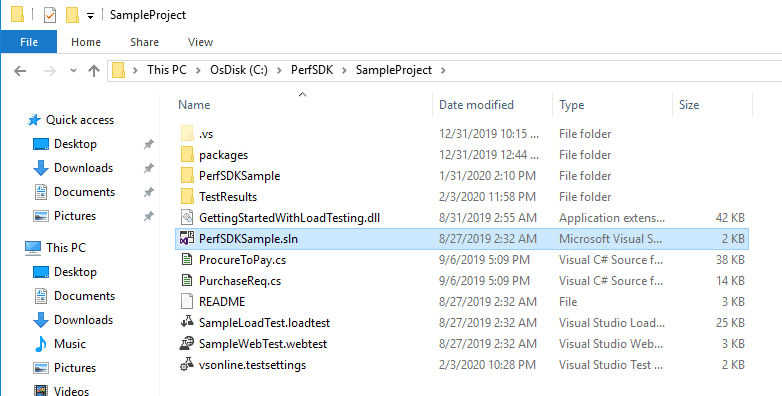
Open Visual Studio with administrative privileges and open the solution on path C:\PerfSDK\SampleProject\PerfSDKSample.sln
Step 4
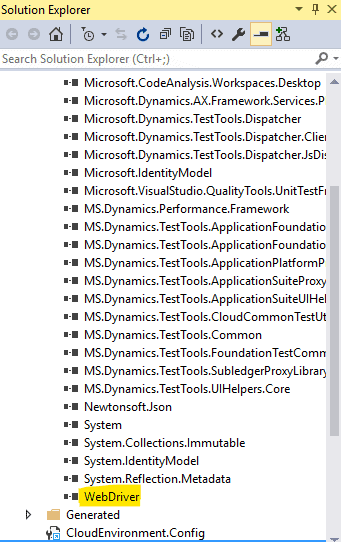
Add a reference to the WebDriver.dll file in the Common\External\Selenium folder:
Step 5
On the Dynamics 365 menu, click on Addins, and then select Create C# perf test from recording:
Step 6
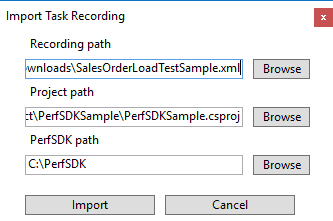
In the Import Task Recording dialog box, enter the following information: Recording path: The location of the Task recorder file that you downloaded into the Developer machine Project path: The location of the PerfSDKSample project. Normally, the path is C:\PerfSDK\ SampleProject\PerfSDKSample\PerfSDKSample.csproj PerfSDK path: The location of the PerfSDK directory. The path in this case is C:\PerfSDK\
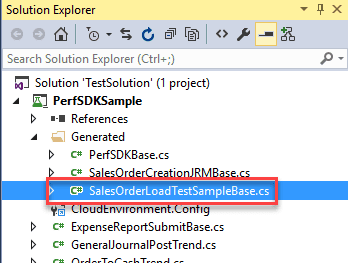
Click on the Import button. The tool will create a new C# class under the Generated folder of your PerfSDKSample project:
Step 7
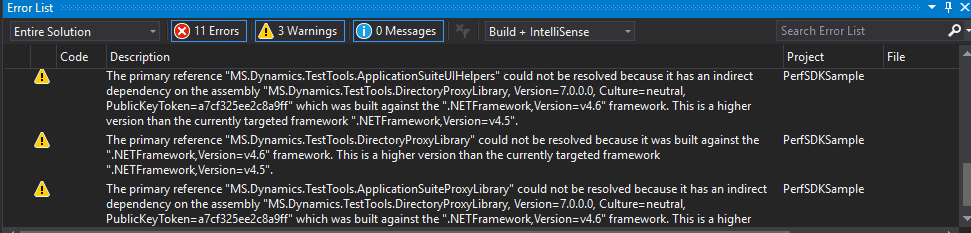
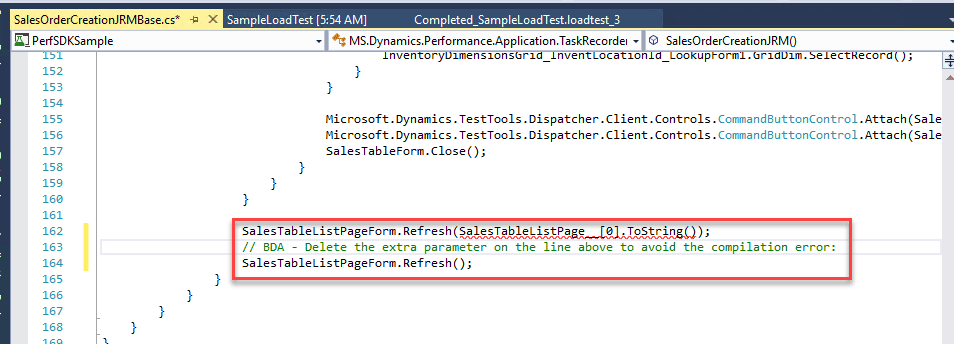
Build the solution. NOTE: If you get these errors, do the following.
- On Solution Explorer, right click on the project PerfSDKSample > Unload Project
- Right click on the unloaded project and click on Edit PerfSDKSample.csproj
- Add the following element inside the first <PropertyGroup> tag:
| <PropertyGroup> <ResolveAssemblyReferenceIgnoreTargetFrameworkAttributeVersionMismatch>True</ResolveAssemblyReferenceIgnoreTargetFrameworkAttributeVersionMismatch> </PropertyGroup> |
- Save the PerfSDKSample.csproj file
- Right click on the project on the Solution Explorer and click on Reload Project
- The project must now compile successfully
Repeat the previous steps for each test scenario that you want to add into the Load testing.
Step 8
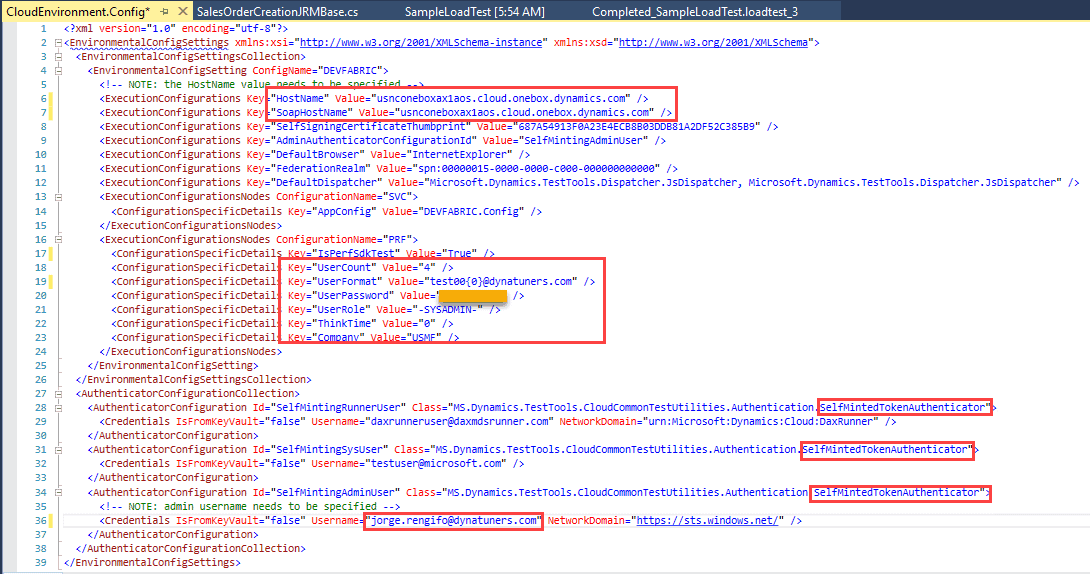
From the PerfSDKSample project, open the CloudEnvironment.config file of the PerfSDKSample project, and edit it to match the configuration of your environment:
- Under ExecutionConfigurations, modify the keys HostName and SoapHostName so that matches the Development environment. The URL for the development environment is cloud.onebox.dynamics.com
- In each AuthenticatorConfiguration element under the AuthenticatorConfigurationCollection element, replace AadAuthenticator with SelfMintedTokenAuthenticator.
- Comment out the AzureActiveDirectoryConfiguration and KeyVaultConfigurations elements, if they exist
Step 9
In Visual Studio, on the Test menu, point to Windows, and then select Test Explorer
Step 10
The Test explorer sidebar will appear. Right-click on your test case and click on the “Run selected tests” option:
NOTE: If you don’t see your Dynamics 365 Load Test listed inside Test explorer, save the solution, restart Visual Studio as an admin, and rebuild the project.
You will see that a new Internet Explorer window will launch, and the tests will be executed on Dynamics 365.
Amazing, isn’t it? Imagine the possibilities… You or your team will be focused on the important things while you can run this automated testing as many times as you want. Hope you liked this first post and if you want to see multiple user testing, please stay tuned for our second part.

