Consulting, Development
Dynamics AX AIF Tutorial Series Part 2: Power User Walkthrough, How to Set up Dynamics AX services for Excel and SharePoint functionality with ODATA
 16193
16193 
May
Now, let’s start building some services in Dynamics AX. In this tutorial, we will take on the role of the power user needing to setup a service and consume the data for business analytical purposes. This will require no code and will show you how a power user could setup and consume services in Dynamics AX. By creating this service you will see how easy it is to take some Dynamics AX and save it to SharePoint or anything else that you want. Plus, you don’t have to go through the irritating problem of Excel timing out as this can handle large amounts of data. Contrary to popular myth, a power user can get very far within the Dynamics AX service-oriented framework with no code. The Dynamics AX team has created a very friendly and intuitive development environment for utilizing services. One such area, that is often overlooked is query services, which allow you for to consume services. The entire purpose of query services is to simplify data access. ODATA is an extension of this idea. Sometimes, you need to expose Dynamics AX data to other applications.
[Note: I am very aware of the differences between the Dynamics AX ODATA implementation and the .NET implementation. That won’t be discussed here.]For this series, I assume that you are using the free demo machine on Partnersource, AX2012R2Av1_5.
-
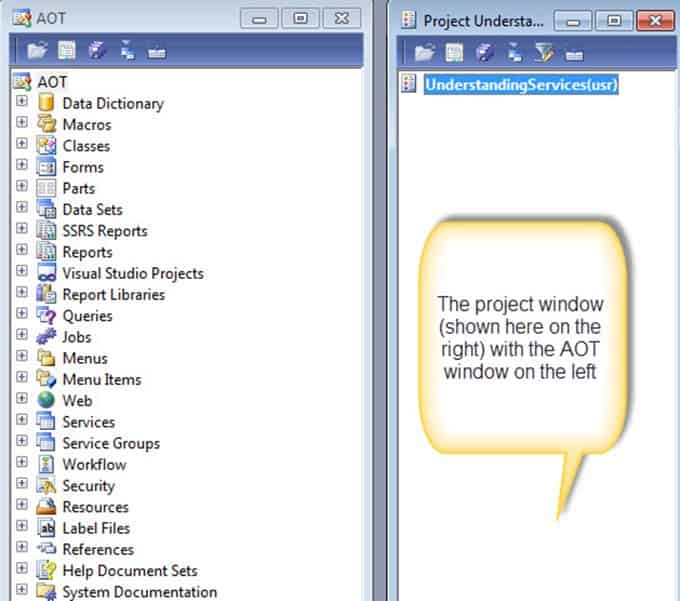
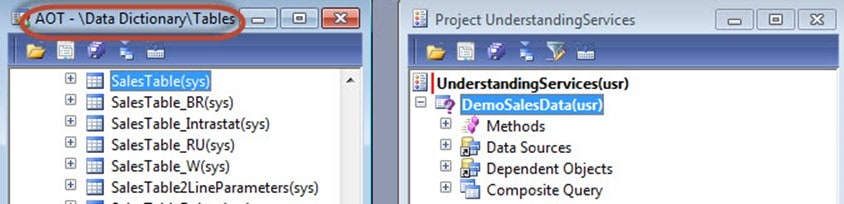
As we have done with my other series, I will need for you to create a project in the development window. Name it UnderstandingServices and align the project to the right of the AOT window. If you need an example of how this is done, see this post of mine, http://instructorbrandon.com/tutorial-developing-reports-with-dynamics-ax-and-ssrs-part-1/, steps 1 through 5 or check out the first post in my forms tutorial. The only step that is different is that you use the name UnderstandingServices instead of SSRSAwesomeProj. When finished, things should look like this:
-
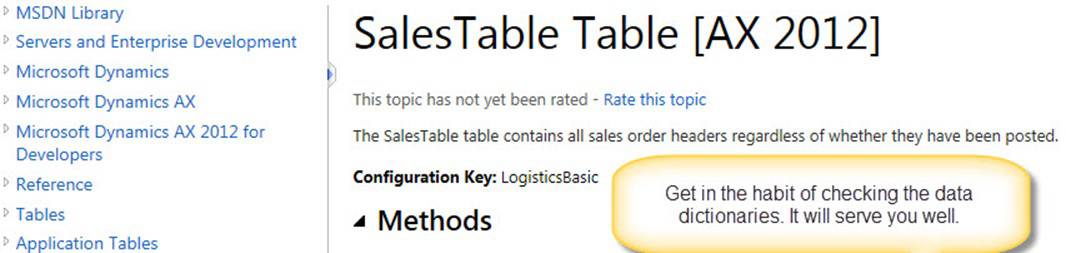
The most important step in getting in getting ODATA is figuring out which data you want to pull. In SQL, write sql queries to do this. In Dynamics AX, we have an awesome query builder tool within the development environment that will usually take care of this for us. We can also code this functionality if we like but I won’t do that here. We’ll drag and drop our hearts out to build a dataset (which consists of the tables and rows that you are working with, aka “query” in ax lingo). In this case, our query will only contain one table, but we could have used a lot more queries. Now, the first step in figuring out a query is to make sure that you have a data dictionary. A data dictionary is a place that defines the tables and columns and what they are supposed to do. Make sure to go online and find one. You can usually google it by the table name.
-
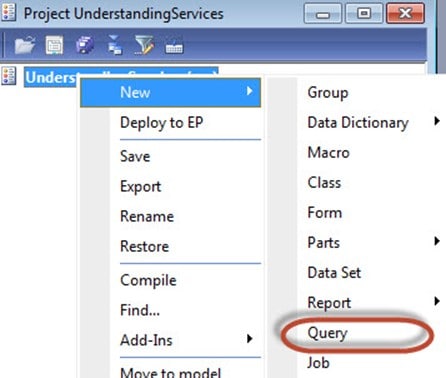
Now, Right-Click on UnderstandingServices, move your mouse over to New, and choose Query. At this point, all we are doing is telling Dynamics AX which data we want to pull. The term “Query” tells Dynamics AX that this is data that you will be working with.
-
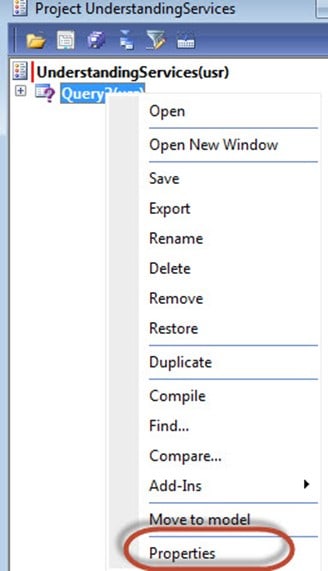
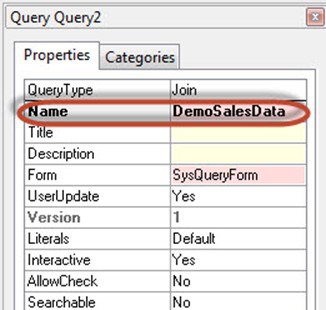
But you can have multiple queries, so you have to give it a name. Right-Click on the query object that appears (could be named differently than mine) and click on Properties. Look to the right at the properties window and change the name to DemoSalesData.
-
Now, we need to tell Dynamics AX which Tables and columns (aka fields) that we will be using. Make sure that your Query is expanded because we will be doing drag and drop. On the window on the left, expand the AOT à Data Dictionary à Tables and located the SalesTable(sys).
-
Drag the SalesTable(sys) from the window on the left over to the Data Sources node on the window on the right (Project UnderstandingServices). This will tell the query which data source (aka table) that it can use. You still need to tell it which columns it can use though.

-
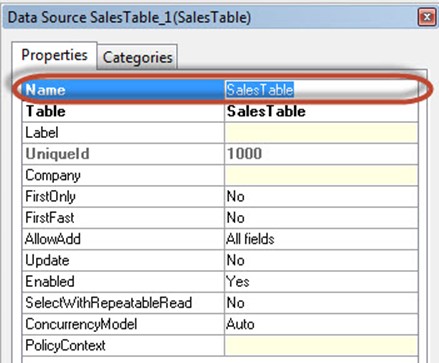
Now, let’s shorten the name of the data source SalesTable_1(SalesTable) to just SalesTable(SalesTable). Dynamics AX puts a _1 there to let you know that this is an object representing the SalesTable and not the actual SalesTable. But, as you will see later, that _1 appears when we consume the data in Excel later. To avoid this, let’s just use SalesTable to make the name shorter. Note: you don’t have to do this. Just a Brandon preference to make the name shorter. Right-click on SalesTable_1(SalesTable) and click on the properties window. Change the name to SalesTable in the properties window.
-
Let’s tell Dynamics AX which columns it can use. Now, in the Project Understanding Services Window, expand the SalesTable(SalesTable) window. On the left of that in the AOT window, expand the SalesTable(sys) Table à Fields(section). Drag and drop the following columns from the Fields node of the SalesTable(sys) node to the Fields node of the SalesTable(SalesTable) data source on the right. Drag the following columns over:
- CustGroup
- SalesUnitId
- smmCampaignId
- smmSalesAmountTotal
-
ShippingDateConfirmed
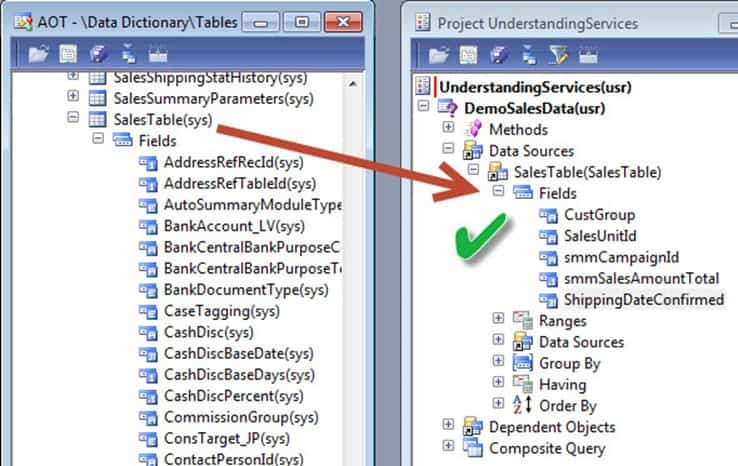
- CustGroup
-
Right-click on the UnderstandingServices Project and left click on Compile. That will save the Query and make it available.

Congrats, you just took Care of the Single hardest part of getting a read-only service up and running!!!!!!!!! Note, that this query interface is really wonderful. I would have covered it more, but this tutorial is focused on using services. There are several excellent blog posts and walkthroughs detailing how to use it. It would be worth your while as it will save you from a lot of time.
New to Dynamics AX is something called Query Services. Query Services are automated services that you can setup with no code based on your service. You can then expose them quite easily as we will do here. There is one limitation. These are for read-only purposes. But they are awesome. They allow you to also get around that timeout excel behavior that you often see in the Dynamics AX graphical user interface and to utilize all of the SQL BI goodies. Now, the Dynamics AX team did one more thing that was ‘slick’ and awesome. They made it so that these services could be exposed with “ODATA.” The purpose of ODATA is to make it easy for anyone to be able to read data from services. Rather than involving all kinds of complicated code to read xml data, we can simply use tools like Excel to go about our way. There are other nice things about it also, but I’ll leave that alone.
-
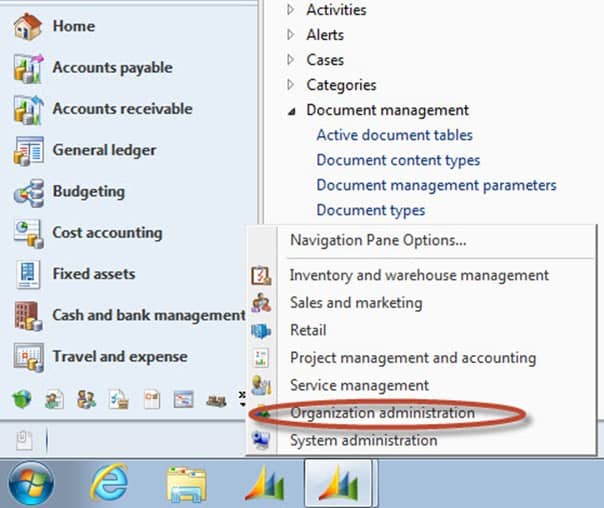
Now, make sure that you aren’t in the development window but in your regular client (the one with all the form options and the favorites option on the left. Open up the Organization Administration Module.
-
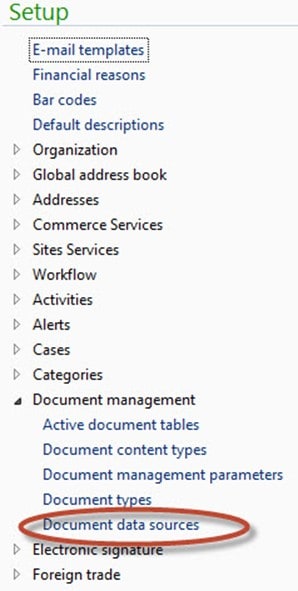
You will need to click on Document Data Sources here. Document Data Sources are the queries that you want to expose for easy reading. Go to Setup à
Document Management à Document Data Sources.
-
Click New on the window. This will set us up to create a new record which points Dynamics AX toward the service to create as a Query.

-
Leave the entry in the Module column alone as it doesn’t matter for this type of Query. Change the value in the Data Source Type to Query Reference and change the Data Source Name value to DemoSalesData, and make sure that the Activated column is Checked. When, you are all done, hit the Activate button circled in the picture below. Make sure that your row looks like my picture. You can hit the Close button when everything is finished.

Congratulations, you just created a service that will feed massive amounts of data anywhere that you like!!!!!!!!!! It really was that easy. You just create the query, and then 4 simple steps, and you are in business. This is 10 times easier than it used to be!! But there is a critical reason why. An ODATA service is meant for knowledgeable business workers who know the data and can make business decisions. This allows them to focus on putting the data to business use while ignoring the need to code for data retrieval.
Still, I do need to sort of prove everything. Okay, let’s see how to decipher this data. This is one of many ways and I do mean that there are many since SharePoint will read Odata from anywhere (lists, ect).
——————————————————————————————————————————————————————————————————————————————————————————————————————-
-
To consume odata, we need to know one thing. The URL where it is hosted. This is going to be: http://<nameofserver>:<portAOSrunningon>/DynamicsAx/Services/ODataQueryService/<nameofquery>. To find the name of the server, find out which server has the Dynamics AX AOS component installed on it. Go to Control Panel àAll Control Panel Items à System. Look at the Computer name property to find the name of the server.

-
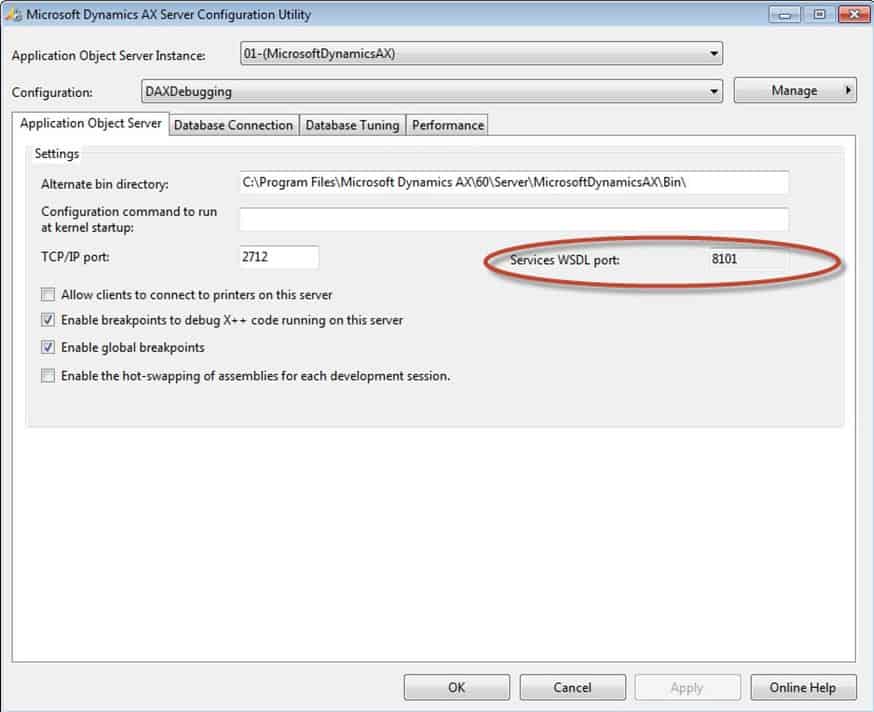
To find the port that the server is running on, click Start à Administrative Tools à Microsoft Dynamics AX 2012 Server Configuration
-
Note, by default Dynamics AX gives us short-hand for typing this in: http://aoshost:8101… But we will ignore that for now. Plus, your network people can do all kinds of stuff to mess with this, so I had you look up things the long way in case. Now, if the URL that you generate doesn’t work, get with the network people and show them the steps that you used to come up with it (posted in steps 13 – 15). For internal services (within the same network), this should work. For outside services, the network people need to install Dynamics AX services on IIS. Following the formula above, our URL will come out to this:
http://ax2012r2a:8101/DynamicsAx/Services/ODataQueryService/DemoSalesData
-
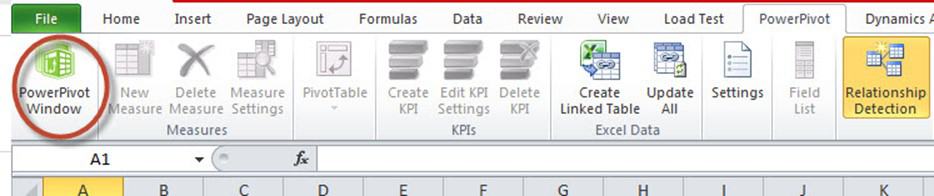
It’s time for you to see what you just did. Open up Excel 2010 or 2013. I’m using Excel 2010 for this example within the virtual machine (Excel 2013 even has more goodies that do things with Odata but we won’t discuss that here). Make sure that PowerPivot is installed on your Excel 2010 à this can be added. Click the PowerPivot tab and then click on the PowerPivot Window to open it.
-
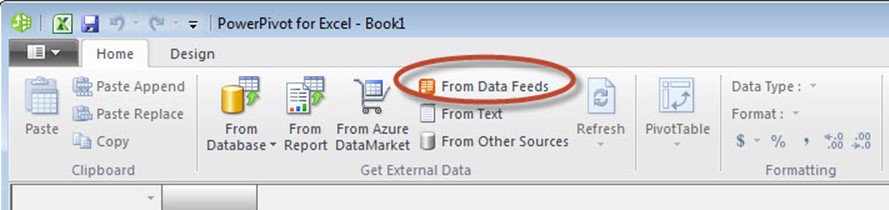
In the PowerPivot window, click From Data Feeds to get your ODATA. This is where you will place your link.
-
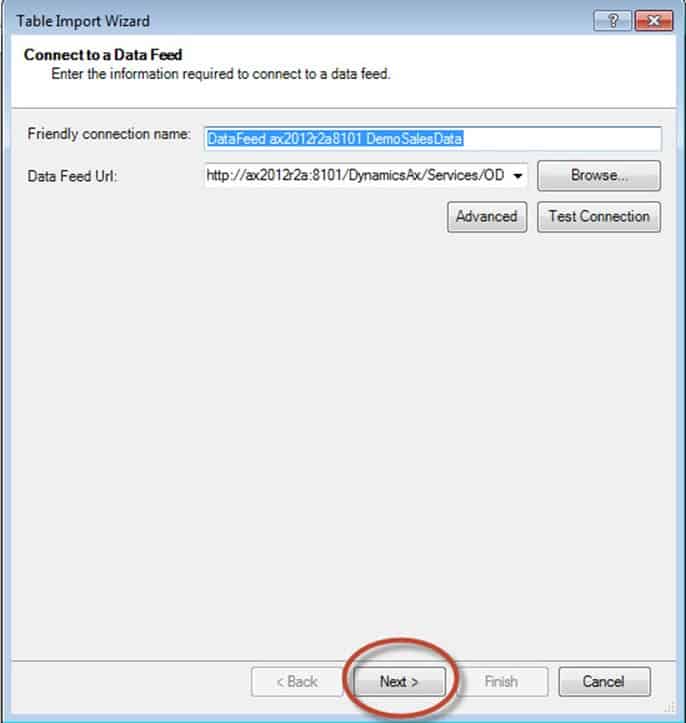
Put the URL that we generated above in the Data Feed Url and press Next
-
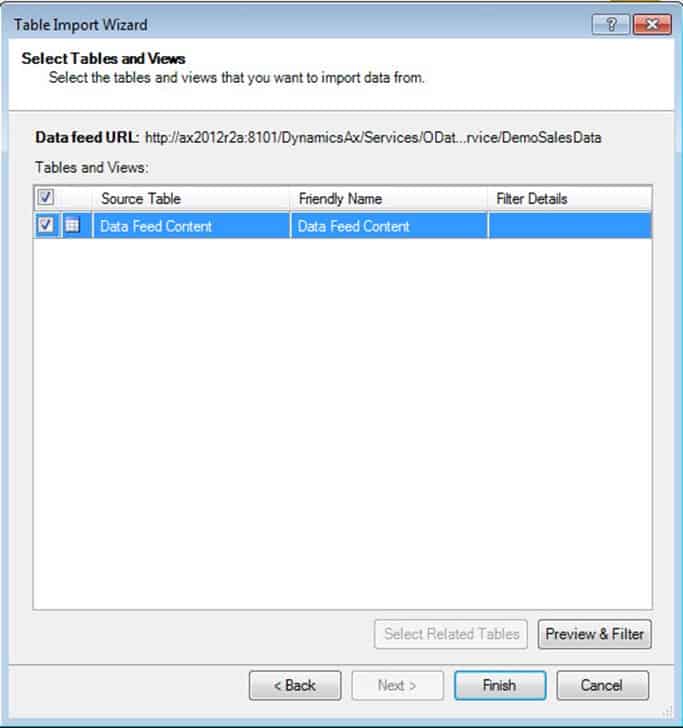
Hit Finish at the next screen to tell Dynamics AX that you are done.
-
Hit Close when the import window is finished. What you just done is pretty nifty and fast!!! Note: I just noticed that smmSalesAmountTotal was 0.. Too bad. I should have used another query, but it is too late now, and you get the point. Once, your data is like this, you can now perform powerpivot Excel analysis on it to get the data to look and feel the way you want to. We’ll take an example like this and make a real dashboard in my Dynamics AX reporting series. For now, the most important thing that you can understand is how to setup a service. As a side note, this can be easily sent to SharePoint in the same way that you send any Excel document to SharePoint. If you are new to Excel or PowerPivot, check out any of the existing tutorials on it. You’ll love it.

Side Note, of course there are a billion ways to get this into SharePoint. This mechanism also works with InfoPath, Business Connectivity Services, Reporting Services, ect.. One such way is to just click file and Save and Send:

Swwweeeeeeeeeeeeeeeeeeeeeet!!!!!!!!!!!!!!!!!! I love ODATA and THANK YOU DYNAMICS AX TEAM. This completes in Part 2 of the series. Now, as for Part 3, we will go into Document Services for the power user. See ODATA is awesome, but sometimes, we need to be able to also allow applications to create new records in Dynamics AX, or update them, or delete them. This is where Document Services comes in and about half the time, it can be ran by a Power User also. For the other half, we’ll need to code and we need to understand the framework. It has a clear logical sequence that you will find very intuitive.

