Consulting, Dynamics Operations Architecture, Featured
OnPremise Tutorials Part 4: Simple way to get modern Certificates and Security Correct for your Service Fabric, AX 7 (Dynamics Operations) installation
 9235
9235 
Aug
Contrary to popular mythology, we don’t have to use outdated legacy, fully exploitable sha1 security to run Dynamics 365 for operations. This is probably the single biggest gotcha to being able to successfully implement Dynamics On-Premise and interface with the cloud in general. Symptoms of misconfigurations include clear text passwords, not being able to conduct development in Azure without a vpn, having to use file share locations like github to trade confidential corporate data because someone didn’t configure the security correctly on the client, not being able to run Dynamics 365 for operations in different browsers because of flunking security, getting hacked, slow performance because of the security mechanism not working correctly, deploying code that suddenly breaks bunches of mobile device scanners causing all kinds of hell with fulfilling orders, etc. I’ve seen a large uptick of this sort of stuff happening lately in our Dynamics world, and it usually has to do with improper configuration of certificates.
So, let’s cover how to generate a certificate that actually works and I will step you through it in this exercise. No technical person reading my blog should undergo the embarrassment of something really bad happening because of a certificate configuration.
Sadly, my beloved wildcard certificate is not enough
Special Mention: Though completely undocumented, I learned that Service Fabric on-premise has compatibility issues with wildcards. Try as I did, I couldn’t get the Service Fabric DNS service to work with a wildcard. Finally, I was forced to accept the fact that I will have to use a non-wildcard certificate for now. Urgghhhhhh.. For production, I would have never used a wildcard certificate but it sure was convenient for Dev. We can still use our wildcard certificate for SQL Server in our Development environment and other places. Or you can use the certificate generated with this method in several different places.
Fear not, I’ll walk you through an easy way to get a working Certificate and properly configure it to make life easier
There are a million little gotchas when it comes to making a certificate. For example, don’t copy and paste the thumbprint unless you do it from a UTF file where you manually typed it in to be safe most of the time. Let’s go through the steps now with explanations to avoid the pains of doing this wrong.
NOTE: THIS IS THE SIMPLEST POSSIBLE WAY TO GENERATE THE CERTIFICATES THAT YOU NEED, NOT THE ONLY WAY!!!!
With this process you must initially generate the CSR request and import the certificate on the same machine. You can import the completed certificates to other machines later.
First, Open up Notepad and put the following Text in there.
Here is the picture . I put the sections you should change in yellow if you are doing Dynamics On-Premise. Special note, depending on your mobile device infrastructure you may have to change the keylength and hash algorithm to something less secure if you need to support legacy software or your hardware drivers are still on the legacy encryption model.
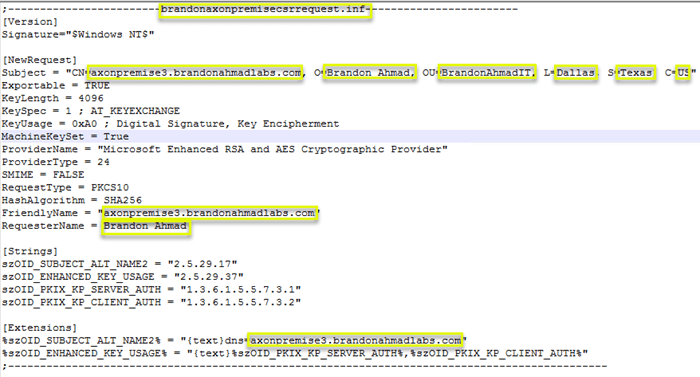
Let’s go through the relevant and important values one by one. Remember that only the yellow values need to be changed to get this working with a Test Install of Dynamics On-Premise.
We create a CSR request called brandonaxonpremisecsrrequest.inf first. Notice the header. For simplicity sake, we want to name the file after the header.
[code language=”sql”] ;————————brandonaxonpremisecsrrequest.inf————————[Version] Signature=”$Windows NT$” [NewRequest] Subject = “CN=axonpremise9.brandonahmadlabs.com, O=Brandon Ahmad, OU=BrandonAhmadIT, L=Dallas, S=Texas, C=US”
Exportable = TRUE
KeyLength = 4096
KeySpec = 1 ; AT_KEYEXCHANGE
KeyUsage = 0xA0 ; Digital Signature, Key Encipherment
MachineKeySet = True
ProviderName = “Microsoft Enhanced RSA and AES Cryptographic Provider”
ProviderType = 24
SMIME = FALSE
RequestType = PKCS10
HashAlgorithm = SHA256
FriendlyName = “axonpremise9.brandonahmadlabs.com”
RequesterName = Brandon Ahmad [Strings] szOID_SUBJECT_ALT_NAME2 = “2.5.29.17”
szOID_ENHANCED_KEY_USAGE = “2.5.29.37”
szOID_PKIX_KP_SERVER_AUTH = “1.3.6.1.5.5.7.3.1”
szOID_PKIX_KP_CLIENT_AUTH = “1.3.6.1.5.5.7.3.2” [Extensions] %szOID_SUBJECT_ALT_NAME2% = “{text}dns=axonpremise9.brandonahmadlabs.com”
%szOID_ENHANCED_KEY_USAGE% = “{text}%szOID_PKIX_KP_SERVER_AUTH%,%szOID_PKIX_KP_CLIENT_AUTH%”
;———————————————————————————————
[/code]
Next, let’s go through the values.
Signature – we use the special variable to tell it to work on all Windows Operating Systems.
Subject – this part is extremely important. In this case, I set CN to a full machine name(“axonpremise3.brandonahmadlabs.com), but we could set it to any name. In this case, I wouldn’t set it to a machine name, I would give it some other name because it will have to be used on multiple machine. So, maybe, call it “DynaOpsOnPrem” with nothing else there. What’s important is that the CN name actually match a DNS name on your network. You can map the dns entry to whatever server or cluster you like.
Exportable – this definitely needs to be set to “Yes”. If not, you won’t be able to use the certificate on any other machines.
KeyLength – Big time Gotcha. Weak, fully exploitable 1024 encryption is deprecated. That being said, bunches of programs don’t support encrypted keys with a length of 4096. So, I installed one here but check. You don’t want to undergo the uncomfortable situation where you have to tell some major company with a million dollars invested in hardware that they need to buy all new hardware and software to support Dynamics AX Operations (AX 7).
KeySpec – let the key be used for signatures as some applications require (leave this at 1).
KeyUsage – Leave this at Encipherment only.
MachinekeySet — set this to true. We want the key in the context of the machine account, not the local user.
ProviderName – You want modern RSA and AES encryption.
ProviderType – 24 is the RSA and AES Encryption Provider
SMIME – Not needed for digitally signing emails
RequestType – PKCS10 standard. Just leave it at this.
HashAlgorithm – You want to use the good encryption if possible. But watch out. Sadly, many of our hardware products and old programs support weak, fully exploitable SHA1 encryption. If at all possible, push your implementations to deprecate this unless they want to end up in the news when some sort of sensitive information gets hacked. If you end having to go with Sha1, try and push your organization to change as quickly as possible.
FriendlyName – Make this the same as the CN for the Dynamics Operations OnPremise Install
RequesterName – Your company name. Here I just used me.
For the strings section just leave the value as is. I tried to use only server based authentication and divide the certificate into 3 parts, and there were problems even though this would be ideal. So, for now, what we pass in is both client and server authentication on the certificate but later we will make sure that the private key doesn’t go on the client.
For the Extensions Section, we are making the extension to support both Client and Server. But there is some strange behavior around some of these applications. So, make the Subject alt name the same as your CN.
Second, save the file in notepad as a .inf file with the exact same name as the request section.
So, here I saved it as brandonaxonpremisecsrrequest.inf.

Here I saved it as brandonaxonpremisecsrrequest.inf.
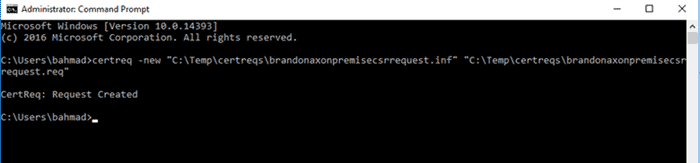
Third, run the following command in the command prompt (as an admin)
Certreq -new brandonaxonpremisecsrrequest.inf brandonaxonpremisecsrrequest.req
You can name the file whatever you want. Name the inf file after what you put between the “———(whatever you put)—-” in the inf.
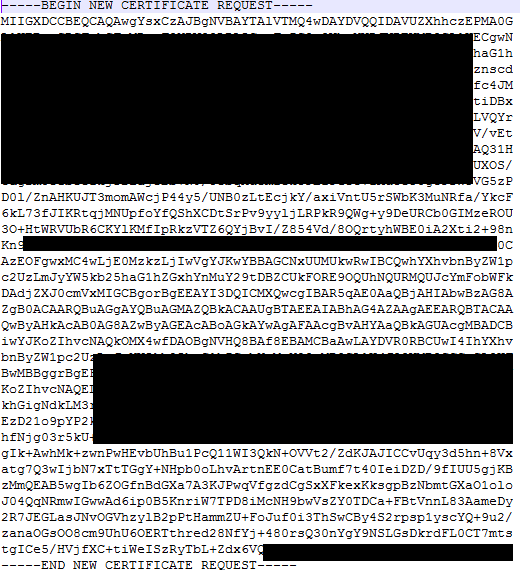
Fourth, open up the file and copy and paste the begin CSR Request and End CSR Request
You’ll notice that the CSR request is encoded but it contains everything you need for being able to set things up the right way, including a bunch of sensitive information.
Fifth, go to wherever you buy your Officially supported certificates at and paste the CSR code in the CSR request section
This process is pretty easy. Here I went to cheap ssl security and brought a nice, official trusted Identity provider for $8.00. Sadly, it isn’t a wildcard, but it will work for an entire Dynamics Instance and I can use it on multiple computers.
Also, please remember to read part 2 of my series on using a trusted identity provider. It’s very important to do that in order to avoid the browser messages and other issues.
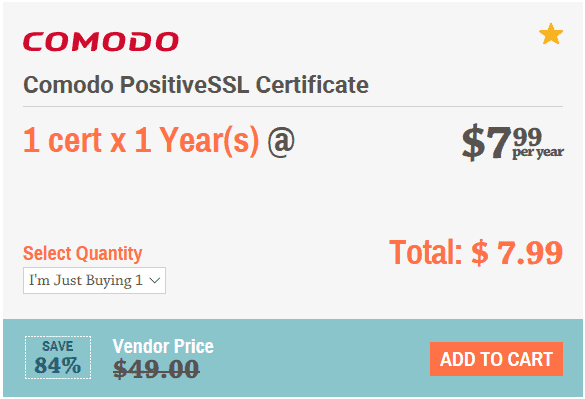
The process is instaneous for getting the certificate. You will undergo some verification at an official email – such as ad***@********in.com and get the certificate back fast. On average, they emailed me back the certificate within 10 minutes.
Sixth, download OpenSSL and install it on the server where you will generate the certificate. Any of the 32 bit versions are find even if you have a 64 bit machine
Thank goodness for open source. We will use the most popular ssl security tool on the web to do the next step. The easiest way to do this is to just go to the wiki and use this link which is valid as of the date of this posting.
https://wiki.openssl.org/index.php/Binaries
Seventh, make the certificate structure a little more friendly and get them ready
You are going to get back 4 different certificates but there is a method to the madness which is very important to understand.
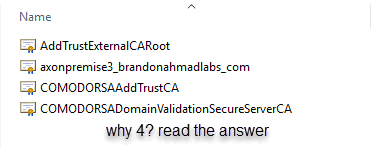
So, why 4? Basically certificates go my a hierarchical organization structure that very much mirrors corporations. You got the executive, manager, supervisor, and worker vibe going on.
- AddTrustExternalCARoot – this is the “executive” or the “Grand Poobah” of deciding which machines can use the certificate. This is a global certificate giving your servers the right to use Comodo certificates. It doesn’t do much else, but it’s very important because you will place these certificates in enterprise. The Director must authorize for any lower certificates to use it. But there is a problem. The director is like a high-level executive with authorization power, but not sweating the details. And while this is good and all, what if you need to get more specific. For example, maybe you need to have a little different security for Europe as opposed to North American. The Intermediate Certificate is our friend.
- The Intermediate Certificate is a step below the director aka “The Manager”. This allows for you to issue out certificates that have authorization from the External CA Root, aka “executive”, but to also issue be more specific. So, maybe you send out one intermediate certificate for Europe and another for North America. During validation, both will check with the “Executive” Certificate before authorizing someone. Thus, we have a certificate chain. So far, the client has to go through 3 loops. But we still aren’t done. A certificate is powerful because it authorizes someone to read data from a particular location. Giving someone access to all the information in North America or Europe is probably too much access for everyone. So, we take it a step further. We make server certificates.
- Server Domain Validation certificates are just how they sound. They decide if someone has access to a particular domain. So, my any lower level certificates issued for this one are valid for the brandonahmadlabs.com domain.
- Server and Client Certificates – This is the hands-on ground worker. It is a special certificate that can do server and client stuff or either/or. This is analogous to your worker. It usually has it’s own key and this is what needs to be secure. Just think about it, the first 3 certificates basically say that we can trust certificates for Comodo for this domain. Now, we need to get more specific and trust certificates for the machine and website that people are accessing. In other words, it is time to enter the weeds like workers generally do. Though frowned upon, in many simplified production scenarios people use the same certificate for client and server authentication (often for the wrong reasons). You need to get more specific. The Supervisor only talks to the customer when there is a need for that. The worker handles the client directly. Sometimes, there are two workers one for the server and one separate for the client tasks. Either way, it is the worker who the client communicates with directly. That’s the fourth certificate and it has the name that you need. One thing we will do is place it in Personal since it is both a server and client certificate but remember the chain. It still holds true.
So, in order: AddTrustExternalCARoot à ComodoRSAAddTrustCA à ComodoRSADomainValidationSecureServerCA à axonpremise3_brandonahmadlabs_com (interfaces with client).
And in fact, you can see through the certificates portal support for this:
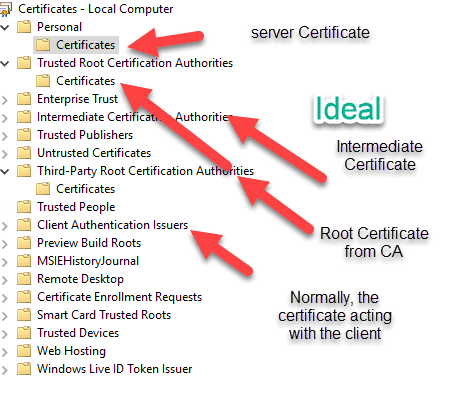
Many times, in development environments, you will just see people combine the certificates and stick them in the Trusted Root Certificates and the Personal Certificates section. Make the private key not exportable. Grant permissions to the certificate key .Then, give some account complete permissions to them. That’s usually fine for development and functionality testing. It’s what Microsoft did for the on-premise test deployment and we will do the same. That’s what we will do here – the non-ideal situation because we are in a development environment and not all software supports the ideal setup (often resulting in security breaches).
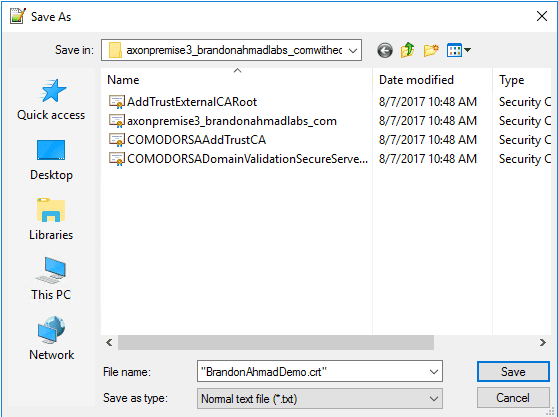
Eighth, Combine all the Certificates into one file and save them with a “.crt” ending.
Order is everything here. You want to start with the certificate lowest in the chain being pasted first and then go up the certificate highest in the chain (last). This is the way that certificates work – they start at the lower level and get an approval from each successive higher level. This is why there can be extra network overhead depending upon how far your certificates need to travel to get the extra authorization.
Notice how I just kept copying and pasting the Begin-End Certificates under each other, starting from the lowest level certificate first.
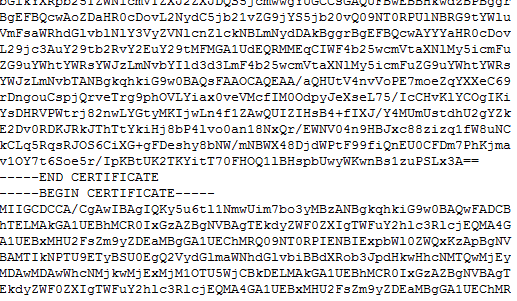
Finally, I save it as a .CRT Extension
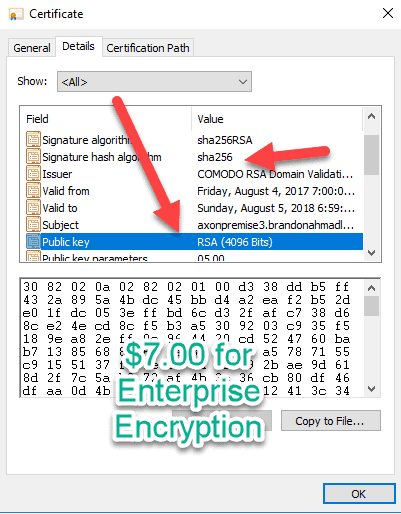
And now notice here that the sha1 nonsense has left as well as the fully exploitable 1024 keys. I paid $8.00 for some real enterprise encryption by a Microsoft certified, official, trusted Certificate authority that I can use for testing. For those of us in ERP systems, this matters a lot. We can’t afford to deploy something to production and watch something happen like a warehouse being unable to fulfill orders because we didn’t test out the encryption with the hardware. I’ve worked with several devices using AX that costs thousands of dollars. $7.00 isn’t much to be current on protection standards.
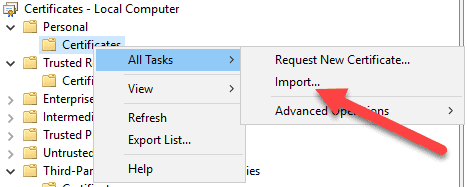
Ninth, import and export the certificate.
Remember, earlier in this blog post when I talked about needing the private key in the likely event that you need to use the certificate for more than one server. Let’s talk about how to do that right here. Remember, the private key is the real decrypter. If somebody has it, they can see all your business. You want to protect it like you haven’t protected anything else because of it. When you export a private key, put it somewhere very, very, very safe if you are using that certificate to protect something worth protecting.
So, first, I go to the local computer certificate store and click import.
It will walk you through securing the certificate. This is the key money shot. You need the password to be able to isolate the key from the certificate later on, so that you can always have a copy of your key somewhere for protection.
Once the certificate is imported, right click on it and choose to export it, but choose the option to export with the private key.

It will create a special Personal Information Exchange file which means that it includes the key.

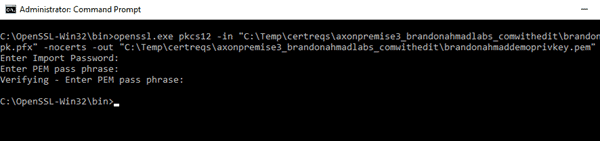
Tenth, now use openssl to get your file ready.
You need to import this to other servers and make sure that you don’t lose your private key. This means that you need to make your private key not exportable but also remove the password from it or it will keep prompting applications for it. You also need to save your private key somewhere safe.
Here I used a command similar to : openssl.exe pkcs12 -in “C:Tempbrandonahmaddemo.pfx -nocerts -out “c:Tempbrandonahmadprivatekey.pem” to output the private key.
Notice how it prompts me for a password before exporting that all so important private key. If you used this method, the passphase is the same as your password protected key.
When it is all done, you should see a special key that you should protect with everything you got if you intend on encrypting something serious with the certificate.

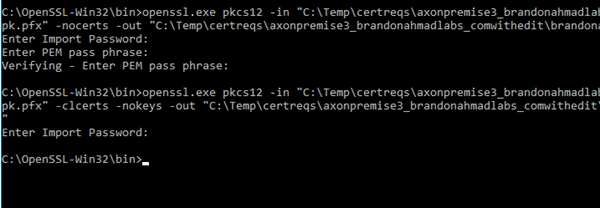
But you still aren’t done. Now export out the certificate without the private key file.
I used something like this to do that:
openssl.exe pkcs12 -in “C:Tempbrandonahmaddemo.pfx -clcerts -nokeys -out “c:Tempbrandonahmadpubliccert.pem”
Or to even make things easier, you use the gui and just export without the private key. This will give you the public certificate which is just fine for someone to see provided that it doesn’t have the key. Now, you can import the key and the certificate in other environments anyway that you like. See tons of blog tutorials with tons of ways to do this.
That’s it. Now, you have a working Certificate. My next blog posts will cover where to put it for Service Fabric and where to put the permissions.
In Summary, I addressed this issue because I had not seen it addressed anywhere, but it could be the single most important issue to getting cloud and noncloud Dynamics Operations (AX 7) installations working. By doing this, the post spills over into several other areas, such as Service Fabric and Azure App Development, but my main focus was for Dynamics Operations (AX 7) development. Now, get ready for what is coming next. From here on out, we will use real certificates (not self-signed) for the rest of this series. This will open the door for us to do some very special, undocumented things with our AX installation in the future.

