Supply Chain and Logistics Management
Configuring Warehouses in D365 Supply Chain Management
 19741
19741 
Mar
Warehouse management systems like D365 Supply Chain Management are a fundamental part of every Supply Chain. More importantly, they can help businesses improve their retail operations and save overall costs while satisfying their demand. After all, the speed of commerce today (especially e-commerce) is forcing companies to respond and meet their demand faster while lowering costs to reach higher profit margins. Which in the end is what all businesses want to achieve—higher profit. Additionally, as e-commerce continues to grow at an incredible pace, distribution and delivery operations require on-point strategies to achieve the business’ objectives.
This is where warehouse management plays a key role in the Supply Chain. Through optimal Warehouse Management, these businesses meet their growing demand while overcoming the constant challenges that they may encounter along the way. Moreover, implementing tools like the Warehouse Management module in Dynamics 365 Supply Chain Management is an excellent way to automate your operations and logistics processes. And, at the end of the day, that will make things a lot easier. That is why, in this article, we are going to talk about how to configure warehouses in D365 Supply Chain Management.
First things first! What is a warehouse and how it works on Dynamics 365?
Warehouses in D365 Supply Chain Management
Let’s start by explaining what a warehouse is.
What is a warehouse?
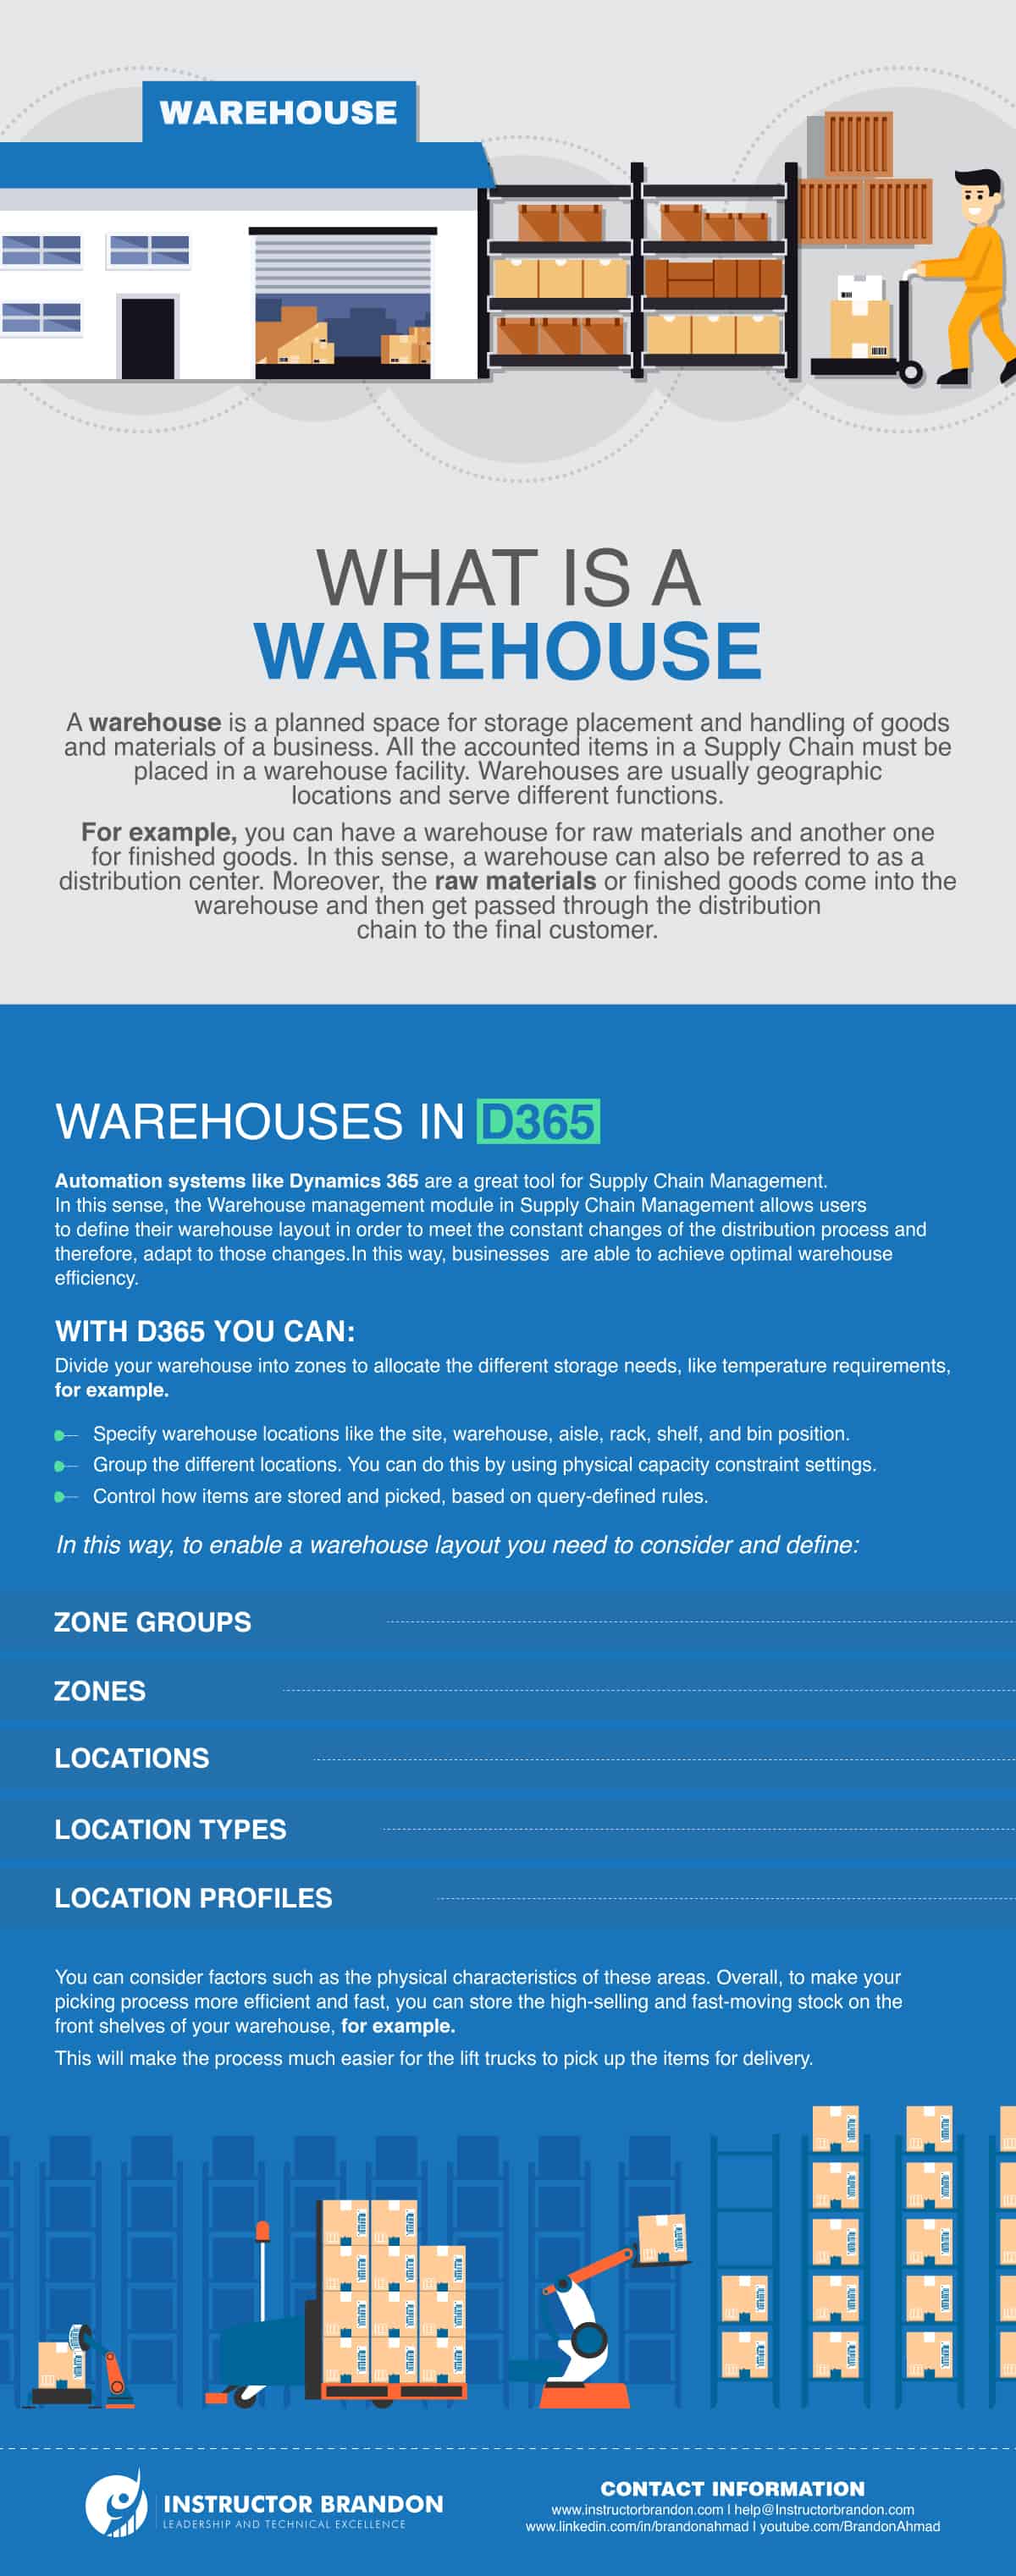
A warehouse is a planned space for storage placement and handling of goods and materials of a business. In other words, all the accounted items in a Supply Chain (Inventory) must be placed in a warehouse facility. Warehouses are usually geographic locations and serve different functions. For example, you can have a warehouse for raw materials and another one for finished goods. Warehouses can also be referred to as distribution centers. Moreover, the raw materials or finished goods come into the warehouse and then get passed through the distribution chain to the final customer.
Warehouses in Dynamics 365 SCM
If there is one thing that helps enhance supply chain operations, it is automation systems like Dynamics 365 Supply Chain Management. But why is that the case? Well, the Warehouse management module in Supply Chain Management allows users to adjust the warehouse layout to adapt to the constant changes in the distribution process. That way, businesses can achieve optimal warehouse efficiency. Moreover, using ERP systems like D365 enhances your business’ operations strategy by automating the different processes that take place in Warehouse Management. You can control, define, and extend different workflows to reach Warehouse Management’s optimal levels.
Warehouse Layout in D365 Supply Chain Management
For starters, since warehouses are the storage place for goods and materials, you can establish high-priority and low-priority storage areas for the placement of goods. More importantly with D365, you can:
- First, divide your warehouse into zones to allocate the different storage needs, like temperature requirements, for example.
- Second, specify warehouse locations like the site, warehouse, aisle, rack, shelf, and, bin position.
- Third, group the different locations. You can do this by using physical capacity constraint settings.
- And finally, control how items are stored and picked, based on query-defined rules.
However, to enable a warehouse layout you need to consider and define:
- Zone groups: As the physical grouping of the different zones within a warehouse.
- Location types: The physical grouping of the warehouse locations.
- Zones: As the physical grouping of locations within a warehouse.
- Locations: They allow you to track where the on-hand inventory is stored and picked in a warehouse.
- Location profiles: The physical grouping of locations that have the same warehouse location process policies
Before defining these, consider how the different areas in your warehouses are used for each process. You can consider factors such as the physical characteristics of these areas. For instance, there might be areas where you can use only a certain type of truck and so on. Overall, to make your picking process more efficient and faster, you can store the high-selling and fast-moving stock on the front shelves of your warehouse, for example. As a result, those handling the lift trucks will find the process of picking and delivering the products much easier.
Location stocking limits, location profile, and fixed picking locations
Now, when it comes to choosing location stoking limits, location profile, and fixed picking locations, you must consider the physical layout of the warehouse. This will help you define the warehouse’s storage capacity and facilitate daily operations.
- Location stocking limits: setting location stocking limits allows you to avoid requesting inventory without the adequate physical storage capacity
- Location profile: you can use the location profile settings to set advanced calculations to control the capacity constraint of each location (weight and volume). In other words, location profiles can be used as filtering options to control the different warehouse management processes.
- Fixed picking locations: you can define the locations per product or product variant.
Defining locations is very important. After all, having a general overview of your warehouses’ locations will allow you to plan, allocate, and optimally use your resources. Poor warehouse location visibility can result in delayed picking and order fulfilments. This can severely impact your delivery time and overall costs. Let’s now continue by talking about the warehouse-related processes in Dynamics 365.
Warehouse processes in D365 Supply Chain Management
As part of the configuration process, you need to enable warehouse processes according to your business requirements. In other words, you must configure wave templates, work templates, work pools, and location directives. Let’s start with Wave Templates
Wave templates
The wave template functionality is used to enable the outbound release warehouse process as soon as the order lines are released. Moreover, you can create three types of wave templates:
- Shipping
- Production order
- Kanban
A wave template is selected based on the wave template sequence and criteria that are specified in each template. You must specify the wave process methods in each one of these. The available methods vary depending on the type of wave template.
Work templates
Work templates define the “what” and “how” of the work performed. They specify the criteria of the work. These work templates can also link to a location that determines where work is performed. Additionally, each template must include at least one Pick operation and one Put operation to drive the basic operation of transferring on-hand inventory from one location to another. Let’s continue with work pools.
Work pools
Work pools organize work into different groups. You can create a work pool to classify the work of a particular warehouse location. Keep in mind that for all work types – except for counting – you can assign a work pool to a work template. Moreover, for cycle counting, you can assign a work pool to the following Cycle Count pages:
- Plans
- Thresholds
- Work by location
- Work by item
When you use work templates to create work, the work pool is automatically assigned to the work.
Finally, we have Location Directives.
Location directives
Location directives are used to direct several work transactions to their respective locations around the warehouse. Now it’s time to talk about the different warehouse types and how they work with Dynamics 365
Warehouse types
There are different warehouse types that you need to define to create your warehouse. According to Microsoft, these are the types of warehouse:
- Default – The main warehouse.
- Quarantine – Attach warehouses of the Quarantine type to regular warehouses of the Default type. When you purchase items that are quarantine-controlled to a warehouse, they are automatically put in the warehouse of the Quarantine type that is attached to the receiving warehouse. When you end the quarantine, the items are then transferred to the specified receipt warehouse.
- Transit – Use for transfer orders and the delivery date control function. Transit warehouses are the system-technical intermediary warehouses between the From and to warehouses, or warehouse and delivery location with the delivery date control functionality.
Inventory aisles
Warehouses are divided into Inventory aisles. These inventory aisles group different locations. Every aisle has its ID and aisle number which helps to identify each aisle in the warehouse. The aisle number helps the system generate sorting codes.
Location
The locations indicate where the items are stored in the warehouse. Items are usually stored and drawn from the same location. Locations have different characteristics:
- Size: in here you have height, width, depth, and volume
- Warehouse, rack, aisle, bin position, etc.
- Location type: there is picking location, bulk location, inbound dock, outbound dock, production input location, inspection location, etc.
- Check text to verify that the operator has selected the right location for an item
Location placement
There are two ways to categorize location placements when configuring your warehouse. First, Input areas. That way, items are grouped based on similar characteristics or according to the order in which they are placed in their locations. For example, items that require specific storage temperatures must be located in one input area, whereas items that can be stored in the general warehouse storage area would be in another and so on. Then, there are Picking areas. These areas group items that are supposed to be picked at the same time or by the same person.
Warehouse items
Warehouse items can define multiple products. Once you create D365 and set up your warehouse with aisles, locations, and zones, you can proceed to assign products to their respective warehouse.
When creating warehouse items, you can enable these options:
- Counting group: this option determines the frequency of cycle counting.
- Default receipt location: this option defines the location used by default when an item is received.
- Default issue location: this option defines the location used by default when an item is delivered.
- Picking location: this option defines the default location of an item that needs to be picked
Moreover, the Default receipt location, Default issue location, and Picking locations fields are only available if the storage dimension group that is assigned to an item has the Location dimension activated. Also, these fields are not available for the default blank warehouse items that are created by the system. Now that we’ve tackled the basics, it is time to explain how you can create a warehouse in D365.
How do you create warehouses in D365 Supply Chain Management?
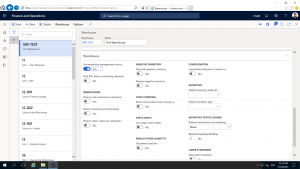
Step 1: Create a new warehouseFirst, you need to go to the Navigation Pane. Click Modules > Inventory management > Setup > Inventory breakdown > Warehouses and select New |
 . . |
 . . |
Step 2: Add the valuesSecondly, you need to type the respective values in the Warehouse, Name, and Site field. |
Step 3: set the use of the warehouse management processesFinally, expand the Warehouse section, set the Use Warehouse Management Processes option to Yes and, close the page. |
 |
If you also want to define a location format, you must do the following:
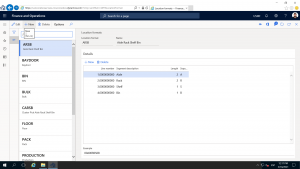
Step 1: create a new location formatFirst, in the navigation pane click Modules > Warehouse management > Setup > Warehouse > Location formats and then click New |
 |
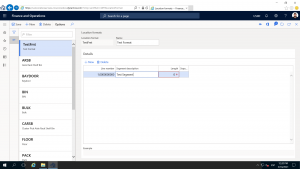 |
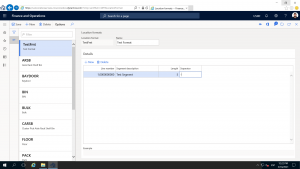
Step 2: add the values to the respective fieldsFirst, go to the Location format field and type a value. |
Step 3: Determine the location nameFirst, go to the Length Field and enter a number to determine how many characters the location name must have (it must be less than 10). |
 |
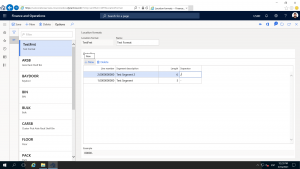 . . |
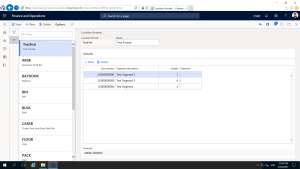
Step 4: add the respective descriptionsFirst, in the Details section, click New. Then, in the Segment description field, enter a value. |
Step 5: add values to the rest of the fieldsProceed to go to the Segment description field, type a value. Then in the Length field, enter a number. |
|
There you go! Now you know how to configure warehouses in D365. With that in mind, let’s look at how proper warehouse management can boost your business’ profits.
How Does D365 Supply Chain Management help boost profits?
There are a lot of ways in which optimal warehouse management can contribute to the profitability of a business. With an efficient Warehouse Management System, you can:
- Smooth out the fluctuations in your Supply and Demand to improve customer satisfaction
- Eliminate Stock-Outs: Since you now can smooth out the fluctuations in your Supply and Demand, you can also avoid stock-outs while having orders fulfilled on time. It also helps save time by holding and splitting orders, paying for shipping, and providing employees with accurate stock levels
- Manage your labor costs efficiently. Factors such as data entry, picking, and packing contribute to more effective use of labor and the potential reduction of errors when transferring goods
- Improve planning and forecasting: By tracking your inventory and sales data, you can plan for high-volume product requirements. Therefore, you will be able to forecast which areas of the warehouse you need to free up, or if you need additional staff
These are only a few ways in which warehouses and optimal warehouse management can result in profit. It is always best if you have the best resources to achieve efficient and effective management.
Finally: Configuring Warehouses in D365 Supply Chain Management
Configuring Warehouses in D365 is the first step to start better Warehouse Management. Transitioning from a traditional Warehouse Management to an automated system like Dynamics 365 is a game-changer.
Thank you for reading this part of our Supply Chain Series. If you have any questions, leave us a comment in the section below and we will get back to you. Additionally, make sure to stay tuned for our next blog post where we will talk more about this and other related topics.
[sc_fs_multi_faq headline-0=”h2″ question-0=”What are warehouses in D365? ” answer-0=”A warehouse is a planned space for storage placement and handling of goods and materials of a business. Read more in our article. ” image-0=”” headline-1=”h2″ question-1=”How to configure warehouses using d365? ” answer-1=”Configuring Warehouses in D365 is the first step to start better Warehouse Management. You can read more on our blog. ” image-1=”” headline-2=”h2″ question-2=”How to create a warehouse in d365?” answer-2=”First, you need to go to the Navigation Pane. Click Modules > Inventory management > Setup. You can read more on our blog. ” image-2=”” headline-3=”h2″ question-3=”What are the warehouse processes in D365? ” answer-3=”As a part of the warehouse process, you must configure wave templates, work templates, work pools, and location directives. You can read more on our blog. ” image-3=”” headline-4=”h2″ question-4=”How to create a warehouse layout?” answer-4=”You can read more about layout optimization on our blog. ” image-4=”” count=”5″ html=”true” css_class=””]Furthermore, if you want to learn how to leverage your business data using Supply Chain Management, you can reach out to us here. This has been Brandon Ahmad, founder of Instructor Brandon and Dynatuners.


Everything is very open with a really
clear description of the challenges.
It was really informative.
Your website is very helpful.
Thank you for sharing!