Data Model Series, Dynamics 365 Tutorials
Techno-functional Dynamics 365 F&S Data Model Explanations for Reporting, Part 5 of 25 – Vendor Creation Process
 11213
11213 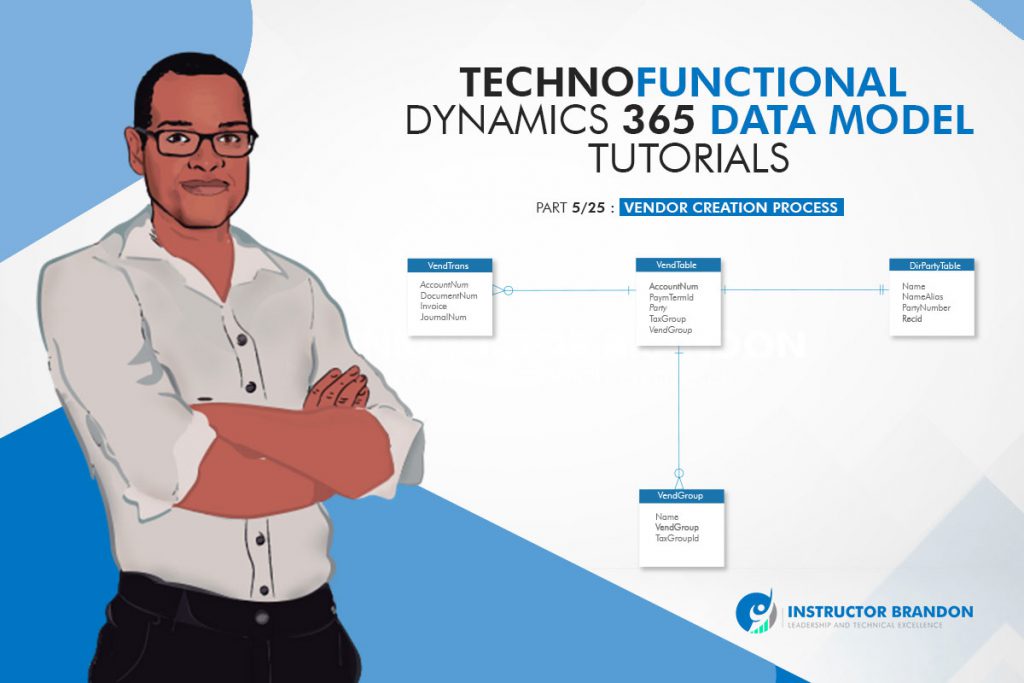
May
Things have changed a lot since I started blogging over a decade ago. There are so many wonderful topics to blog and learn on today; it seems like one doesn’t even know where to start. To make the process more friendly, I’ve introduced a new sort of post — the hybrid video/blog tutorial. In this series, we will produce a video and blog for every topic covered. Some very talented developers from my team have contributed their expertise to assist with this content/video approach to ensure that we keep our quality and quantity high. I hope you all sincerely enjoy the new approaches that we’ve innovated.. And as always, don’t hesitate to reach out to me.. I’m always here to help. — Brandon Ahmad

Vendor Creation Process
Understanding the vendor creation process in Microsoft Dynamics 365 is a fundamental skill to make sense of the data model in a better way. Information like this is normally hard-learned through trial and error. We’ve compiled the basics of what you need to know right here to create your vendor. You’ll need this information when searching for specific information about vendors and transactions. This tutorial will make a lot of work on the fly in an instant and it’s well worth the investment.
In this Microsoft Dynamics 365 tutorial, you will get to learn first-hand the functional process to create a vendor in Microsoft Dynamics 365. We will then discuss the related technical data model later in the blog.

Vendor Creation Process: Dynamics 365 Functional Walkthrough
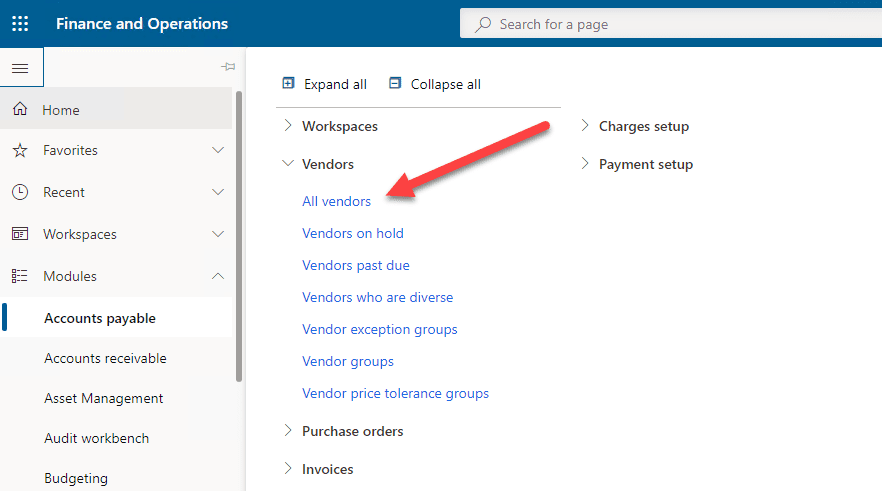
Step 1:
First, open the Dynamics 365 client in your browser and locate the ![]() symbol in the upper left-hand corner. Next, go to the ‘Accounts payable’ module from the list. Then go to ‘Vendors’ and click on ‘All Vendors.’
symbol in the upper left-hand corner. Next, go to the ‘Accounts payable’ module from the list. Then go to ‘Vendors’ and click on ‘All Vendors.’
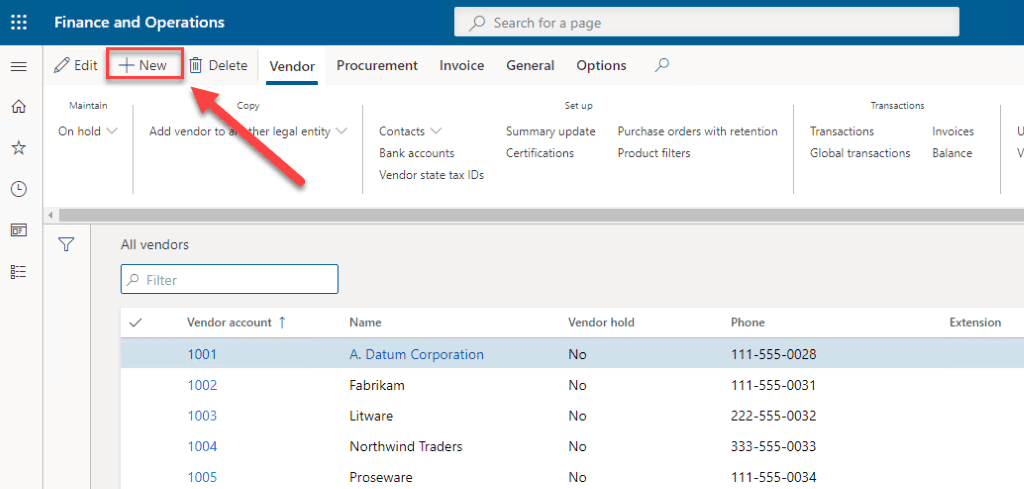
Step 2:
Here you’ll see that the vendor list page will be opened. Now simply click on the ‘New’ button to create a new vendor.
Step 3:
Once you click on the ‘New’ button, this will open the vendor creation form. The following highlighted fields need to be filled in to create your new vendor. After filling in the highlighted forms, simply click ‘Save’ in the top left corner to finish creating your vendor.

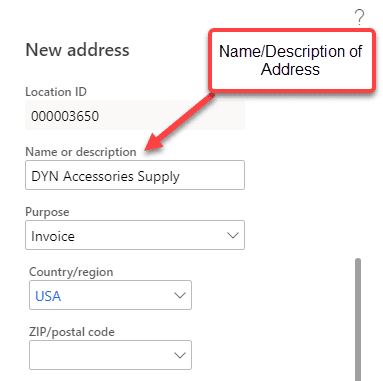
Step 4:
After saving your newly created vendor, open the ‘Addresses’ tab, and click on ‘Add’. Now to enter the address of the vendor. Be sure to add the vendor ‘Name or description’ of address in the titled field to segregate from other addresses.
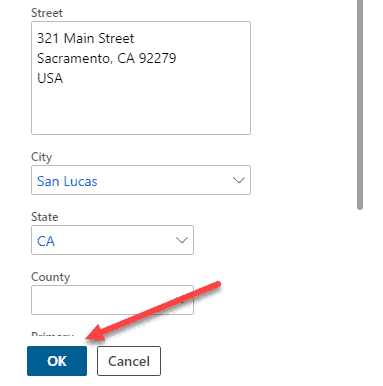
Step 5:
After that, simply click ‘Ok’ to create the address.
Step 6:
Now, open the ‘Contact Information’ tab and click on ‘Add’ to create contacts for your new vendor.

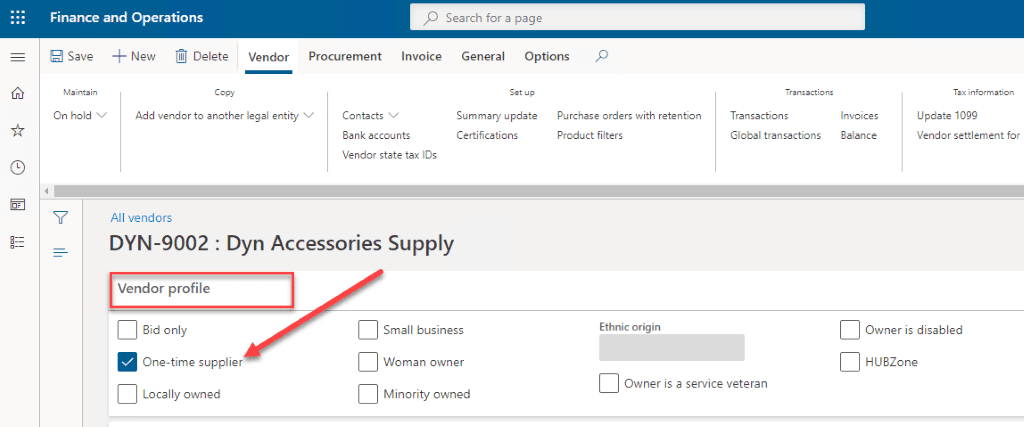
Step 7:
Open the ‘Vendor Profile’ tab and select the appropriate profile for your vendor from the following check-box options:
Vendor Creation Process: Dynamics 365 Technical Walkthrough
Entity Relationship Diagram:
In the graphic below you can see the principal tables behind our functional walkthrough. This ERD illustrates the relationships between tables and logical structures of related tables.

Here is the Runnable class(job),
[sourcecode language=”c-sharp”] class ibVendorCreationJob
{
public static void main(Args _args)
{
VendTable VendTable;
NumberSeq numberSeq;
Name name = ‘Union states’;
DirParty dirParty;
DirPartyPostalAddressView dirPartyPostalAddressView;
DirPartyContactInfoView dirPartyContactInfo;
DirPartyTable dirPartyTable;;
ttsBegin;
VendTable.initValue();
try
{
//VendTable
numberSeq = NumberSeq::newGetNum(VendParameters::numRefVendAccount(), true);
numberSeq.used();
VendTable.AccountNum = numberSeq.num();
VendTable.VendGroup = ’30’;
VendTable.Currency = ‘USD’;
VendTable.PaymTermId = ‘Net45’;
VendTable.PaymMode = ‘CHECK’;
VendTable.insert();
dirPartyTable = DirPartyTable::findRec(VendTable.Party, true);
dirPartyTable.Name = name;
dirPartyTable.update();
//DirParty
// Creates a new instance of the DirParty class from an address book entity that is represented by the VendTable parameter.
dirParty = DirParty::constructFromCommon(VendTable);
dirPartyPostalAddressView.LocationName = ‘HeadQuarters ‘;
dirPartyPostalAddressView.City = ‘São Paulo’;
dirPartyPostalAddressView.Street = ‘4th Avenue’;
dirPartyPostalAddressView.StreetNumber = ’18’;
dirPartyPostalAddressView.CountryRegionId = ‘BRA’;
dirPartyPostalAddressView.State = ‘SP’;
// Fill address
dirParty.createOrUpdatePostalAddress(dirPartyPostalAddressView);
dirPartyContactInfo.LocationName = ‘Contact Phone’;
dirPartyContactInfo.Locator = ‘561291156431’;
dirPartyContactInfo.Type = LogisticsElectronicAddressMethodType::Phone;
dirPartyContactInfo.IsPrimary = NoYes::Yes;
dirParty.parmName(name);//(‘Teera7878’);
// Fill Contacts
dirParty.createOrUpdateContactInfo(dirPartyContactInfo);
info(strFmt("Your vendor has been created."));
ttsCommit;
}
catch(Exception::Error)
{
//ttsAbort;
throw Exception::Error;
// throwException::Error;
}
}
}
[/sourcecode]
VendTable
The VendTable contains vendors for accounts payable in Dynamics 365. This is called a master table, as it stores the header information of vendors. This table can perform various other important functions, which are listed below:
- getting the vendor details from the stored information of vendors by simply entering vendor account number.
- checking whether a particular vendor is blocked or opened for business.
- extensive reporting data in Dynamics 365 such as Vendor account statement, Vendor aging report, History by transaction, etc.
The table below shows a few other important fields in the VendTable. You can also find respective descriptions and technical information below which are helpful for better understanding.
| Field | Data Type | Description | |
| AccountNum | string | This field contains Vendor Account for Vendor. | |
| VendGroup | string | It has information of Vendor Group. | |
| PaymentTermId | string | It contains Terms of Payment. | |
| InvoiceAccount | string | It contains the account number on which invoice will be posted. | |
| ItemBuyerGroupId | string | It has location information for which purchase order is created. | |
| InventSiteId | string | It stores the site information. |
VendTrans
The VendTrans table contains the transaction information of each vendor. This way it keeps a record of information of all the vendors that are posted and can track any vendor when needed. It also:
- contains the voucher details, which are very helpful for tracking transactions.
- helps to create reports (like mentioned above) in Dynamics 365.
The important fields of the VendTrans table along with some technical information are mentioned below.
| Field | Data Type | Description | |
| Voucher | string | This field contains Voucher Number | |
| Invoice | string | It has information of Vendor Invoice Id. | |
| AccountNum | string | It contains information about Vendor Account for Vendor. | |
| PostingProfile | string | It has information about Vendor Posting Profile. | |
| Approved | enum | It stores Information about the Approved status. | |
| JournalNum | string | It contains Journal Number. |
DirPartyTable:
This table contains all the parties. The global address book stores all the people and organizations that are used in the system. Depending on vendor type, the global address book considers the vendors as parties. The field name is a lookup field in vendor creation form, and it contains the global address book.
Given below are the important fields of the DirPartyTable, along with some technical information:
| Field | Data Type | Description | |
| Name | string | This field has the information of Name (vendor name). | |
| NameAlias | string | This field contains Name Alias i.e. Search Name | |
| PartyNumber | string | The Party Number, which identifies the type is found in this field. |
Summary
In this article we covered the vendor creation process for creating a new vendor in Microsoft Dynamics 365. You learned step by step how to create a new vendor, and the relevant data models and tables for analyzing the information contained in vectors. Congratulations! The vendor creation process is a valuable and important step that brings you one step closer to mastering Microsoft Dynamics 365.
We hope you enjoyed this Microsoft Dynamics 365 techno-functional tutorial. You can learn more about Dynamics 365 by reading our other articles here.
We sincerely hope that you enjoyed part 5 of our exciting series on the Dynamics 365 data model. We aim to provide quality service at all times. And as always, if you need to reach me, you know how to get in touch by reaching out to me here. — Brandon Ahmad, founder of InstructorBrandon and Dynatuners

