Consulting, Development
Tutorial Avoid warehouse drama and post Product Receipts with PurchFormLetter
 14043
14043 
Feb
Sometimes, I have to fix really nasty warehouse integrations – you know where inventories are not posting correctly and general ledger transactions are messed up. I can tell you that 9 out of 10 times this happens because someone tried to get fancy and didn’t use the built-in, ease of use ways for posting. Especially when inventory is bad, start with product receipts. You see, there are common errors that developers make when posting them. So, let’s review how to post them and we’ll do something in code that I haven’t seen covered anywhere — how to write code so that we properly post product receipts to specific PO lines. There are three ways to go about ensuring that your product receipts (aka packing slips) post correctly.
Once Again, this cannot be found in any courseware. This strictly comes from experience and the code is mine. So, please keep that in mind.
Here are the three easiest ways:
- Data Import Export Tool (or DMF or DIXF) – shoot, this is like using a wizard. Heck yes, you want to use it. However, as of this date (they keep adding to this tool every few months and making it better), the built-in entities don’t cover many of the advanced scenarios with Purchase Orders such as Fixed Assets and Project Module adequately (from what I find). This isn’t to say that you can’t add it or that it won’t be better in the future.
- Document Services – been around forever but you have to customize these services heavily to get past basic functionality
- My personal hero: PurchFormletter classes. This isn’t as easy to setup as the Data Migration Framework (using old school name because old habits are hard to break) but it will get the job done and get it done right over and over again — the safest way to ensure that complicated postings go to the right place.
I’ll dedicate this post to my old friend, the PurchFormletter class (DIXF for another day).
DON’T RISK THE DRAMA of embarassing integrations. Use our hero, the PurchFormLetter framework. Basically, the PurchFormletter classes include logic to do everything that you need with Purchase Orders – including invoices, versions of purchase orders, ect.
So, let’s take a typical scenario that often gets broken on a warehouse integration gone bad, resulting in all kinds of bad blood between a company and a consulting firm. Some company needs to post Product Receipts to specific lines on a PO. Seems easy enough, but here is where things go bad, they need to make sure that the data is updated in all the places where it is supposed to be located – yes, that means any submodules like project module, inventory postings, ect. If you profile this with a sql trace, you will see that it usually entails changes to over 13 tables (and it will probably change after the schema get more complicated again).
Now, let’s see our hero in action:
First, Create a job in the AOT called PurchAwesome
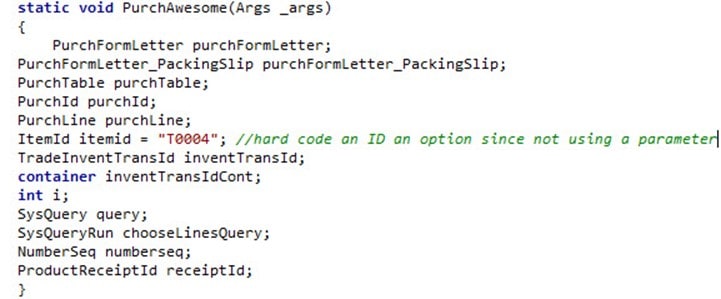
Second, let’s add some variables now
For copy and paste you can paste the following code. Not, we will hard code everything in the job.
PurchFormLetter purchFormLetter;
PurchFormLetter_PackingSlip purchFormLetter_PackingSlip;
PurchTable purchTable;
PurchId purchId;
PurchLine purchLine;
ItemId itemid = “T0004”;
TradeInventTransId inventTransId;
container inventTransIdCont;
int i;
SysQuery query;
SysQueryRun chooseLinesQuery;
NumberSeq numberseq;
ProductReceiptId receiptId;
Or the Screenshot:
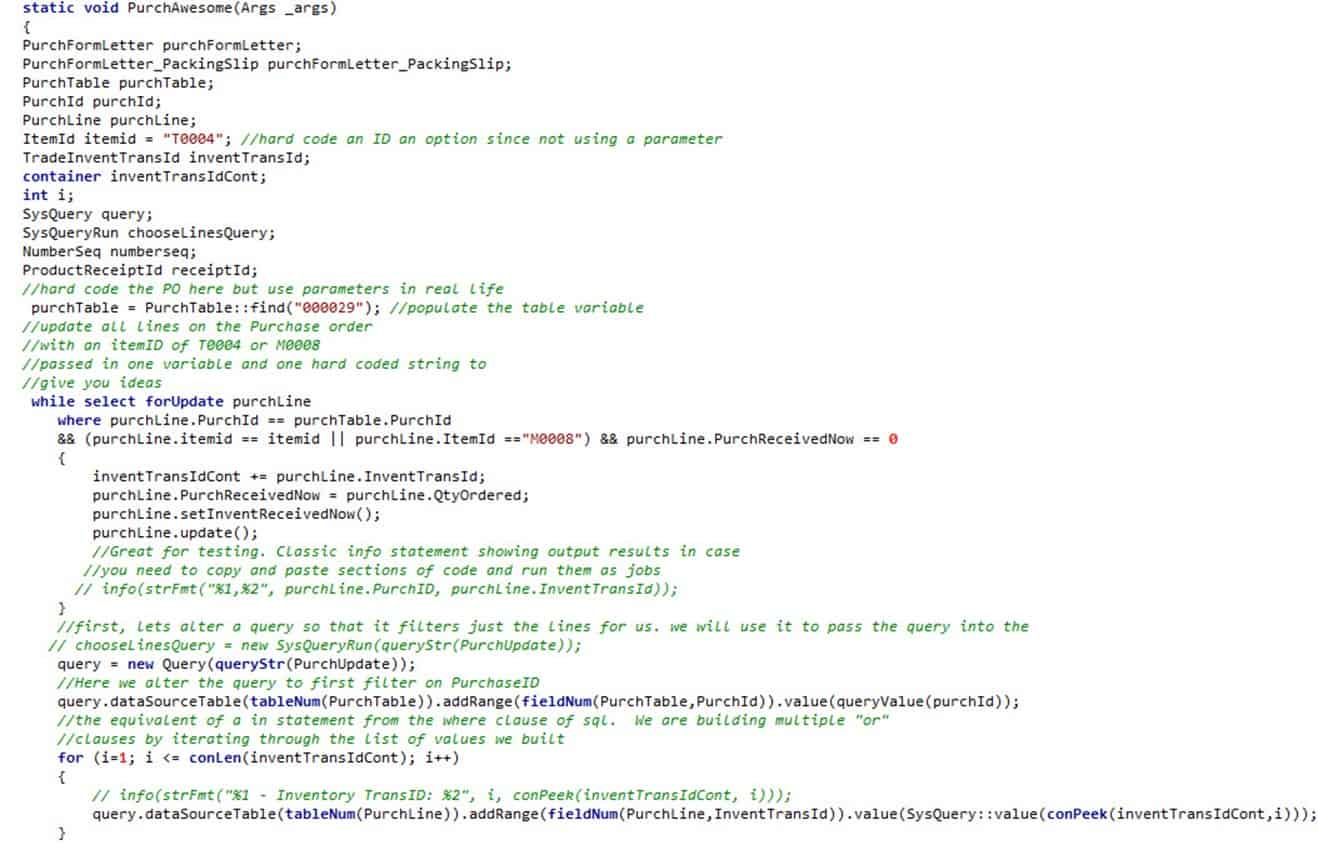
Third, let’s now build a query where we update the purchase lines. This is where most mistakes are made.
Under experienced developers only update the Purch and Purchline tables while forgetting the other stuff.
That messes up the underlying subledgers. Also note that we populated a container called “inventtransidcont”
With the unique identifier of each PO line for our query.
purchTable = PurchTable::find(“000029”);
purchId = purchTable.PurchId;
while
select
forUpdate purchLine
where purchLine.PurchId == purchTable.PurchId
&& (purchLine.itemid == itemid || purchLine.ItemId ==“T0004”) && purchLine.PurchReceivedNow == 0
{
inventTransIdCont += purchLine.InventTransId;
purchLine.PurchReceivedNow = purchLine.QtyOrdered;
purchLine.setInventReceivedNow();
purchLine.update();
}
Fourth, now in AX, there are certain things that you copy and modify so that they work the way you want them to work.
Queries are a classic case. There is a special query called “PurchUpdate” which you can use for updating PO lines.
But you need to tell it which lines to update. For the sql people out there, think of the term Range as the equivalent
Of the “where” clause in SQL (a simplification but you get the main idea). What we will do here is add the unique
Identifier for each purchase order line to the where clause of the query. So, for the sql ones of you, think of it
Like the “in” clause (Select something from sometable where UniquePO in (polineunique1,polineunique2,polineunique3).
query = new Query(queryStr(PurchUpdate));
query.dataSourceTable(tableNum(PurchTable)).addRange(fieldNum(PurchTable,PurchId)).value(queryValue(purchId));
for (i=1; i <= conLen(inventTransIdCont); i++)
{
query.dataSourceTable(tableNum(PurchLine)).addRange(fieldNum(PurchLine,InventTransId)).value(SysQuery::value(conPeek(inventTransIdCont,i)));
}
Here is the updated screenshot:
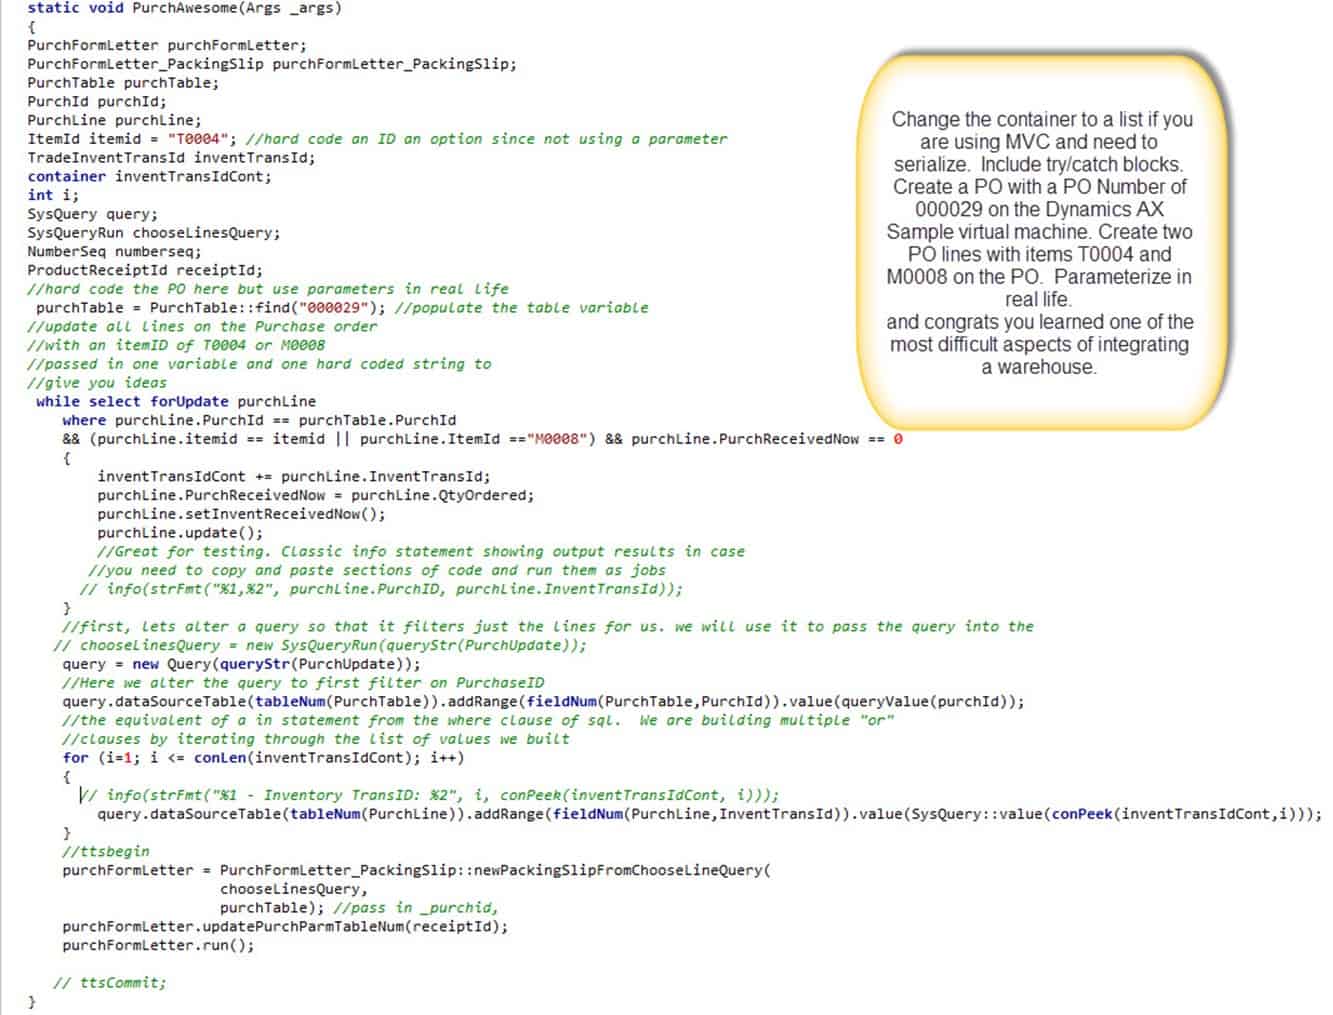
Fifth, at this point, realize that all that we have really done is update the “PurchLine” Table and add multiple
Purchase Line id’s to our query. Now, for the PurchFormLetter classes to work, they need a query of type
SysQuery, which can basically be converted to any query type. Here, we will convert our query to a
Sysquery. We also need to create new product receipts (aka packing slips in this case), which requires
That each packing slip have a unique identifier. The way that we provide a unique identifier is through
A number sequence. Here, I will just use a built-in number sequence, but I would normally create my own
Number sequence to use here. Google how to create number sequences if this concept is new to you.
chooseLinesQuery = new SysQueryRun(query);
numberseq = NumberSeq::newGetNum(NumberSeqReference::findReference(extendedTypeNum(PurchCORPackingSlipId)), true);
receiptId = numberseq.num();
Sixth, now comes the most critical step and the easiest one. Create a Packing slip and make sure
That it hits all the right tables. This simple code does that for us. You call a static method
which is called “newPackingSlipFromChooseLineQuery”. It does just what it says, it creates packing
slips based on the query that was provided earlier with the purchase lines for update. It then makes
sure that all the postings go to the right place. The advantage here is that your transactions match
the lines correctly, not to mention the other goodies you can do here like allocate fixed assets
and project postings. And look, just 2 lines of code though one has 3 parameters:
purchFormLetter = PurchFormLetter_PackingSlip::newPackingSlipFromChooseLineQuery(
chooseLinesQuery,
purchTable); //pass in _purchid,
purchFormLetter.updatePurchParmTableNum(receiptId);
purchFormLetter.run();
And here is how it should all look in the end.
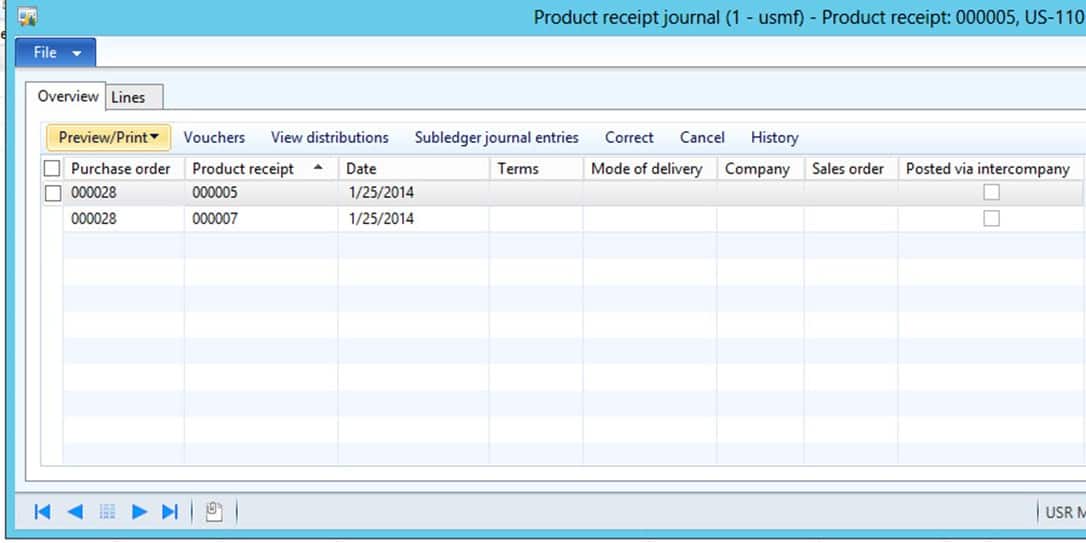
Finally, here is a screenshot of a PO that I created with a different PO number(000028) but same item numbers. If you understand this, congratulate yourself. I go to a lot of places and fix code. Trust me, when I say that you have learned how to do something that many AX experienced developers have trouble with.. You can build on this for custom services and all sorts of things with the FormLetter framework It really is powerful.
Note, please, please please forgive the late responses to emails. I promise that it is only because of my 80 work weeks and I don’t mean to ignore anyone. It takes a lot to be an AX technical architect. I’ve done and seen everything in AX lately – okay, probably not, but it sure feels like it… Anyway, look forward to the next post!

