Data Model Series, Dynamics 365 Tutorials
Techno-Functional Dynamics 365 F&S Data Model Explanations for Reporting, Part 21 of 25: Inventory Transfer Journal Process
 16612
16612 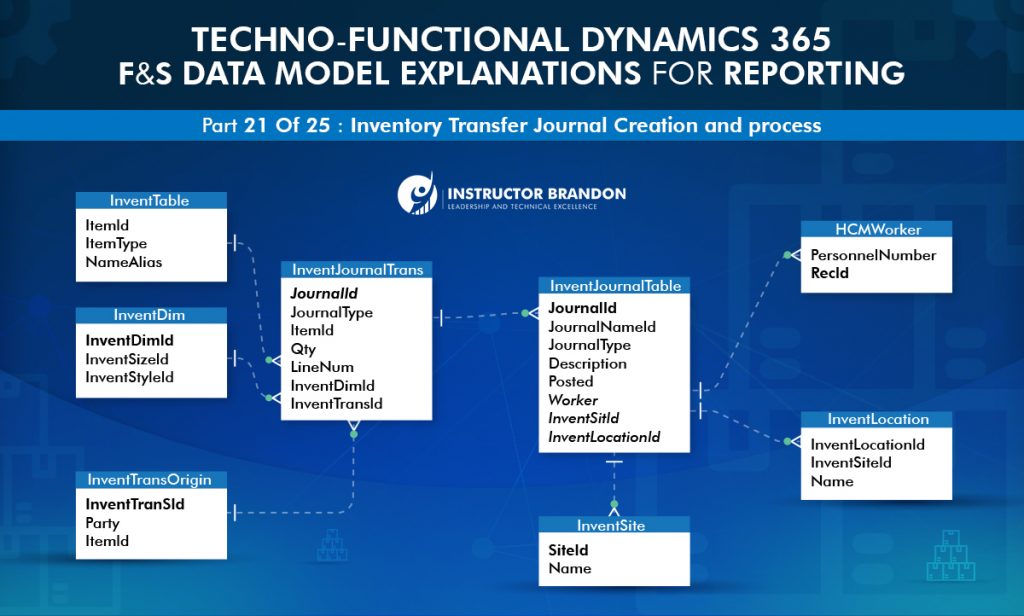
Nov
Inventory Transfer Journal Process in Microsoft Dynamics 365
Inventory Transfer Journal is a document through which inventory can be transferred from one warehouse to another, within a company. Many times, the site of ‘sending’ warehouse and ‘receiving’ warehouse could be different.
Let us first discuss Inventory Transfer Journals through an example:
Suppose Walmart has multiple branches in California, and California is declared as one site. We are also going to suppose that a separate warehouse is attached to both stores.
In the 1st store of this California site, chocolates have almost finished; they remain in little quantity. In the 2nd store, chocolates exist in extra quantity.
The fastest way to transfer the stock of chocolates from the 2nd store to the 1st is to directly transfer them.
To complete this task, the Inventory Management worker will create a ‘Transfer Journal’ and directly ship chocolates from the 2nd warehouse to the 1st warehouse.
Inventory Transfer task can also be done by using various other documents such as sales order, purchase order or transfer order. However, keeping this in mind, it is still quicker and less complicated to use Inventory Transfer Journals.
In Dynamics 365, Inventory Transfer journals work this way. When an Inventory Transfer journal gets posted, two inventory transactions are created in the system.

- Item Number
- Quantity (with the negative value)
- The warehouse (where the negative value exists)
In Dynamics 365, this kind of transaction is known as ‘Issue’ and it will deduct the transferred quantity from said warehouse.
The 2nd transaction will be containing the same item number, same quantity but in positive (+) value and to the other warehouse. This transaction is known as ‘Receipt’ in Dynamics 365.
Let’s move on to the next step in which we will create Inventory Transfer Journal in Dynamics 365.
Functional Overview: Inventory Transfer Journal Process
Step 1: Inventory Management
- Open Dynamics 365 client in Internet Explorer and navigate to modules; then select Inventory Management module.

Step 2: Journal Entries
- In Inventory management module, expand the Journal entries tab. Then, in Journal entries tab, expand Items tab and click on Transfer.

Step 3: Inventory Transfer Journal
- Inventory transfer journal form will be opened after this step, and all the existing inventory transfer journals will come in display (if there are any). In case you want to create a new Inventory Transfer journal, click on +New button.


Step 4: Create Inventory Journal
- On clicking +New button, the Create Inventory Journal form will slide in from the right side of the window.

- Input these values in form:
| Field Name | Value |
| Name | ITrf |
| Description | Inventory transfer journal |
| Site | 1 |
| Warehouse | 12 |
| Selection by | Posting |
| Detail level | Summary |

Step 5: Create a Journal
- After this, click the OK button on form to create a journal (after giving input values).

Step 6: New Inventory Transfer Journal
- By clicking OK, a new inventory transfer journal will be created and a details form will be opened. However, the Journal lines tab will be empty at this point.

Step 7: Journal Lines
- In Journal lines tab, click on +New button to add a line in grid.

Step 8: Select Desired Item Number
- In journal lines tab, click on Item number drop-down and select desired item number. After you are done with this step, you have to go to the In To site drop-down, select 1. In Quantity field, and keep input at 15.

Multiple lines can be added in this grid to transfer multiple items.
Step 9: Validate
- Click on Validate button on top of the form.

Step 10: Successful Validation
- After successful validation, info message will appear on form.

Step 11: Post Journal
- Now click on Post button, to post the journal.

On posting the journal, inventory transactions will be created and (15) the quantity of selected items will be deducted from warehouse (12) and added to warehouse (13).
Functional Overview: Inventory Transfer Journal Process in Microsoft Dynamics 365
Entity Relationship Diagram:
In the process of Inventory Transfer Journal creation, two tables are majorly used.
The first one is InventJournalTable (the header table), while the second one is InventJournalTrans table. InventJournalTrans is a ‘transactional’ table and is directly connected to the header table. It also has a JournalId column, having a one-to-many relationship between them.
Apart from these, there are other supporting tables attached to both the header and transactional table.
If you wish to see more details on these, please see the ER diagram given below:

To create and post Inventory Transfer Journal using X++ code in Microsoft Dynamics 365, follow the steps mentioned below:
-
-
- Create new Dynamics 365 project in visual studio 2015
- Create new Data entity in project (Data entity type should be Master and data source should be InventJournalTable)
- Go to methods of data entity and create methods mentioned below
-
{
InventJournalTable inventJournalTable;
NumberSeq numberSeq;
ttsbegin;
inventJournalTable.clear();
inventJournalTable.initFromInventJournalName(InventJournalName::find("ITrf"));
inventJournalTable.JournalType = InventJournalType::Transfer;
inventJournalTable.Description = "Inventory Transfer Journal";
inventJournalTable.insert();
ttscommit;
return inventJournalTable;
}
/// <summary>
///
/// </summary>
public JournalId initTransferJournalLines()
{
InventJournalTrans inventJournalTrans;
InventDim frominventDim,ToinventDim;
try
{
ttsbegin;
inventJournalTrans.clear();
inventJournalTrans.initFromInventJournalTable(this.initTransferJournalHeader());
inventJournalTrans.ItemId = "M0002";
frominventDim.InventLocationId="12";
frominventDim.inventSiteId ="1";
ToinventDim.InventLocationId = "13";
ToinventDim.InventSiteId ="1";
ToinventDim = InventDim::findOrCreate(ToinventDim);
frominventDim = InventDim::findOrCreate(frominventDim);
inventJournalTrans.InventDimId = frominventDim.inventDimId;
inventJournalTrans.initFromInventTable(InventTable::find("M0002"));
inventJournalTrans.Qty = 10;
inventJournalTrans.ToInventDimId = ToinventDim.inventDimId;
inventJournalTrans.TransDate = SystemDateget();
inventJournalTrans.insert();
ttscommit;
}
catch
{
error(enum2Str(Exception::CLRError));
}
return inventJournalTrans.JournalId;
}
public void postInventTransferJouranl(JournalId _journalId)
{
InventJournalTable inventJournalTable;
InventJournalTrans inventJournalTrans;
InventJournalCheckPost inventJournalCheckPost;
JournalCheckPost journalCheckPost;
boolean _throwserror=true;
boolean _showinforesult=true;
inventJournalTable = InventJournalTable::find(_journalId);
try
{
ttsbegin;
inventJournalTable.SystemBlocked = NoYes::Yes;
inventJournalTable.update();
journalCheckPost =
InventJournalCheckPost::newJournalCheckPost(JournalCheckpostType::Check,inventJournalTable);
journalCheckPost.parmThrowCheckFailed(_throwserror);
journalCheckPost.parmShowInfoResult(_showinforesult);
journalCheckPost.run();
inventJournalTable.SystemBlocked = NoYes::No;
inventJournalTable.Posted = NoYes::Yes;
select count(RecId) from inventJournalTrans where inventJournalTrans.JournalId == inventJournalTable.JournalId;
inventJournalTable.NumOfLines = inventJournalTrans.recid;
inventJournalTable.update();
ttscommit;
info(strFmt(‘Journal %1 posted successfully’,inventJournalTable.JournalId));
}
catch
{
error(enum2Str(Exception::CLRError));
}
}
Add new Runable class into the project and open it in edit mode. Copy and paste below lines of code into runnable class.
[sourcecode language=”c-sharp”] class CreateInventoryTransferJournalClass{
/// <summary>
/// Runs the class with the specified arguments.
/// </summary>
/// <param name = "_args">The specified arguments.</param>
public static void main(Args _args)
{
InventTransferJournalHeaderEntity headerEntity;
//headerEntity.initTransferJournalLines();
headerEntity.postInventTransferJouranl(headerEntity.initTransferJournalLines());
}
}
[/sourcecode]
Set runnable class as startup object and click on Start button in visual studio.
InventJournalTable:
This table acts as a header table in all Inventory Journal processes.
All the Inventory Journals (Inventory counting journal, Inventory movement journal and inventory transfer journal) headers are stored in this table.
In this table, the major columns are JournalId, JournalNameId and JournalType.
By using column JournalType, the system differentiates whether it is a counting journal, movement journal or transfer journal.
For more details about columns of this table, please follow the table below:
| Field | Data Type | Description |
| JournalId | String | Unique journal Id store in this field. |
| JournalNameId | String | Journal Name (can vary according to setup) store in this field. |
| JournalType | Enum | Type of journal (counting, movement, Transfer) store in this field. |
| Description | String | Description attached to the journal name store in this field. |
| Posted | Enum | Journal is posted or unposted status store in this field. |
| Worker | Int64 | RecId of creator worker from HCMWorker table store in this field for reference. |
| InventSiteId | String | Attached site id store in this field. |
| InventLocationId | String | Attached location/warehouse store in this field. |
InventJournalTrans:
This table contains all the transactions and lines of mentioned journals.
To connect with the header table, it uses JournalId column. Item Id’s used in the journal lines exist in this table (along with quantity and unit).
As we have already established, a journal can have multiple lines; so line numbers are also attached with each record.
For more details, take a look at the table below:
| Field | Data Type | Description |
| JournalId | String | Referenced journal id from header table store in this field. |
| JournalType | Enum | Referenced journal type from header table store in this field. |
| ItemId | String | Selected Item id store in this field. |
| Qty | Int | Inserted quantity of item store in this field. |
| LineNum | Int | Number of line for specific journal store in this field. |
| InventDimId | String | Inventory dimension id (size, color, style) store in this field. |
| InventTransId | String | Referenced Inventory transaction id from InventTransOrigin table store in this field. |
Summary:
To sum it all up, in this blog post Inventory Transfer Journal Process in Microsoft Dynamics 365, we have covered the most important aspects of the Inventory Transfer Journal Process.
In this post , you have:
-
- learnt how to create and post Inventory Transfer Journals in Dynamics 365 F&S
- reviewed the technicalities of create and post Inventory Transfer Journals
- discussed two major tables: InventJournalTable and InventJournalTrans
- discussed ways to use both tables
In addition, we sincerely hope that you enjoyed part 21 of our exciting series on Microsoft Dynamics 365 Data Model. In short we aim to provide quality service at all times. Moreover, if you need to reach me, you know how to get in touch by reaching out to me here. – Brandon Ahmad, founder of Instructor Brandon and Dynatuners.
If you wish to see more from our series, you can visit our website Instructor Brandon for more information. As always, we are available to help with any queries that you may have; leave us a comment in the section below and we will respond you ASAP.

