Data Model Series, Dynamics 365 Tutorials
Techno-functional Dynamics 365 F&S Data Model Explanations for Reporting, Part 7 of 25 – Sales Order Creation Process
 19065
19065 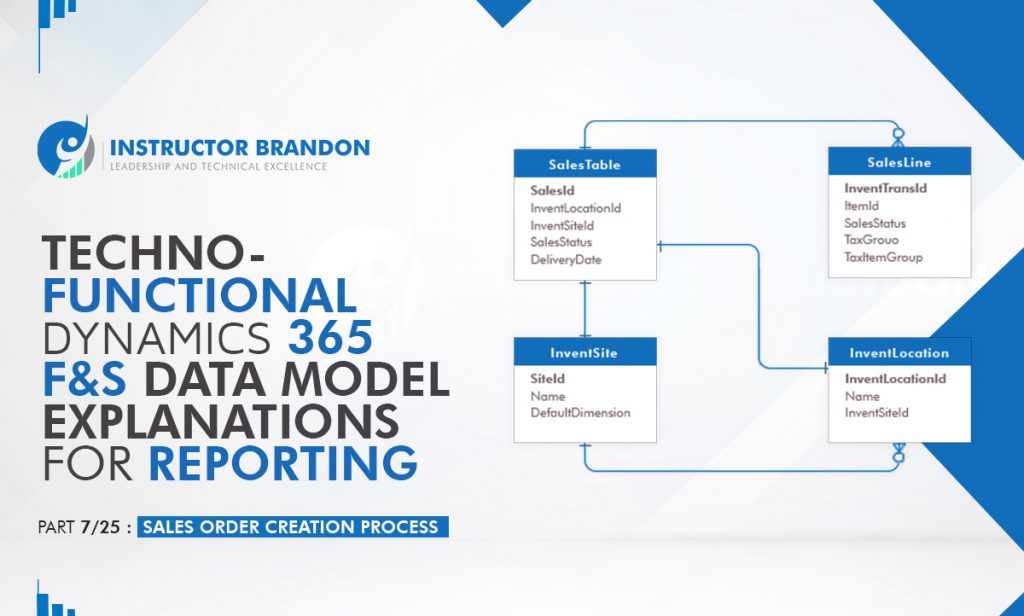
Jun

Dynamics 365 Sales Order Creation
Today, we’re going to look at one of the most frequently customized processes in Dynamics 365 – sales order creation. Learning the functional and technical processes for creating sales order can be daunting at first, but we’re going to break it down step-by-step and take the mystery out with this tutorial. We will begin with the basic functional process before getting into the technical part of the process. You will be pleased to see impressive data model functionality, amazing ERDs, and tables.
Now let’s move on to creating a sales order.
How to Create Dynamics 365 Sales Order Manually: Functional Walkthrough

Step 1
First, locate the icon ![]() in the upper left corner of your D365 client. Then navigate to ‘All sales orders’ by clicking on ‘Modules’ > ‘Accounts receivable’ > ‘Orders’ > ‘All sales orders.’
in the upper left corner of your D365 client. Then navigate to ‘All sales orders’ by clicking on ‘Modules’ > ‘Accounts receivable’ > ‘Orders’ > ‘All sales orders.’

Step 2
After that, locate the ‘+New’ tab at the top left corner and click it. This will direct you to ‘Create sales order’.

Step 3
Locate the ‘Customer account’ field and select any value. After that, its associated information will auto-populate the rest of the sales order header. For the purpose of learning, here we have used the standard Contoso machine as an example.

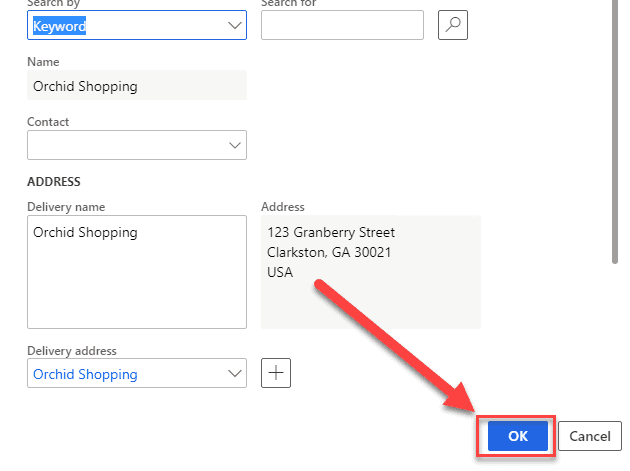
Step 4
Now click ‘OK’ to create the sales order.
Step 5
Now you will be directed to the following display. Click on the ‘Item number’ field and choose any item for your sales order line item.

Step 6

Step 7
Finally, click on ‘Confirm sales order’ to validate that the sales order is legitimate and acknowledged as a valid sales order.

Now, we will move on to the technical part of creating a sales order.
The Data Model Behind Dynamics 365 Sales Order Creation: Technical Walkthrough
We focused on the basic functional process and now we are going to move on to the technical part of creating a sales order.
Entity Relationship Diagram for Creating Dynamics 365 Sales Order
These are some of the important tables involved in creating sales order in Dynamics 365. You can see the primary tables and the cardinality constraints with ‘InventSite’ and ‘InventLocation’

Below you will see a Runnable Class (job) to create the Sales Order by getting the next number sequence of the Sales Order:
[sourcecode language=”c-sharp”] // Using USP2 Contoso Company for sample data.class ibCreateSalesOrder
{
/// <summary>
/// Runs the class with the specified arguments.
/// </summary>
/// <param name = "_args">The specified arguments.</param>
public static void main(Args _args)
{
NumberSeq numberSeq;
SalesTable salesTable;
SalesLine salesLine;
ttsBegin;
numberSeq = NumberSeq::newGetNum(
SalesParameters::numRefSalesId());
numberSeq.used();
salesTable.SalesId = numberSeq.num();
salesTable.initValue();
salesTable.CustAccount = ‘US-020’; // using data from USP2 contoso legal entity
salesTable.initFromCustTable();
if (!salesTable.validateWrite())
{
throw Exception::Error;
}
salesTable.insert();
salesLine.SalesId = salesTable.SalesId;
salesLine.ItemId = ‘M6008’; // using data from USP2 contoso legal entity
salesLine.createLine(true, true, true, true, true, true);
ttsCommit;
info(strFmt("Sales order ‘%1’ has been created", salesTable.SalesId));
}
}
[/sourcecode]
Although there are many tables included in this process, we’re going to focus on two major tables. The two major tables we will focus on are ‘SalesTable’ and ‘SalesLine.’ Let’s go ahead and start with SalesTable.
SalesTable:
This table stores the header information of the Sales Orders and is also called a ‘master table’ for this process in Dynamics 365. This table is extremely useful in Dynamics 365. Let’s have a look at some types of data SalesTable contains:
- It has customer account details which include customer balances and transactions.
- The return orders including updates are processed through this table.
- Simulated delivery dates are helpful to get the available ship and receipt dates, SalesTable have the reference for Simulated delivery dates.
Below, we have listed down other significant fields of the SalesTable along with their respective descriptions.
| Field | Data Type | Description |
| SalesId | string | Unique numeric sales order Id, it is also primary key |
| SalesName | string | Customer name |
| ProjId | string | Associated project Id, if any |
| SalesStatus | Enum | Sales Order status (Open order, Received, Cancelled or Invoiced) |
| InventLocationId | string | Unique id for the location for which Sales Order is created |
| InventSiteId | string | Unique id for Site of location |
| DeliveryDate | datetime | Delivery date for the sales order |
| DeliveryName | string | Title of default Delivery address for customer |
Now let’s take a look at SalesLine.
SalesLine:
The line details of Sales Order are populated in this table, and we can get all the information we added in the Sales Order lines view earlier. Let’s have a look at some characteristics of the SalesLine table:
- Contains item id with product name and variant number
- Multiple lines of single item orders can be stored in the SalesLine table
- SalesLine contains frequently used data for reports such as discounts, taxes, and quantity of past sales of specific items.
Next we will show you a few of the important fields of this table along with the description.
| Field | Data Type | Description |
| ItemId | string | Unique numeric Item Id |
| SalesStatus | Enum | Sales Order status (Open order, Received, Cancelled or Invoiced) |
| TaxGroup | string | Foreign key to look up Tax Group |
| TaxItemGroup | string | Foreign key to look up Tax Item Group |
| SalesQty | int | Quantity of Itemid to be sold |
| CustAccount | string | Foreign key to look up Customer Account |
Overview:
In this post, we:
- covered creating a sales order in Dynamics 365 F&S
- reviewed the technical side of creating a sales order
- discussed two major tables: SalesTable and SalesLine
- discussed ways in which to use both tables.

