Data Model Series, Dynamics 365 Tutorials
Techno-Functional Dynamics 365 Data Model Tutorial Part 15 of 25 – Create Worker Process
Techno-Functional Dynamics 365 Data Model Tutorial To Create Worker Process
Get Microsoft Development Training and learn to create a Department in Dynamics 365 through our techno-functional walkthrough. Here’s the Dynamics 365 Create Worker Process.
In the previous blog post of this series, you have learned how to create a department and positions in Dynamics 365. Now, following this series of blog posts, we will guide you to the technical and functional processes of worker creation, so you can get a deep understanding and knowledge of this process.
In every company around the world, there are workers and employees. By following the steps explained here, you can create a new worker in your Dynamics 365 environment. This way you have a register and control of the people involved in your company.
This blog post offers step-by-step guidance through visuals, ERD, tables, and X++ code, aiming to develop a clearer understanding of the process.
Let’s move on the Dynamics 365 Create Worker Process.
Quick Functional Recap of Dynamics 365 Create Worker
Let’s start with a quick functional recap. In Dynamics 365, you must follow some basic steps to create a new worker:
Step 1: Go to HR & Click on Workers
Go to Human Resources > Workers and click on Workers. The Workers form will open.

Step 2: Create New Worker
Click on the “New” button to create the new Worker. The “Hire new worker” dialog will pop up on the right of the screen.

Step 3: Enter the Worker Details
Enter the worker details. In the example below, the worker’s first name is Worker First Name, the worker’s middle name is Worker Middle Name, and the last name is Worker Last Name. Select the employment date of the worker, the worker type, and the position of the worker.
After adding all the required information, click on the “Hire” button to create the worker.

Looking for Microsoft Dynamics 365 Training Courses, Instructor Brandon can help you in this as we have the most advanced Dynamics 365 Training Courses from Microsoft along with Top Level Certifications which can add real-time value and enhance your career as a professional in IT World.
Moreover, you can also read about Microsoft courses and Dynamics 365 certifications with every possible detailed information provided.
Step 4: Dynamics 365 Create Worker Process
In the Workers form, you can see that your worker was created successfully in Dynamics 365.

Quick Technical Part
DirPersonName
The DirPersonName table contains the date effective names for each person in the system.
| Field | Data Types | Description |
| FirstName | String | This field contains the first name of the worker |
| LastName | String | This field contains the last name of the worker |
| MiddleName | String | This field contains the middle name of the worker |
| Person | Int64 | This field contains information on Person |
| ValidFrom | DateTime | Contains information of valid from date of the person |
| ValidTo | DateTime | Contains information of valid to date of the person |
DirPerson
The DirPerson table contains the party record of the person.
| Field | Data Types | Description |
| BirthMonth | BaseEnum | This field contains information on Birth Month |
| Gender | BaseEnum | Contains information on the gender of the person |
| MaritalStatus | BaseEnum | This field contains information on the marital status of the worker |
| Hobbies | String | Contains information about the hobbies of the person |
| PersonTitle | Int64 | Contains information of person title |
HcmEmployment
This table shows the type of employment.
| Field | Data Types | Description |
| DefaultDimension | Int64 | This field contains information of Default Dimension values which is Ref Recid of Ledger Dimension |
| EmploymentType | Enum | This field refers to the employment type |
| LegalEntity | Int64 | Contains the information of the legal entity, which is the company where the employee is working |
| ValidFrom | DateTime | Contains information of valid from date of an employee |
| ValidTo | DateTime | Contains information of valid to date of an employee |
| Worker | Int64 | RecId reference to the worker in the table HCMWorker. |
HcmWorker
This table contains the records of the employees and contractors that are further used with the HRM and payroll tables.
| Field | Data Types | Description |
| Person | Int64 | DirPartyRecId contains information with the name of the person |
| PersonnelNumber | String | A personnel number assigned to employee/worker by employer/organization and is used to track different records. |
DirPartyTable
The DirPartyTable contains all the parties. The Global Address Book stores all the people and organizations used in the system.
| Field | Data Types | Description |
| Name | String | This field contains the name of the party, which can be an employee or contractor. |
| PartyNumber | String | This field contains the party number |
| PrimaryAddressLocation | Int64 | The primary address information of the party is stored in this field. |
| AddressBookNames | String | Global address book names of parties are stored in this field. |
| PrimaryContactPhone | Int64 | The contact number of the party is stored in the table. |
Here is the code example to create a new Worker in D365:
[sourcecode language=”c-sharp”] class WorkerCreation{
/// <summary>
/// Runs the class with the specified arguments.
/// </summary>
/// <param name = "_args">The specified arguments.</param>
public static void main(Args _args)
{
DirPerson dirPerson;
DirPersonName dirPersonName;
HcmWorker newHcmWorker;
HcmWorkerTitle hcmWorkerTitle;
LogisticsLocation logisticsLocation;
LogisticsLocation lLogisticsLocation;
DirPartyContactInfoView dirPartyContactInfoView;
DirParty dirParty;
HcmEmploymentRecId newEmploymentRecId;
ValidFromDateTime employmentStartDateTime;
ValidToDateTime employmentEndDateTime;
str employeeEmailAdress;
HcmPersonnelNumberId employeeid;
RecId compayRecId;
;
dirPersonName.FirstName = "Test First Name"; // First Name of the worker
dirPersonName.MiddleName = "Test Middle Name"; // Middle Name of the worker
dirPersonName.LastName = "Test Last Name "; // Last name of the worker
employeeEmailAdress = "Testworker@gmail.com"; // Email address of the worker
employeeid = "TestWorker-001"; // Worker Id
compayRecId = CompanyInfo::findDataArea("USMF").RecId; // Company
employmentStartDateTime =DateTimeUtil::utcNow(); // Worker start date
employmentEndDateTime = DateTimeUtil::applyTimeZoneOffset(DateTimeUtil::maxValue(), DateTimeUtil::getUserPreferredTimeZone());
if(!HcmWorker::findByPersonnelNumber(employeeid))
{
newHcmWorker = HcmWorker::find(HcmWorkerTransition::newCreateHcmWorker(dirPersonName
, employeeid
, compayRecId
, HcmEmploymentType::Employee
, employmentStartDateTime
, employmentEndDateTime));
dirParty = new DirParty(DirPerson::find(dirPersonName.Person));
if(employeeEmailAdress != ” && newHcmWorker.Person != 0)
{
logisticsLocation.clear();
logisticsLocation = LogisticsLocation::create(‘Email’, NoYes::No);
dirPartyContactInfoView.LocationName = ‘Primary Email’;
dirPartyContactInfoView.Locator = employeeEmailAdress;
dirPartyContactInfoView.Type = LogisticsElectronicAddressMethodType::Email;
dirPartyContactInfoView.Party = DirPerson::find(newHcmWorker.Person).RecId;
dirPartyContactInfoView.IsPrimary = NoYes::Yes;
dirParty.createOrUpdateContactInfo(dirPartyContactInfoView);
}
if (newHcmWorker.RecId != 0)
{
ttsBegin;
hcmWorkerTitle.clear();
hcmWorkerTitle.Worker = newHcmWorker.RecId;
hcmWorkerTitle.ValidFrom =DateTimeUtil::utcNow(); // Valid from Date
hcmWorkerTitle.ValidTo = employmentEndDateTime; // Valid To date
hcmWorkerTitle.insert();
ttsCommit;
}
if (newHcmWorker.RecId != 0)
{
info(newHcmWorker.PersonnelNumber+" Worker Created");
}
}
else
{
info(HcmWorker::findByPersonnelNumber(employeeid).PersonnelNumber+" already exists");
}
}
}
[/sourcecode]
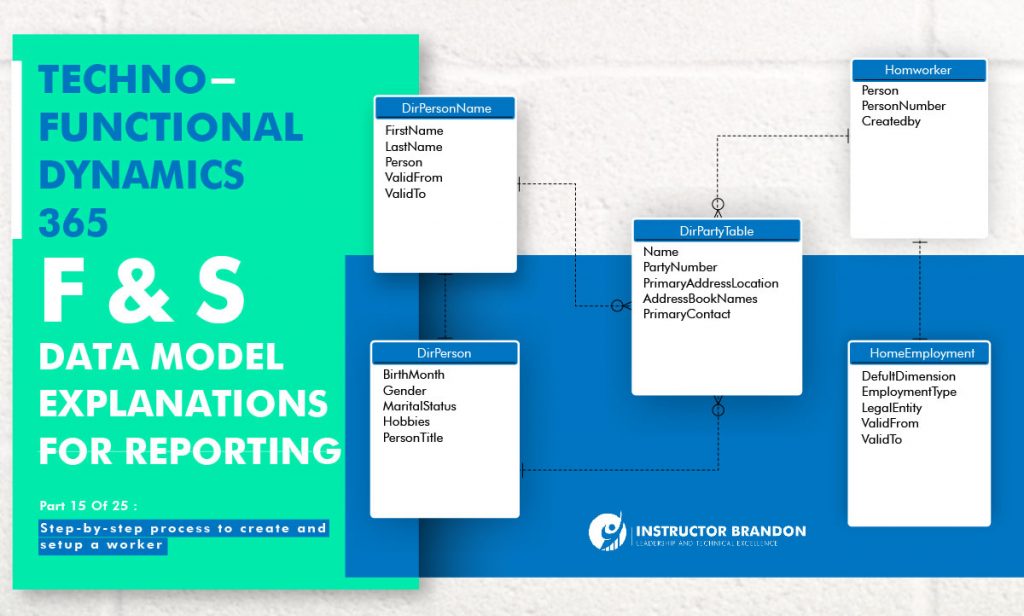
ERD: Entity Relation Diagram of Dynamics 365 Create Worker
And this is the ERD. By looking at the ERD of the Worker creation process, you will get a deeper and better understanding of the involved tables, their relationships, and the overall hierarchy of the data.

Summary – Dynamics 365 Create Worker Techno-Functional Tutorial Part 15
In this blog post Dynamics 365 Create Worker Techno-Functional Tutorial Part 15 what you have learnt is summarized as below:
- Learned how to perform an important Human Resource (HR) process in Dynamics 365-Creating a worker
- Familiarized yourself with step-by-step procedures for the process
- Explored the technical aspects of Worker Creation Process
- Looked at ERD, tables, and X++ runnable code for the process
- Understood the importance of the tables DirPersonName, DirPerson, HcmEmployment, HcmWorker, DirPartyTable, along with their fields and functions.

 17806
17806 


