Data Model Series, Dynamics 365 Tutorials
Techno-functional Dynamics 365 F&S Data Model Explanations for Reporting, Part 2 of 25 – Item Receipts & Inventory Registration
 14282
14282 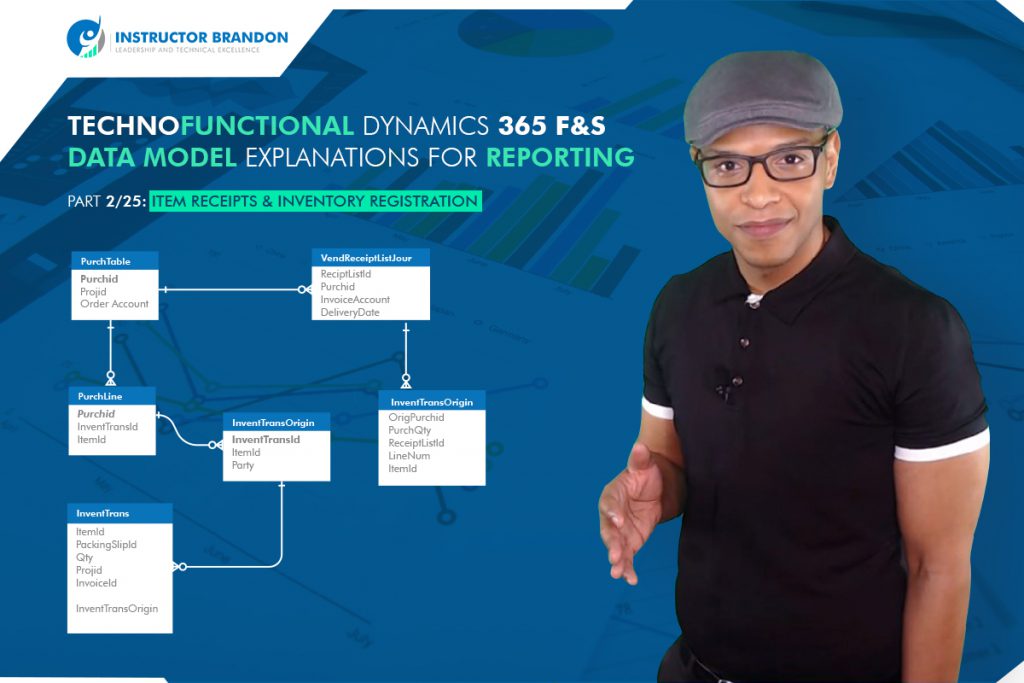
Mar
Things have changed a lot since I started blogging over a decade ago. There are so many wonderful topics to blog and learn on today; it seems like one doesn’t even know where to start. To make the process more friendly, I’ve introduced a new sort of post — the hybrid video/blog tutorial. In this series, we will produce a video and blog for every topic covered. Some very talented developers from my team have contributed their expertise to assist with this content/video approach to ensure that we keep our quality and quantity high. I hope you all sincerely enjoy the new approaches that we’ve innovated.. And as always, don’t hesitate to reach out to me.. I’m always here to help. — Brandon Ahmad
In this post we will continue with our purchase order in the previous article. We will review the process of registering and reserving a purchase order line item, and dig deeper into the purchasing/receipt list data model.
First, let’s be clear on what these two functions actually do. In the previous post, we entered the site where the item is to be delivered into the purchase order header record. Then we entered the location within that site where the item will be reserved and warehoused. When it shows up at the site address, we may or may not be ready to warehouse the item. Receiving docks can be extremely busy places with lots of deliveries going on, and receiving priorities can change rapidly. So the Dynamics 365 purchase order reservation process provides a registration step. Later, as time and workload allows, we can receive the delivery into active inventory.
Data model functional walkthrough Dynamics 365: Register and reserve a purchased item using receipt list
Here is the functional process flow:

Now let’s perform the registration and receipt functions.
Step 1:
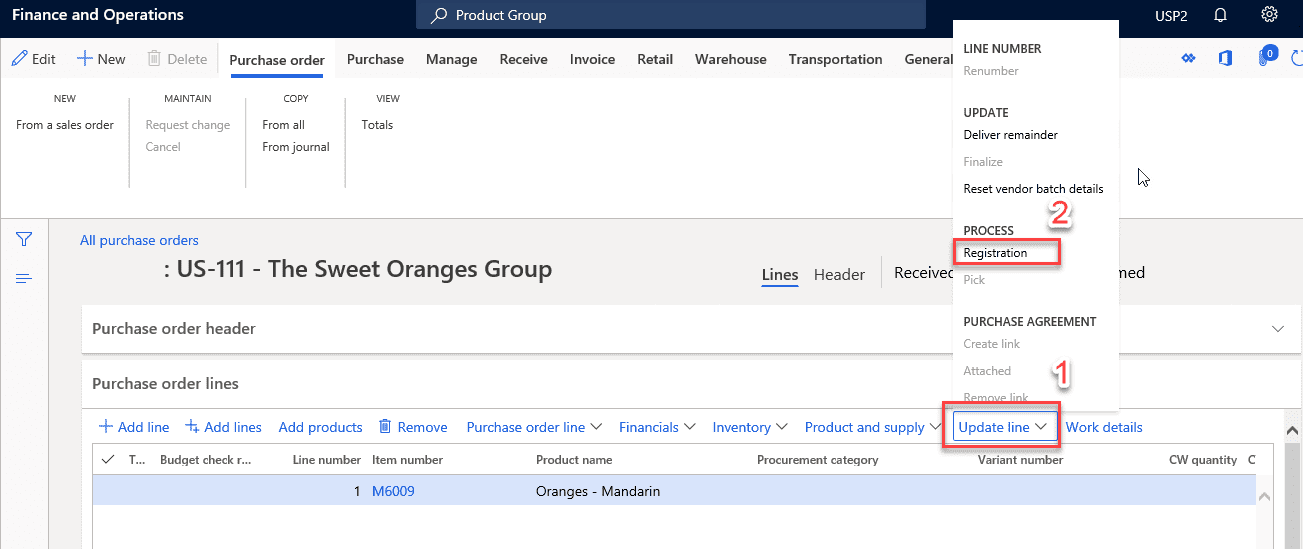
First, open the ‘Purchase Order’ created in the previous article discussing Dynamics 365 data model tutorial of the purchase order. Otherwise, go back to that post and create a purchase order and line item to work with here. To register the item being delivered, click on ‘Update Line’ in the Purchase order line item action bar. Then click on the ‘Registration’ action.
 Step 2:
In the ‘Registration’ window, select the purchase order line item to register and click on the ‘Add registration line’ action. The new line will be added in the Registration Lines area. Then click on the ‘Confirm registration’ button.
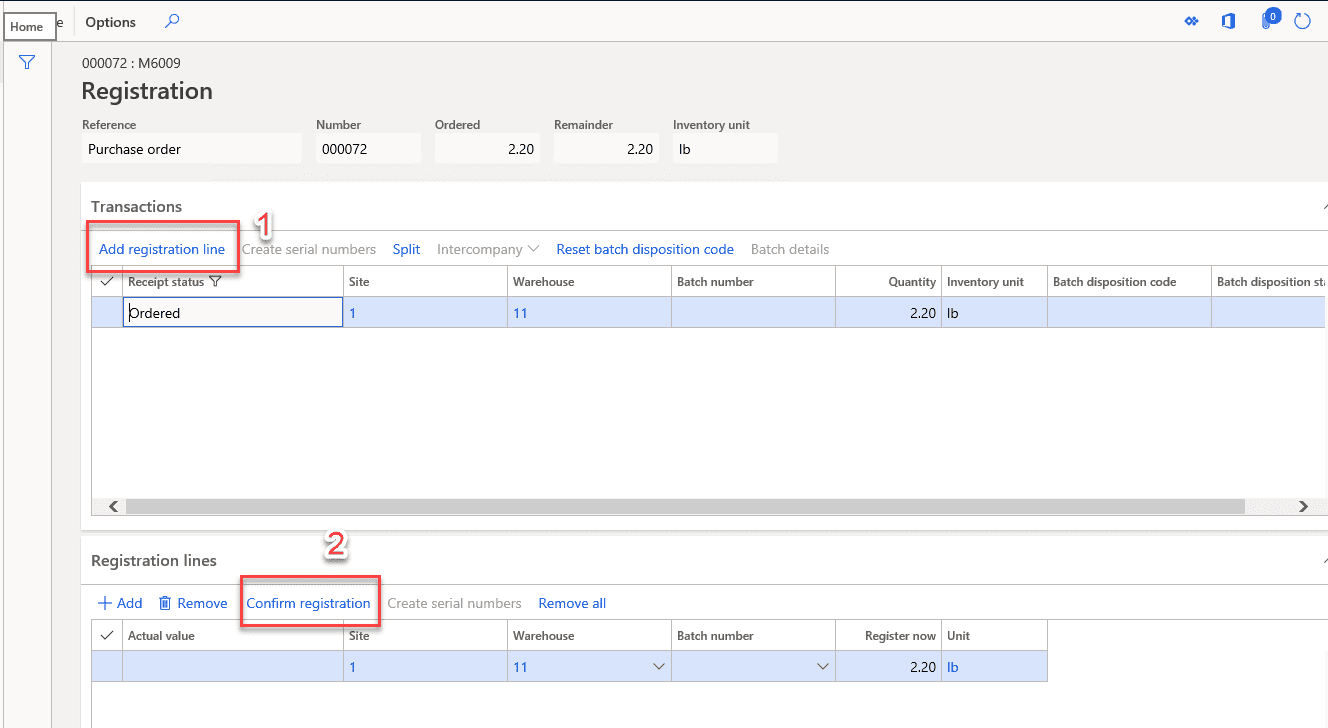
(Note: When you click on the button ‘Confirm registration’, notice that the receipt order status will change from ‘Ordered’ to ‘Registered’.)
Step 3:
Now return to the Purchase Order display, click on the ‘Receive’ tab and choose ‘Receipts list’ from the drop-down menu.
 Step 4:
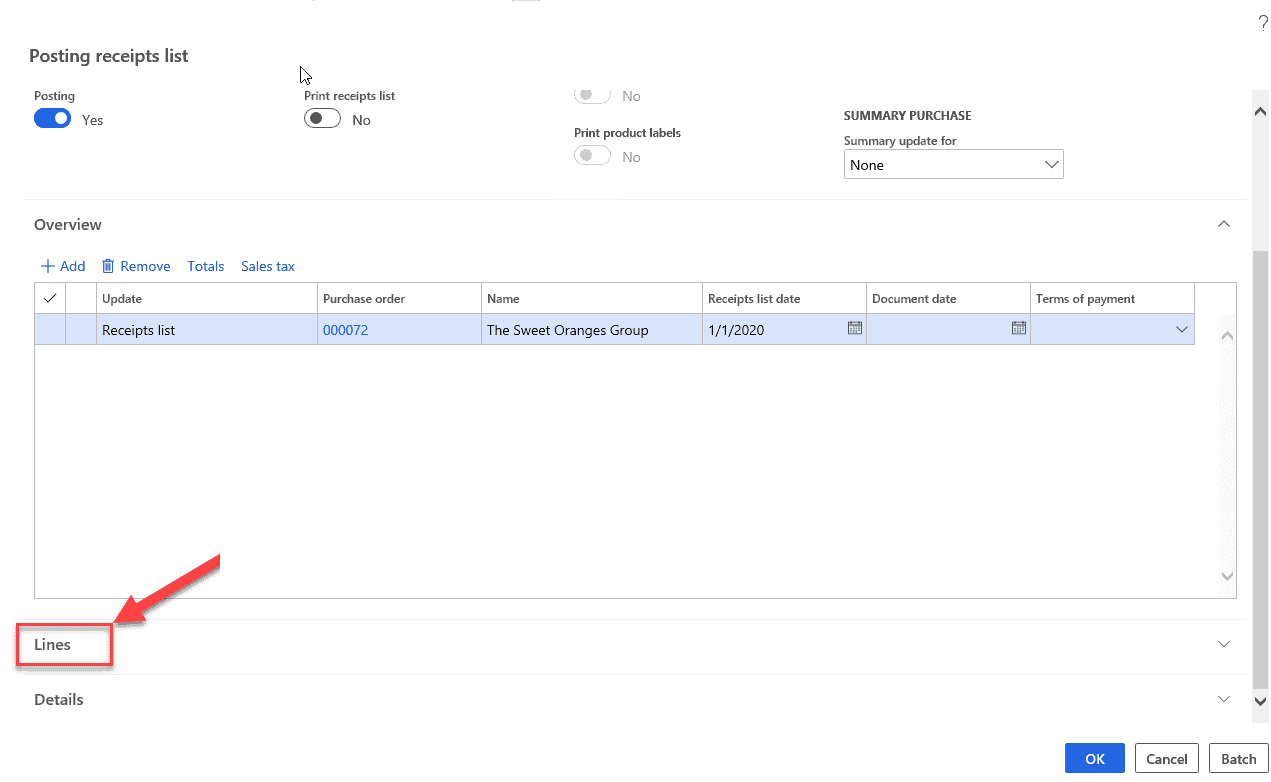
Then click on ‘Lines’ to check the details of purchase order lines.
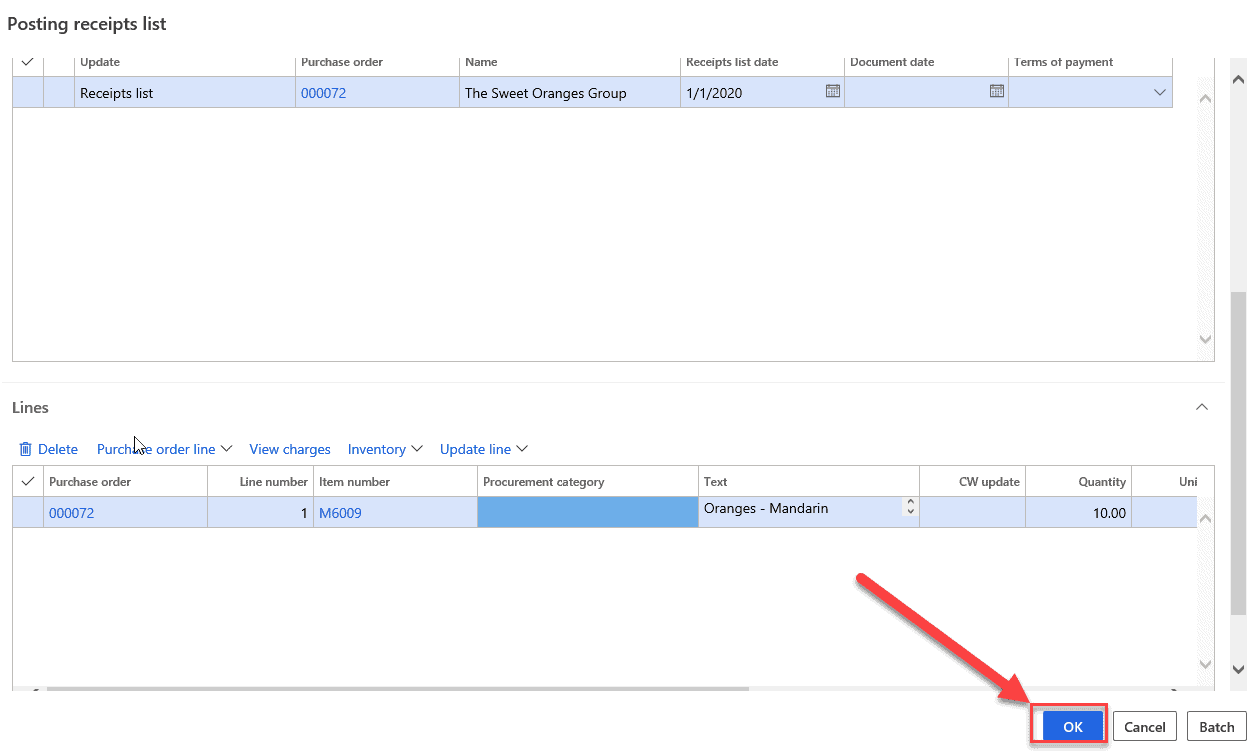
Step 5:
After checking the lines, click ‘OK’.
 Step 6:
Finally, you will see that a new tab is generated. It is generated under the ‘Receive’ tab with the name ‘Receipts list’, just below the ’JOURNALS’ tab. Here you can view the receipts list of your purchase order lines items.

Dynamics 365 technical walkthrough: the data model behind receipts
Now, let’s cover the technical aspect of this process.
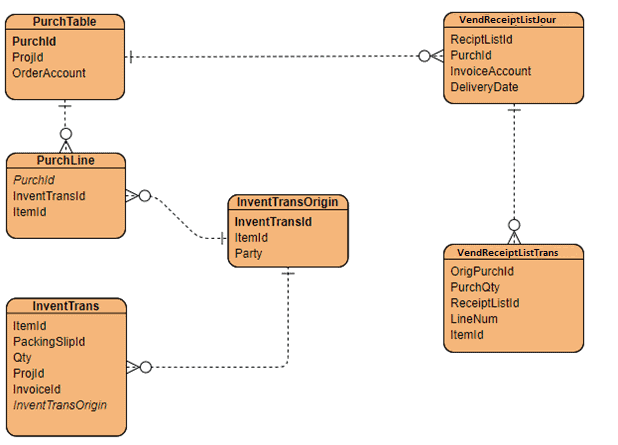
The previous post showed the relationship between PurchTable (purchase order header records) and PurchLine (purchase order line items), the central tables of the Purchasing function. The ERD below adds tables that are fed by the registration and reservation processes—inventory transaction and receipt journals.
- PurchTable connects with PurchLine using PurchId column.
- PurchLine connects with InventTransOrigin using InventTransId.
- InventTransOrigin connects with InventTrans using RecId of InventTransOrigin.
- PurchTable connects with VendReceiptListJour using PurchId.
- VendReceiptListJour connects with VendReceiptListTrans using ReceiptListId.
{
/// <summary>
/// Runs the class with the specified arguments.
/// </summary>
/// <param name = "_args">The specified arguments.</param>
public static void main(Args _args)
{
PurchId purchId;
PurchTable purchtable;
PurchLine purchLine;
TmpInventTransWMS tmpInventTransWMS;
InventTransWMS_Register inventTransWMS_Register;
InventTrans inventTrans;
boolean purchLineRegisterationSuccessful;
purchId = "00000250"; //replace this Purchase order number with yours.
purchtable = PurchTable::find(purchId);
//ibPurchaseOrderLearningDemo instance to call member functions like "confirmPurchOrder()"
ibPurchaseOrderLearningDemo ibPurchaseOrderLearningDemo = new ibPurchaseOrderLearningDemo();
//Validate and confirm if Purchase order is in Approved state.
if(purchtable.DocumentState == VersioningDocumentState::Approved)
ibPurchaseOrderLearningDemo.confirmPurchaseOrder(purchtable);
// Inventory registeration for all Purchase order lines
while select *
from purchline
where purchLine.PurchId == purchId
{
inventTransWMS_Register = InventTransWMS_Register::newStandard(tmpInventTransWMS);
inventTrans = InventTrans::findTransId(purchLine.InventTransId);
tmpInventTransWMS.initFromInventTrans(inventTrans);
tmpInventTransWMS.InventQty = purchLine.QtyOrdered;
tmpInventTransWMS.LineNum = purchLine.LineNumber;
tmpInventTransWMS.InventDimId = purchLine.InventDimId;
tmpInventTransWMS.ItemId = purchLine.ItemId;
inventTransWMS_Register.writeTmpInventTransWMS(tmpInventTransWMS, inventTrans, InventDim::find(tmpInventTransWMS.InventDimId));
if (!inventTransWMS_Register.updateInvent(purchLine))
{
purchLineRegisterationSuccessful = false;
error(strFmt("Error occurred during purchase order inventory registration on line no. %1.", purchLine.LineNumber));
}
}
// After successful item registeration
// we will create the Receipt list for purchase order
if(purchLineRegisterationSuccessful)
{
PurchFormLetter purchFormLetter;
purchFormLetter = purchFormLetter::construct(DocumentStatus::ReceiptsList);
purchFormLetter.update(
purchTable,
purchTable.PurchId,
DateTimeUtil::date(DateTimeUtil::utcNow()),
PurchUpdate::All,
AccountOrder::None,
NoYes::No,
NoYes::Yes);
info(strFmt("Receipt List posted successfully."));
}
}
//Function to validate document state and confirm purchaser order
public void confirmPurchaseOrder(PurchTable _purchTable)
{
PurchTable purchtable;
PurchFormLetter purchFormLetter;
purchtable = _purchTable;
//condition to check whether purchaser order is not in "Confirmed" and "Rejected" state.
if(purchtable.DocumentState != VersioningDocumentState::Confirmed && purchtable.DocumentState != VersioningDocumentState::Rejected)
{
purchFormLetter = PurchFormLetter::construct(DocumentStatus::PurchaseOrder);
PurchFormLetter.update(purchtable,”);
info(strFmt(‘Purchaser order number %1 Confirmed’, purchtable.PurchId));
}
}
}
[/sourcecode]
InventTransOrigin
This is the master table for the inventory transaction data we just created. Some of the major columns of this table are explained below.
| Field | Data Type | Description |
| InventTransId | string | Unique identifier that corresponds to the purchase order line item (PurchLine) column of the same name. |
| ItemId | string | The unique identifier for the inventory item in the purchase order line item. |
| Party | int64 | The Party id that corresponds to the vendor of this purchase order. |
InventTrans
This is the detail table of InventTransOrigin, with a record for every inventory transaction against the line item referenced by InventTransID. From this table, we can get every detail of the inventory transaction such as Quantity, Invoice ID, Project ID, and Item ID. In the table below, some important columns are mentioned with a description.
| Field | Data Type | Description |
| ItemId | string | The inventory item id of the PO line item is repeated. |
| PackingSlipId | string | Link to packing slip data. |
| InvoiceId | string | Link to invoice data. |
| ProjId | string | Link to project data. |
| Qty | int | The inventory quantity transacted. |
| Voucher | string | Link to ledger voucher data. |
| Dateinvent | DateTime | Date of the inventory transaction. |
| DateFinancial | DateTime | Date of financial post of inventory transaction. |
| InventDimId | string | Company code. |
| InventTransOrigin | Int64 | The RecId value of relevant records that exist in InventTransOrigin table. |
VendReceiptListJour
In this table, vendor receipts journals are stored after posting. For more details, have a look at the table below having description and other details.
| Field | Data Type | Description |
| VendAccount | string | Link to vendor data |
| DeliveryDate | DateTime | Delivery date of receipt list. |
| DeliveryPostalAddress | string | Delivery address of receipt list. |
| PurchId | string | Link to purchase order data. |
| InvoiceAccount | string | The account invoiced for the receipt list. |
| ReceiptListId | string | This field contains a receipt list ID. |
VendReceiptListTrans
In this table, vendor receipts trans are stored after posting. For more details, have a look at the table below having description and other details.
| Field | Data Type | Description |
| PurchQty | string | This field contains Purchase Order Qty against the receipt list. |
| ItemId | DateTime | This field contains a delivery date of receipt list. |
| DeliveryDate | string | Delivery data of receipt list |
| PurchId | string | This field contains a purchase order ID against the receipt list. |
| InventoryTransId | string | This field contains an Inventory Transaction ID against the receipt list. |
| InventDim | string | This field contains an inventory Dimension Id |
Summary
In this techno-functional Dynamics 365 Data Model tutorial, we registered a purchase order line item we reserved and posted the receipt list. Then we saw the chief tables impacted by our transaction. We saw no impact at this point on our physical on hand quantity, but our ordered quantity was increased. If you want to know how to check the on-hand quantity, click here.
Our next post is Technofunctional Dynamics 365 Data Model tutorial part 3: the purchase order. You will learn how physical on hand quantity is updated by posting the ‘Product Receipt’ and some cool data model tidbits for being able to extract all sorts of fun information for your super charged reports.
We sincerely hope that you enjoyed part 2 of our exciting series on the Dynamics 365 data model. We aim to provide quality service at all times. And as always, if you need to reach me, you know how to get in touch by reaching out to me here. — Brandon Ahmad, Founder of InstructorBrandon and Dynatuners

