Consulting, Development
Tutorial: Understanding the Simple List & Details form within Dynamics AX 2012r2 Part 4
 14582
14582 
Apr
In Part 4, me (the instructor) is really looking for you to develop a feel for how we go about making a MorphX form. This section is a lot of fun and for those of you from the .NET development world, get ready to feel jealous! You need to develop an intuitive understanding for stacking groups and how that is pivotal to form layout. The order of the groups is important. The order of the controls is important. While we have a designer for drag and drop like some of our .NET development environments, this is seldom used. Here we will create a fake TitleGroup above the current TitleGroup. Think of a title group as a group of controls that should be on the top of the page which is responsible for identifying the page meaning to our users. We will also see how to use the StringEdit control. It is a best practice in general to always include a title on every form page. The Title should also be noticeable – which means putting it at the top of the page, usually in some sort of bold, and with bigger letters. The controls that go in the Title Group need to be ones that are the most important towards identification purposes – for example, first and last name to identify a customer in a customer form.
One of the most critical things to understand about forms is that you shouldn’t be coding in your form design a lot. It’s a best practice to not do that as it is a big culprit of causing upgrade hell when going to newer versions of Dynamics AX. Ideally, having a good knowledge of the controls and MorphX environment should get you pretty far. After that, it’s a far better practice to add code in classes and tables. In the 2012 framework, events were introduced as another mechanism to avoid having to introduce code in things like forms. However, that being said, there are times where we do have to add code directly to our forms, even in 2012R2. We’ll do a coding example in the next part of the series where we get an opportunity to do this.
Remember: the more one follows poor practices like directly customizing the interface instead of adding customizations through classes, table methods, and events, the more pain that will be felt when it is time to upgrade & add cumulative updates.
This Tutorial assumes that you have done Parts 1, 2, and 3 of the series. You will need that project up and running from the Contoso sample machine.
-
Open up the SimpleListDetailExample project as you have done through earlier parts of this tutorial. Right-click on Design(usr), hit New Control, and choose Group. Ignore the poor shape attempting to circle group. I was trying to draw with my mouse and it didn’t go so well. J Note: the group control is a fundamental control in the form. It gives you the ability to group several controls together under a heading. You can enclose those controls in thick borders, light border lines, or whatever you like. It’s a really nice organization control. When we design in MorphX, we typically think of groups. Usually, you will add the ActionPane first because you need to have navigation. After that, you will add groups with a title to represent each thing that you need.

-
The truth of the matter is that the Simple List Detail template already has a group called PageTitleGroup. But I wanted to make a point. Using your mouse drag, your newly created [Group:Group](usr) just below the [ActionPane:ActionPane](usr) so that it looks like the picture below. Note, at this stage you should see 4 groups. At this stage, you should begin developing that feel for the layout of a Dynamics AX form. Notice how we organize groups from top to bottom. If you click on the plus sign, you can expand the groups to see the controls underneath them. If you right click on the group, you can add controls directly within the group. As you may have guessed, many of the group properties are there for organization and layout of controls. For example, you can arrange all of the controls vertically when setting the ArrangeMethod property of the control to Vertical.

-
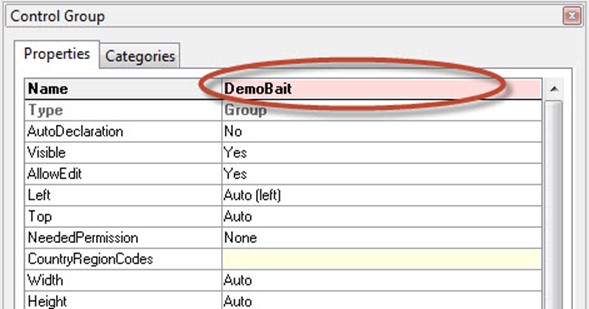
Right-click on [Group:Group](usr) and choose properties. For the Name, type in DemoBait. “DemoBait” is the term that I use in the classroom when I have people do something more for the purposes of learning than for the real world. In the real world, you already have a group responsible for the Title, called PageTitleGroup. This is where you would make all of your changes in real life. However, I want to make sure that you understand best practice form development by stacking groups on top of themselves and then filling them up. That’s the MorphX way of developing forms. Now, there are plenty of other cool properties there, and I want you to play around with them. Try to change certain settings like font, then compile your form and run it. You can also reference the documentation to see what each property does though I find that people learn fastest when they experiment with the properties and look at documentation. At least, that has been my experience when teaching.
-
Right-Click on Group:DemoBait(usr), and choose New Control à StringEdit. Notice how the control has a methods section, and another section called StringEdit:StringEdit(usr). All of your controls have their own methods which can be customized to whatever you like. These control methods help when you have to do something really custom. But beware as changing these will often lead to problems with upgrading later. So, if you are going to alter these, keep a list of all the customizations that you have made. Then, test these out on a new installation to make sure that they still work. That will save your company a ton of expensive, billable hours later in upgrade troubleshooting expenses.
-
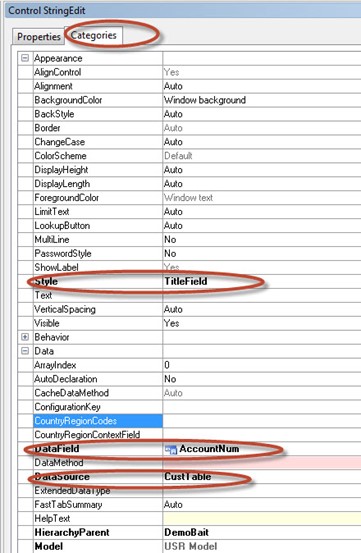
Right-Click on StringEdit:StringEdit(usr) and choose Properties. In the properties window, change the Name to DemoStringEdit. Click the Categories tab within the control Title Bar (circled below) and expand the Data section. Change the DataSource to CustTable. Change the DataField to AccountNum. Expand the Appearance section and change the Style option to TitleField. See the below screenshot after the explanations.
Now, what did you just do: A number of important lessons are apparent here. First, the StringEdit control is used for being able to enter, edit, and display text. You can have a user enter in text that gets written to a new record or you can automatically populate the control with some value after an action – make it say “Please double check your Purchase Order before submitting it” or something. You should get the point that the opportunities are limitless. I had you click on the “Categories” view of the property window. Sometimes, it’s easier to find things with this view. It has all of the controls like the regular “Properties” view but they are organized into groups. In the case of wanting to populate data to your form, you can find everything that you need under the “Data” category quite quickly. We choose to use the form DataSource to populate the data. Then, we just picked a field. Notice that there is an option called DataMethod. We could have used a built in method to customize our data, so that we could concatenate two fields like first and last name as an alternative to using a field. This is pretty cool. Finally, to illustrate my point about MorphX being very intuitive, we changed the “Style” property to “TitleField.” Styles are built in settings which will automatically give your control a certain look. They really save time because you don’t have to tinker with things like background color and font when you set them unless you want to customize your own settings. The styles that are available out of the box depend on the control that is used. Now, you should start to see why MorphX is a very powerful graphical designer.
-
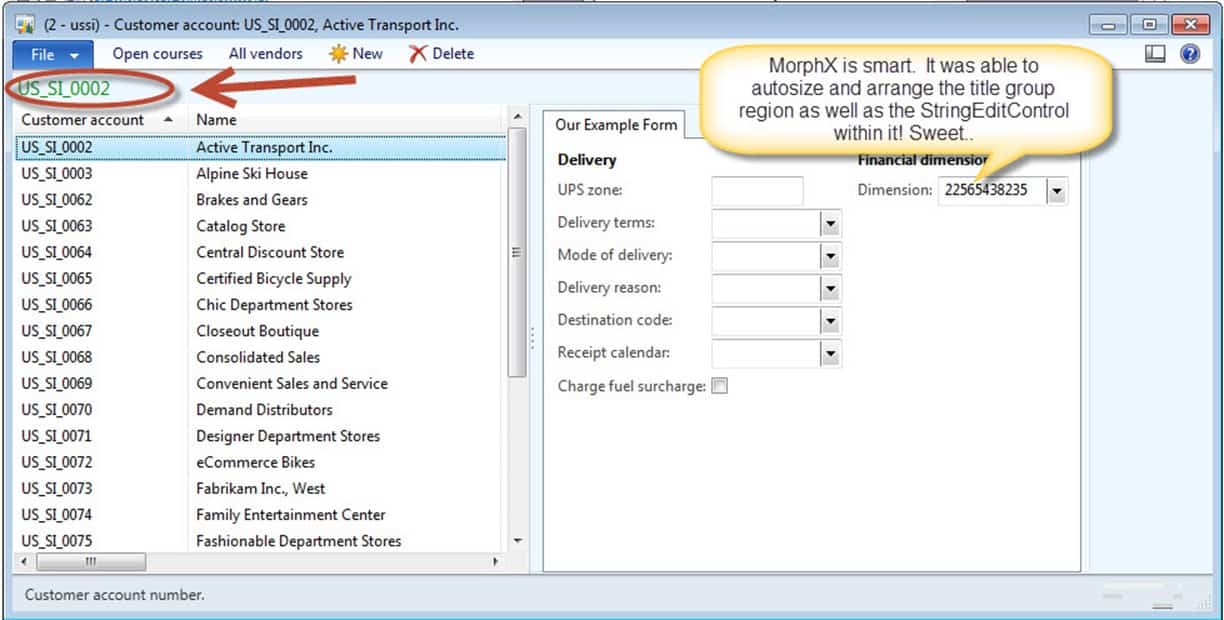
Finally, just as you learned in earlier parts of this tutorial, save and compile your project. Then run the form. Sweet!!!! Notice the rectangular section with the “US_SI_002” written within it. Simply by choosing a style, we were able to auto configure our display. Notice how MorphX stacked the groups in a non-obtrusive way à in other words, the design flows. An end user wouldn’t be identify each section as a group control. They just see logical units that work together. This is the essence of MorphX form development. We let the development interface do what it is supposed to do while we give it a gentle, guiding hand in terms of form generation. J I LOVE THIS DEVELOPMENT ENVIRONMENT!!!! Those of you from the .NET world should be feeling spoiled even with this little bit. Part 5 of the tutorial is next.