Consulting, Dynamics Operations Architecture
Step by Step Performing a Code Upgrade from Dynamics AX 2012 to Dynamics 365 for Operations Part 3
 10494
10494 
Oct
In this final part of our mini-upgrade blog series, we learn that the D365 upgrade isn’t so bad once you get past the wacky workarounds that Microsoft is addressing for on-premise development machines. We’ll walk through one real-life code merge example. I tried to choose a more convincing one. We’ll also walk through extensions somewhat and clear up the confusion out there on extension points. I could write a huge novel detailing every tip and trick and circumstance to work around, but to get familiarity with the upgrade, let’s narrow the focus on this last type of conflict – that of the form designer. And that should wrap it up for now when it comes to getting the scoop on the upgrade.
Please Understand that the Dynamics 365 for Operations Upgrade Strategy that You Choose Depends on the type of Element. The Conflict Resolver differs in how it resolves conflicts. Here we will look at how to handle form elements that don’t immediately map from AX2012 to D365.
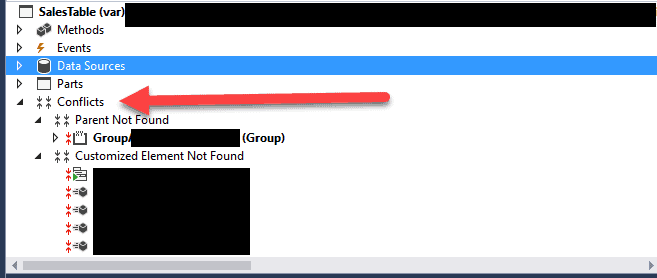
First, SalesTable should already be opened from the last example. Browse to the conflicts:
You should notice that there are a couple of issues. Let’s focus on Parent not found. It tells us that there is a group control that no longer is contained within a parent control. This is pretty common on an upgrade from AX 2012 to the D365 because the form design patterns have changed. Some things simply don’t translate into the new design. So, basically, the strategy here is going to be to refactor this into something that we can change with our judgement as human beings (not automated processes).
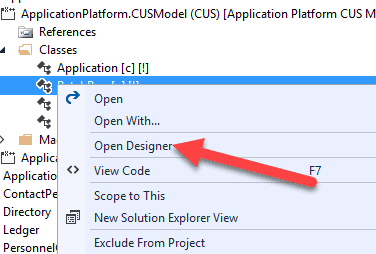
Second, understand that the code conflict resolver differs based on the element:
Here is a big time saving tip if you are new to the upgrade. Always right-click on an element and go into the designer to see conflicts. For some types of code artifacts, you just hit “open” and on others, you have to hit “open designer”.
Okay, you have you to choose where to put it.
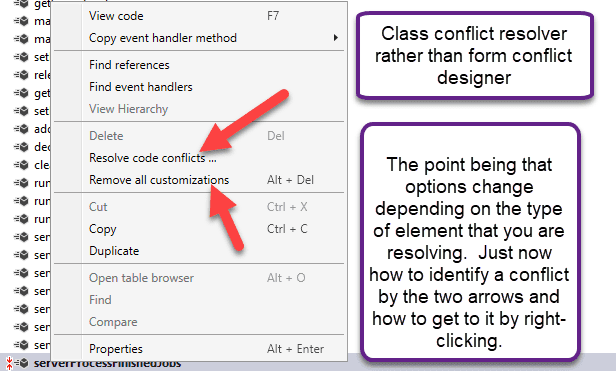
Notice that inside of this class, there is a conflict by the serverProcessedFinishedjobs. But notice how the conflict option changes because I’m inside of a class conflict rather than a form element conflict that we will resolve later. Each element will behave a little differently in the conflict designer so remember to get that designer up. Right-clicking is your friend!
Third, Create a New Model called “ExampleUpgradeModel”
Now, for the fun part. Let’s resolve the conflict with the form element not having a parent. First things first, you need at least one custom model where you can house all your internal development. I’ve observed two very common patterns here. First, many partners create one model and make it reference all assemblies. They love the approach and swear by it because of the simplicity and luxury of having just one model for customizations. Other partners swear by multiple models. I’m not sure that “one size fits all here” and the preferred way seems to mainly be a matter of preference at this point.
I’ll create an inherited model just for the model that I’m customizing in this case, the Application Suite – e.g. select an existing package.
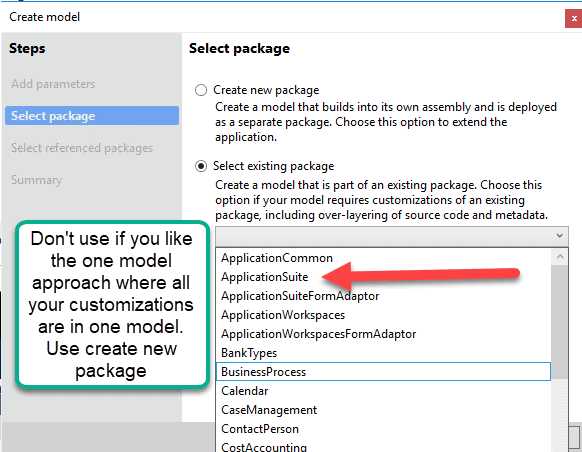
So, I just select the Application Suite and get a nice pretty message. I also tell it to create a new project for me. Also, notice how I make it my default model and it contains all the references necessary for the Application Suite to work which is where my salestable is located.
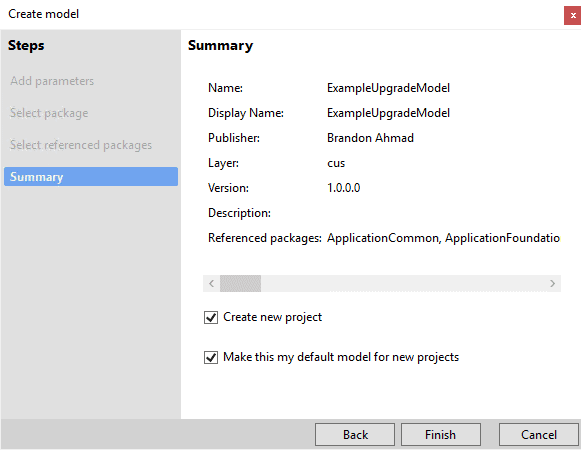
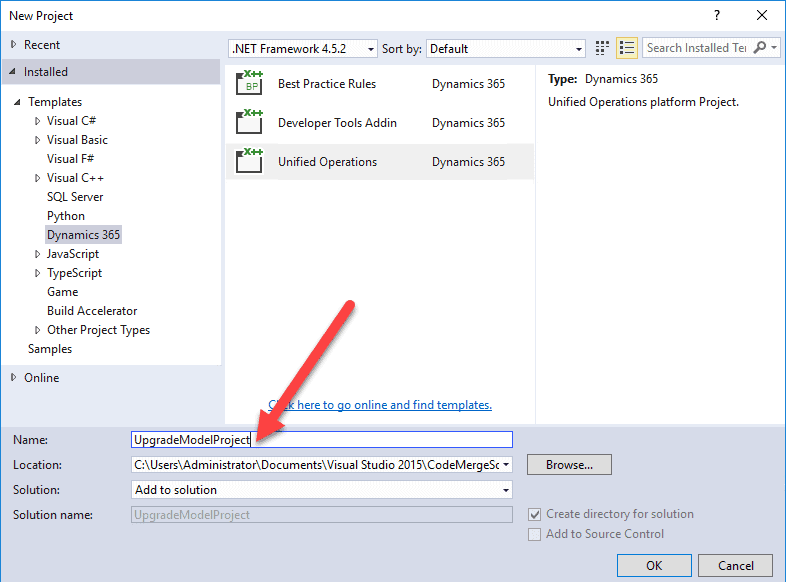
Finally, Add the project to your existing Code Merge Solution. It’s just a personal preference for me, but I don’t like bunches and bunches of solutions on my upgrade. Three is enough for this developer. Notice in Solution how I clicked on “Add to Solution”.
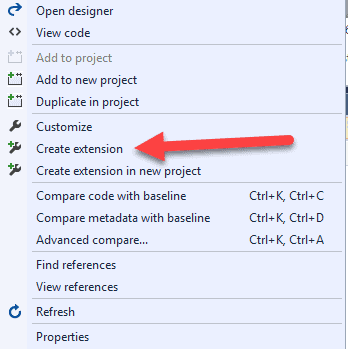
Fourth, add the extension to the project
So, I right click on the SalesTable form in the Application Explorer window in Visual Studio and choose “Create Extension”.
Fifth, holding down on your mouse drag the extension you just created from the Application Explorer window to Solution Explorer underneath the UpgradeModelProject
So, holding down on your mouse, take the new extension that has been created, “SalesTableExtension1” and drag it over to the project “UpgradeModelProject”.
Drag this:
And it should end up in here like this:

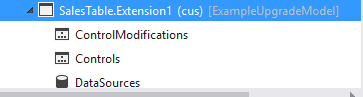
Sixth, now the first thing you need to do is change the name of your extension.
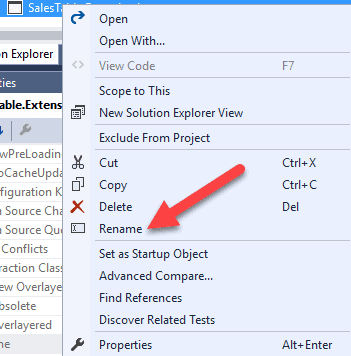
Right-click on SalesTable.Extension1 in your solution and click on “Rename”.
Then, change the name to SalesTable.EUMExtension. You can do this right from the properties window or on the element itself. Microsoft recommends that the part before the extension have the model name followed by the Suffix Extension. I used initials here. Notice how the first part with the name of the element stayed the same.
Note that the links for current Microsoft documentation change fast, but here are the latest guidelines:

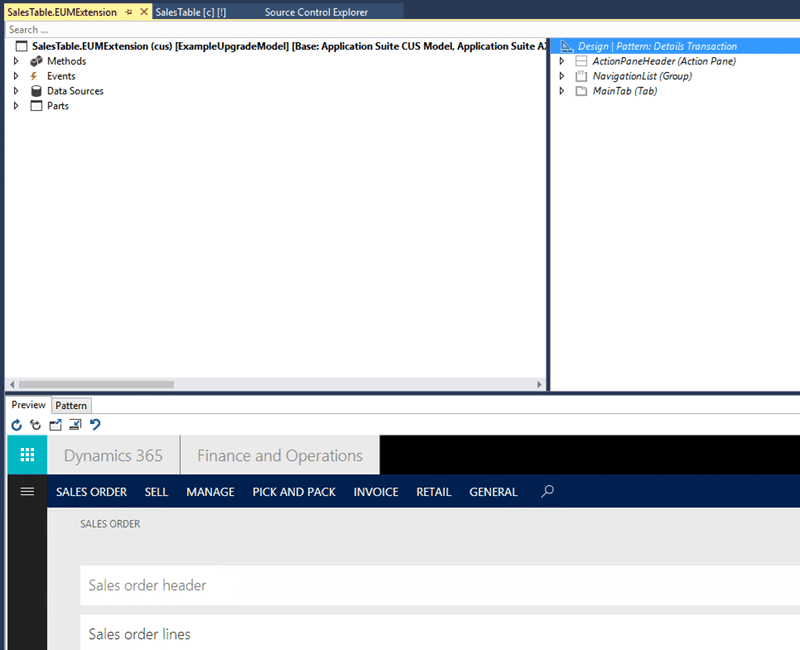
Now, right-click on Sales Table extension and hit “open”. Excellent. This is a pause for this extension but we will come back to it later. We are now ready to do some extension-based merging.
Seventh, “resolve” the conflict but don’t forget the properties:
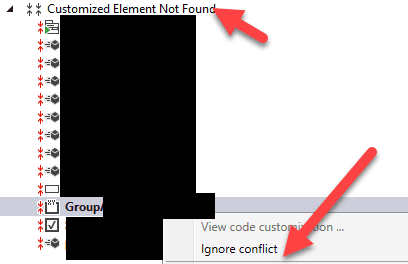
Remembering my common theme that this conflict resolver behaves differently depending on the element. For forms, you get the “Ignore Conflict” option which is a little confusing. What it actually does is delete the conflict from your form, which means that you have to recreate it from scratch at this time. You have two choices when you right-click on the element. So, our strategy will basically be to delete this code and recreate it in an extension. We could overlayer it, but why bother. Once the model is sealed, you’ll have to go redo all the work if you do that.

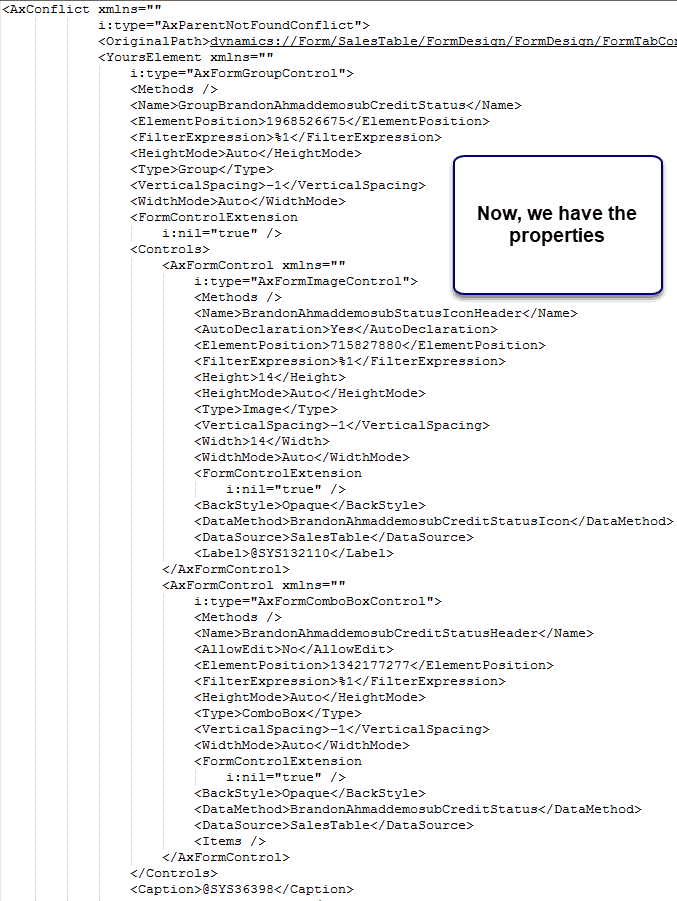
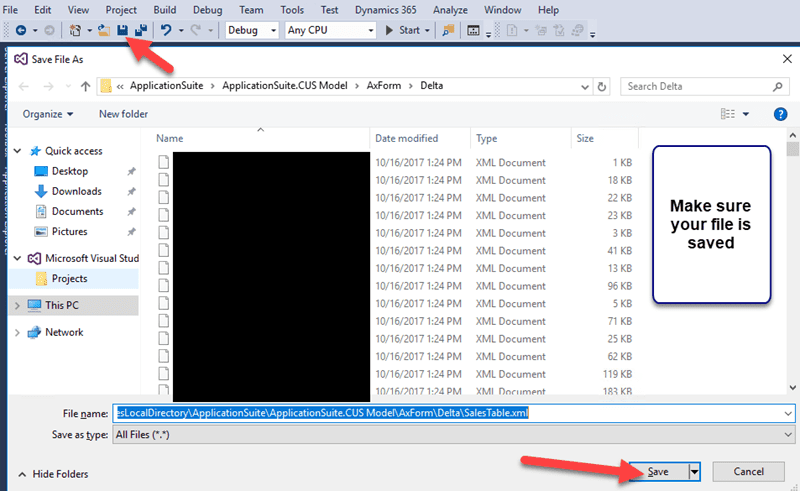
So, I bring up my handy notepad++ to keep track of some values that I will need for the recreate. I browse to the C:\PackagesLocalDirectory\ApplicationSuite\ApplicationSuite.CUS Model\AxForm\Delta\SalesTable.xml to just get a listed view of what I need to try and recreate as closely as possible. I then copy and paste the section between AxConflict into another notepad++ window that I can use for my memory when I recreate the element as an extension.
So basically, I just do this to set the properties aside for later because I just can’t remember all those properties in one glance when I do my recreation. Plus, it makes for some good explaining.
Now, go back to your conflict window, and hit “Ignore Conflict”

Now, hit the “Save” button in Visual Studio and replace the file (the file should already be checked out). You shouldn’t even see the popup, but I forgot to check out my XPPMetadata files when I made this screenshot. Thankfully, it looks like Microsoft will fix the onpremise XPPMetadata thingy in the future and the workaround of checking it out for On-Premise VM’s to work won’t be necessary. But for now, we non-cloud upgraders have to check in the XPPMetadata to bring our files into source control.
Eight, “resolve” the next conflict as the element will give us a brand new conflict pattern in this case:
Now, watch what happens next as this is very important to understand. There can be more than one conflict on a given element. Check out the before and after in our SalesTable.xml file.
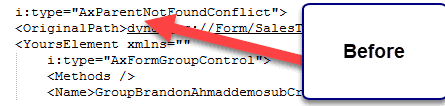
And check out the “after” where we clicked ignore conflict on the initial conflict. Now, you get a new conflict with the element not found. This means something about the element doesn’t exist in the next Dynamics 365 which existed in the old one.

Let’s hit “ignore conflict again.
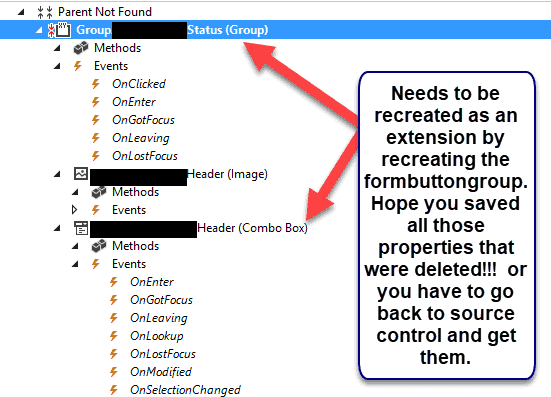
Now, if you go back to your handy dandy notepad++, and click “find” to locate the conflict control in the SalesTable, you’ll notice something very interesting:
Repeatedly, clicking Ignore just deleted the Conflict element from the form…
Geeeze.. It took me so long to get used to the fact that “ignore conflict” really just deletes the form conflict controls if you resolve your conflicts that way. Why not just name “ignore conflict” delete conflict element or something. “Anywayzzzzzzzz… ”
Ninth, Recreate the element as an Extension
Let’s avoid all the academic jargon and “keep it real” here. The crash course explanation of an extension is that they are files created in separate assemblies so that big companies can have an expedited path for moving code into production. In other words, sometimes, you need a faster process to get code to users, especially when you have some big complicated process that generates code overhead consistent with thousands of developers like Microsoft. Extensions help in that Microsoft is able to get updates out faster than without them while the more stable code artifact processes go through the traditional path. Sometimes, extensions become the more stable processes and are integrated in that code flow. They do not magically eliminate the need for testing or make it any easier for organizations without hundreds or thousands of developers to get code out. They do not necessarily guarantee stability though there is usually some correlation between the numbers of updates and stability over time. They do help with an expedited code move and compile time function for everybody. What’s always been true of forms is that you have to help the upgrade tool out a little bit. There are times when the design pattern changes enough to where something doesn’t fit in enough for the code upgrade tool to know what to do with it in the new design. In those cases, deleting and recreating is often key..
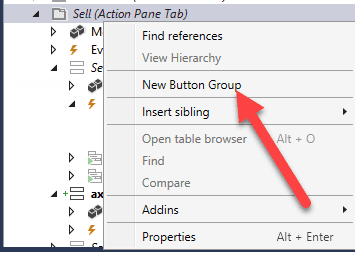
I first go to the form designer for the SalesTable.EUMExtension. I then expand Design à Sell (Action Panel Tab) à New Button Group. Here I will put my new button group in the sales section as a proprietary decision, but in real-life, you have to ask the business users unless you are one of those technical people who has worked with a company so long, you can usually tell where they will want it.
But here, I’ll use the “Alt plus Up Arrow” hotkey combination to move the Button Group Control where you want it.
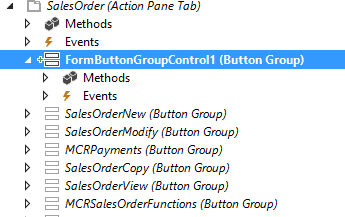
Now, what you do here is pick where you want the control. So, for example, I put this control to the left of the SalesOrder.

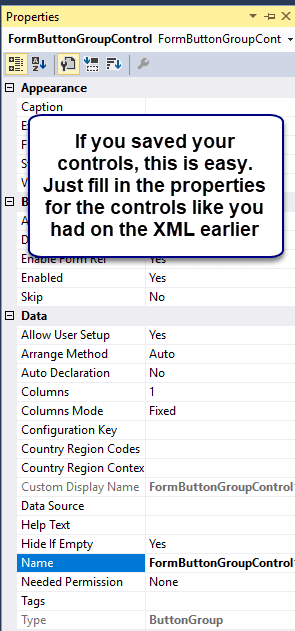
If you saved the values for the controls, this is super easy. Just fill in their values like you did earlier. Than, start right clicking and adding the other elements where users agree.
Other big lesson, on a design pattern form conflict, the key to upgrading is getting agreement on where your users want the controls.
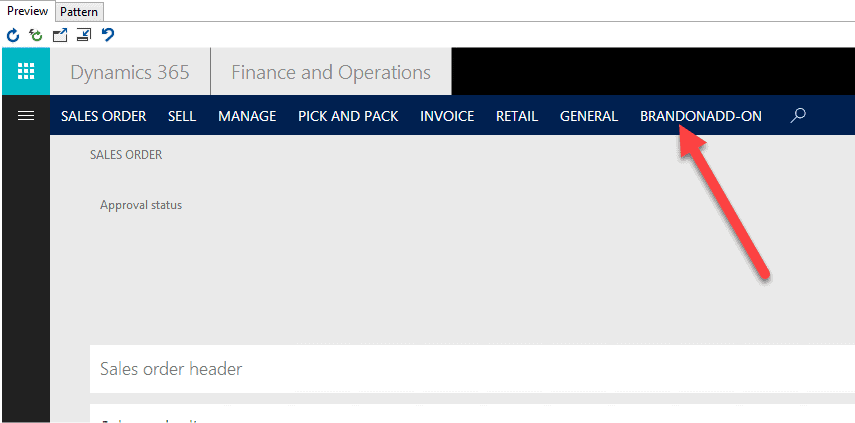
In other words, the right answer on where to place the new controls depends on the Organization and how they want to use the new design pattern, but if you just right-click and choose the controls, you got it. Here is an example, where I added the control to the ActionPaneHeader and then used the context menu drop down to embed the other controls. It just depends on where you want it and which controls, you decide on as replacing the other ones. The user interaction, not the complexity, makes the form merge take a little longer in my opinion than some of the other merges.
Tenth, crash course if we need to “extend “a method in a form.
Due to sheer time constraints, I won’t be able to deep dive into some of the code extensions (for this series anyway), but I wanted you to get the main idea of how to use them when it comes to Dynamics Operations when it comes to merging. After all, for some existing implementations, this might become months of reality for you and higher expensesRemarkably, this isn’t that complicated, just time consuming.
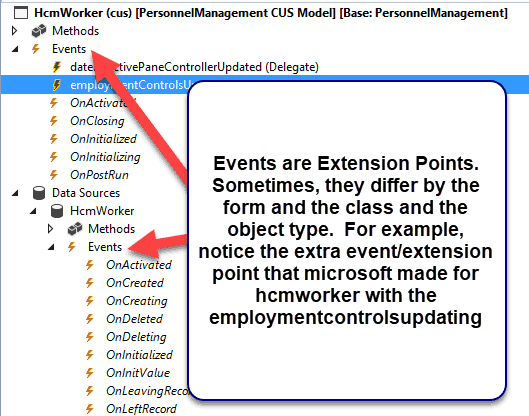
A really good example to learn from as a starting point would be the HCMWorker form and the HcmWorkerFormExtensionExpenseHandler class in my opinion.
Notice how I clicked on the HcmWorker form and expanded the “Events”. The events are “extension points”, points where Microsoft will allow you to customize code. The events essentially map back to our old code (form methods in this case but dependent on the object). What you are supposed to do is program in there instead of of using a form method event in AX2012 like datasource.write.
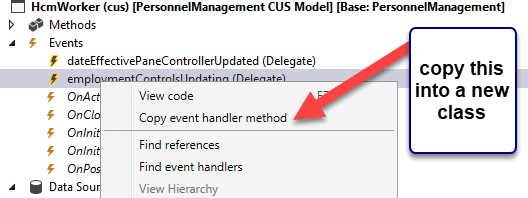
To setup an event, you use a delegate where you basically right-click on the event, copy it and paste it into a new class. It has a method stub that basically connects you to the form.
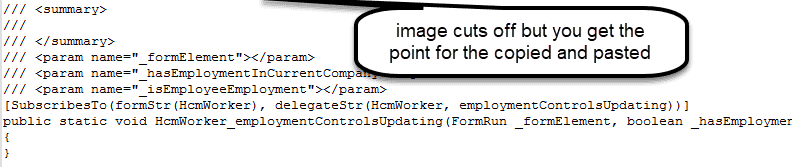
Here you can see the copied and pasted method stub. Microsoft already created a delegate for the event that allows for us to connect to it.
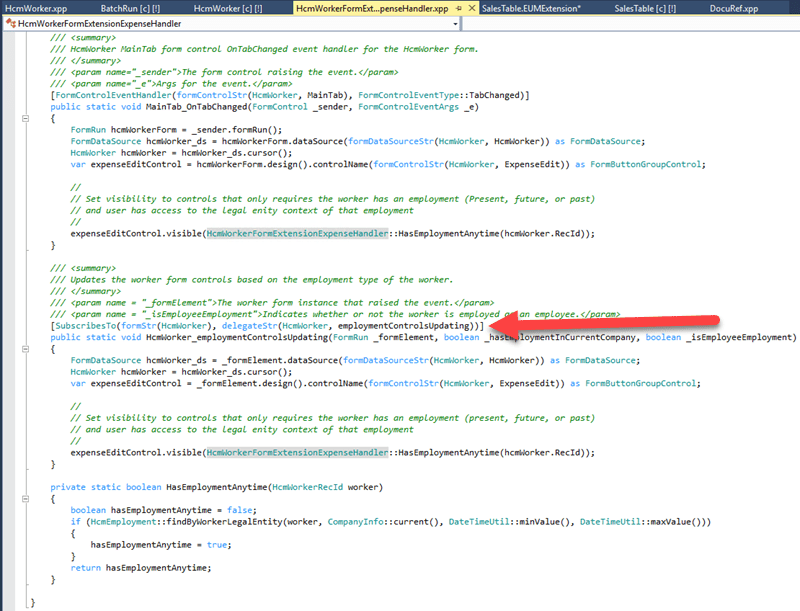
And here you can see the method actually implemented, where the visibility of the control has changed.
Okay, so how the heck do you know which events map to the old events in AX 2012. For example, what should you use now instead of the Writemethod for a form Datasource?
Microsoft includes a handy little document that you should keep at all times with you.
Given the instability of links, make sure you can find it by the title because you will need it again and again. It is located here.
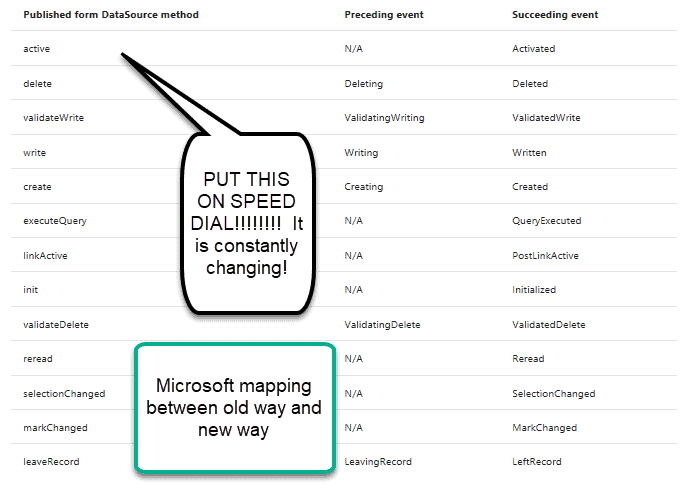
So basically, once you get down the new mapping with the old mapping, this really isn’t that big of a deal except for one factor with extensions. Microsoft recognizes that there are plenty of custom code scenarios that are not fully covered by the extensions just yet. However, they’ve said that they will put it in overdrive with adding bunches of extension points as they get requests. So basically, over time, the customizations will equivocate with what you could do in previous verisons of Dynamics. The hardest part for organizations will be if it is some mission crtitical customization and they have to wait for an extension point. The other hard part is having to remove all the existing overlayering. For a new implementation, I’m hoping you will see that extensions aren’t the radical big deal that they seem. If an experienced developer knows how to use the mapping document, they could easily acclimate their coding to the new patterns.
So, I think that should get you all setup on the extension hype. It’s called an extension point because Microsoft chooses exactly where you can customize as opposed to before when you got to pick.
But Brandon, why are certain misinformed salespeople telling customers that extensions will make their testing process so much easier and magically solve all ERP testing problems that have been around for the last 40 years? They don’t have anything to do with directly testing here as this looks like a mechanism for code move efficiency. ME: NO COMMENT!!!!
In Summary, this blog series sure was a lot of fun. I think the main point of this mini-series is that the upgrade tool is just business as usual. I wanted to explain it from the perspective of someone who has done it on an implementation and experienced the real thing, not some idealistic demo bait workaround. We solved real, undocumented Microsoft problems with the tools, but we also saw just how much the upgrade has come along. There are several positive points to this upgrade also. And we learned not to be afraid of extensions unless we are compressed for time and budget and don’t want to spend all that time rewriting them. Hold on to your horses because I’m not done blogging about several other topics. The new D365 for Operations has caused me to get more technical interest than ever before, and I’m listening. There will be other parts of the upgrade story that we can revisit in the future as we continue to clear topics.
See you in the next post!!!!!!!!!!!!
O
